The post How important is the Membership Page appeared first on MiBase New Zealand.
]]>The reason being is that this is where the membership fee, the type of membership, the loan period, the maximum amount of toys members can have, the length of the membership, and the length of toy hire are all commanded from this page.
This page must be completed before you start adding in all your members and acquiring new ones.
To check all your memberships, go to Member -> Membership

Then check all info in the list, if you have any.
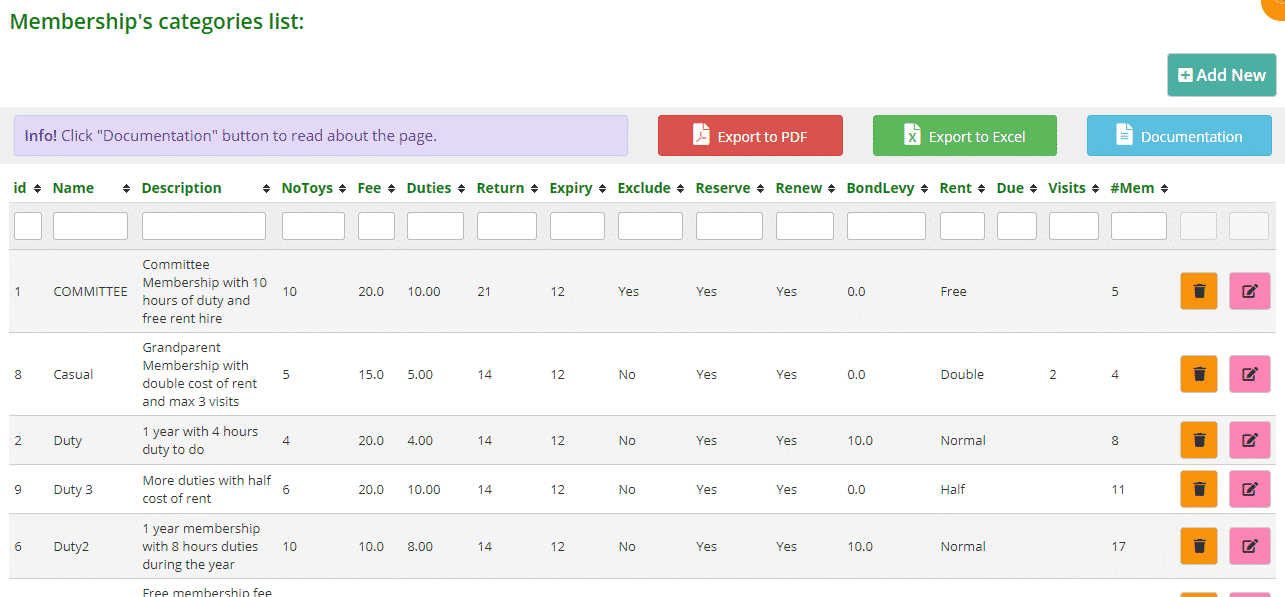
Detailed descriptions of each field
- id: it is automatically generated from the system and is a sequential number
- Name (mandatory): choose a membership name, not too long, which is simple to remember/use, for example, Duty or Full or Committee. The name will appear on your Public Website on the Join Now page
- Description: explains the type of membership and if there is a duty or not. The description will appear on your Public Website on the Join Now page
- NoToys: is the maximum number of toys that a member can loan. On the loan page when a member reaches the maximum number of toys allowed, the system will block the admin from loaning more toys
- Fee: the cost of the membership. Insert only numbers without the $ sign. When the admin adds a new member or renews a membership on an expired or due to expire member, the system will add the amount in the payment system. If it is 0 nothing will be added
- Duties: the number of hours of duty due during the membership time, not the number of sessions! This is very important for duty membership. For example, 4 sessions will be recorded as 8 hours
- Return: the number of days that a toy can be hired, the default is 14 but it can be different for each membership. It’s VERY IMPORTANT to add the number carefully. Further information on its importance can be read further below
- Expiry (mandatory): the number of months of the membership, the default is 12 months. If you leave a 0, each time you insert a new member or renew an existing member, the expiry date will NOT change
- Exclude: in the Join Now page on the public website, a new member must insert a membership type. You can choose to show some membership types and hide others, for example, Duty or Full can be made public and Committee can be hidden. Choose No if you like the membership public and Yes to keep it private
- Reserve: would you like members with this membership to be able to reserve toys on the Member Website? Choose Yes or No
- Renew: would you like members with this membership to be able to renew their membership on the Member Website? Choose Yes or No
- Bond/Levy: insert the bond if the membership requires it. For example, for a duty membership, if a member misses a duty and the fine is $10, add 10 in this field
- Rent: you can choose a rent to be Free, Normal, Half, or Double on the toy detail page
- Due: if the membership has a specific expiry date, insert the date. We do not recommend using it. The system will NOT calculate any depreciation on the fee when a new member joins or renew the membership in the middle of the year
- Visits: if one of your memberships only entitles a member to a limited number of visits throughout its term, you can add that number here. When the member has reached their limit, an alert will appear on the Loan page stating ‘No more visits available’. A running total also appears in the Loan page so you can inform members of how many visits they have left. For example, Visits: 3 of 4
- #Mem: this is a calculation of the number of members using each membership. Remember, unless you change a member to be Resigned and/or Locked, you will have all the old members added to the calculation.
How important is the Rent field
The Rent field on the page is very important as it commands the rent cost when admin loans or renews a toy. If a specific membership has Free rent, the system will not charge any rent for loans or toy renewals. The initial cost comes from the TOY. If the toy has a $1.00 rent on the toy detail page the cost of rent will change as per the different types of membership. For example, the membership with Double will be charged $2.00 for this toy or the membership with Half will be charged $0.50.
How important is the Return field
The Return field is very important for two reasons.
- It determines how many days the toy is hired. If the field is left empty or a 0 is added, the system will hire toys but the due date will be the same as the loan date
- It is linked with the reservation system. If a 0 is added to the field, the reservation system will not work! This means admin and members will not be able to reserve toys
Deleting Memberships
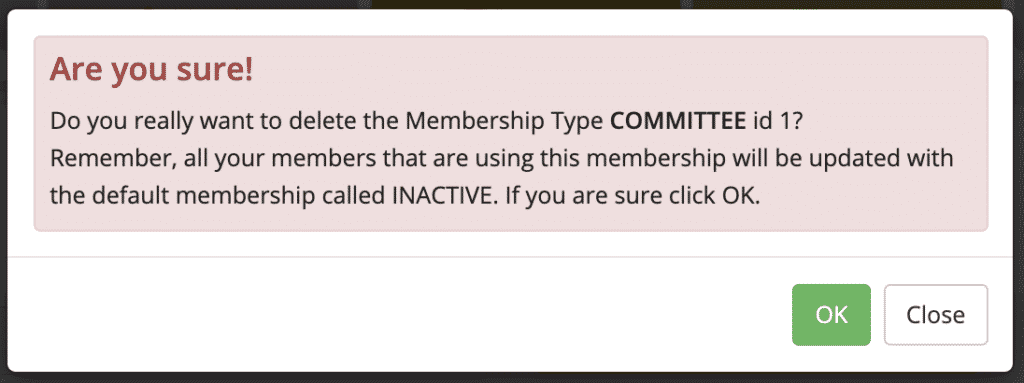
If you are not using some of the memberships you can delete them. If you only have some members that are actually using the membership and you would like to move them, you can do this using 2 different ways:
- Delete the membership and the system will automatically move all these members to the INACTIVE membership. Once you have done that, go into your members’ list, check who has the INACTIVE membership and change them to the correct membership.
- Go into your members’ list, change the membership that you need to change to all your members, and then delete the membership from the Membership page.
When you are deleting a membership type, an Are you sure! message will appear. This prevents anyone from accidentally deleting a membership. Click OK if this is what you want to do.
Follow the article, Create a new membership, if you need to add a new one.
Follow the article, Creating Payment options, if you need to speed up your payment system.
The post How important is the Membership Page appeared first on MiBase New Zealand.
]]>The post Create a New Membership appeared first on MiBase New Zealand.
]]>To start adding in your different types of memberships, go to Member -> Membership 
Then click Add New
A lot of information needs to be added on this page so read and add carefully as they are all important. 
- Membership Name (mandatory): choose a membership name, not too long and simple to remember/use, for example, Duty or Full or Committee
- Membership Description: explain the type of membership and if there is a duty or not
- Expiry Period (mandatory): it is the number of months the membership is for, default is 12 months.
If you leave a 0, each time you insert a new member or renew an existing member, the expiry date will NOT change - Max No Toys: the maximum number of toys that a member can have on loan, default is 3.
- Required Duties: it is the number of hours, not sessions, of duty a member is required to do during this membership time, this is important for duty memberships
- Fee: it is the cost of the membership, insert only numbers without the $ symbol
- Return Period: it is the number of days that a toy can be hired for, default is 14 but can be different for each membership, for example, Rural or Childcare
- Visits: maximum number of visits a member can have during the length of the membership. If there is no restriction, leave it blank
- Rent: select from the dropdown menu what the rent for toy hire will be; free, normal, double, 1.5, or half. For example, committee members receive half-price toy hire; if a toy has a $2 rent allocated to it, the committee member will automatically be charged $1
- Exclude from Member Online: in the Join now page on the public website, a new member must choose a membership type. You can decide which membership can be seen and what can be hidden. For example, Duty or Full are public and Committee is hidden. Choose No if you like the membership public and Yes for private
- Bond/Levy: insert the bond if the membership requires it. For example, for a duty membership, if a member misses a duty and the fine is $10, add 10 in this field.
- Membership Due Date: if the membership has a specific date of expiring, insert the date.
We do not recommend using it - Reserve: would you like members to be able to reserve toys on the Member Website? Select from the dropdown menu Yes or No
- Renew: would you like members to be able to renew their membership on the Member Website? Select from the dropdown menu Yes or No
Once all data is filled in, click Save. You will see the Success message appear or an Error message if there is a problem. ![]()
Click OK and it will take you back to the Membership List page. After creating a new membership it would be great to create a specific Payment Option for each membership type. To do this, look at the article Creating Payment Options.
The post Create a New Membership appeared first on MiBase New Zealand.
]]>The post Renewing a Membership appeared first on MiBase New Zealand.
]]>- Members can do it themselves in the Member Website
(only if your toy library is using the Member Website and has changed the setting to make this possible) - Admin can do it in the admin website
Admin Website
Click Members List in the second menu, find the member you wish to renew and click the pink Edit button alongside it.

You will be taken to the Editing Member page. To the right of the page, you will see an orange Renew Member button above the heading Important Data, click that and the membership automatically renews based on the current information listed for that member.

A Success message will appear with the membership fee amount, new expiry date and the button Send Renew Membership Email if this option has been set up in your system.
Follow this link Membership Renewal email if you would like to see how.

Clicking OK will take you back to the member’s detail page.
Clicking Send Renew Membership Email will take you to the send email page. Scroll down to the bottom you will see the button Send Renew Email, click that to send the email.
The membership fee amount added will be seen in the member’s payment page. To see this click the Payment button in the top menu. You will see the fee added and the account balance will adjust accordingly.

If you go back to the Editing Member page, you will see in the Important Data box, the new expiry date field will have updated. This expiry date will adjust according to the membership type but also according to the setting expire_from_now.
This setting calculates the new expiry date based on either, the day the membership is renewed or the day the membership expired.
This setting was created due to members renewing after the membership expired but the system calculated the new membership period based on when it expired which meant members would miss out on using part of their membership. If this happened admin would have to manually update the dates so the membership started on the day it was renewed.
With this setting, you have the option of when the new membership dates can start.
To change this setting go to Setup -> Administration and search for the setting expire_from_now.

If you choose No, the new expiry date will update (according to the membership type) from the old expiry date regardless of when you renew.
If you choose Yes, the new expiry date will be calculated from the day you renew.
If you renew BEFORE the membership expires, the new expiry date will update from the old expiry date.
If you renew AFTER the membership expires, the new expiry date will be calculated from that day.
Member wants to change their membership type
If a member wants to change their membership type, this will need to be updated first and saved before renewing the membership. The reason being is when the renewal membership fee is added, it will add the old membership type and not the new. If this does happen, however, it can be manually changed in the Payments page by clicking the green Edit button next to the payment.
To change the membership type simply go to the Editing Member page, go to the Important Data section, scroll down till you see the heading Membership Type, and select from the dropdown menu.
Click Save Member.
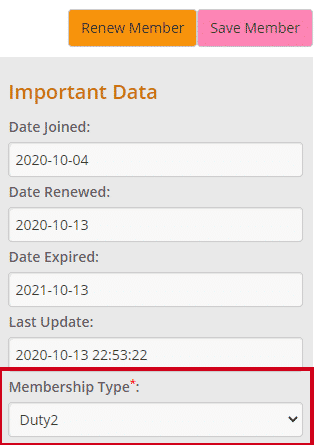
A green Success message will appear. Clicking OK will take you to the Member Detail page. Click the pink Edit button and then the Renew Member button. 
Member Website
If your toy library is using the Members Website, you can also set up the option of allowing your members to renew their own membership when it expires.
To do this go to Setup -> Members and type in online_renew in the Name search box. Change the setting to Yes if you would like members to be able to renew their own membership by clicking the Edit button and making the change.
Once this is done, when a membership is due to expire in a month or has expired, the member will see in their Home page, once they have logged in, a red Renew Now button under their details.
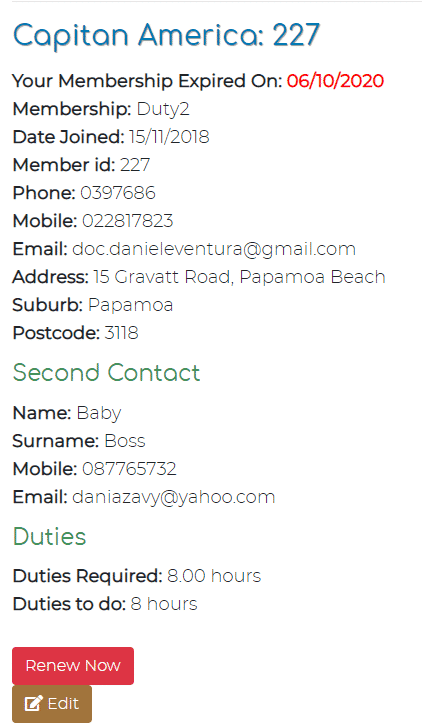
Clicking this button automatically renews their membership and displays the membership fee added to their account and the new expiry date. Clicking OK will take them back to their Home page.
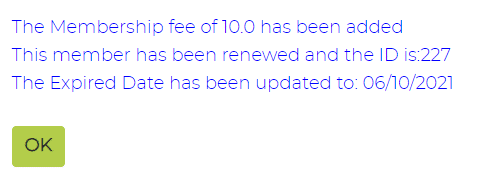
If they click on the Transactions tab, they will see the fee added to their account.

The fee will also appear on their Payments page in the admin website.
![]()
Note: a member cannot change their membership type. If they would like to do that they will need to contact you, the admin.
The post Renewing a Membership appeared first on MiBase New Zealand.
]]>The post Creating Payment Options appeared first on MiBase New Zealand.
]]>The most important Payment Option would be for your memberships, creating a separate one for each membership you have entered in MiBaseNZ.
Other Payment Options may include toy hire payment or account credit, fines, or bonuses, whatever you would like.
Go to Member -> Payment Option 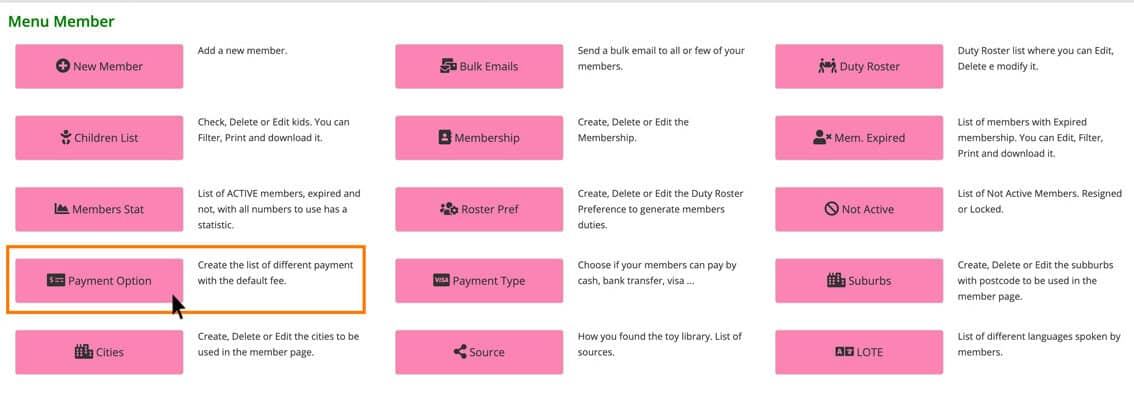
Click the button to the right Add New 
All fields on this page need to be completed. 
- Category: the payment category, for example, Membership Fee or Fines. This will speed up the payment registration during the toy library session as the option can be quickly selected from the dropdown menu.
- Type Payment: cash, internet, bank transfer…
- Description: insert an extensive description of the payment to avoid any confusion in the future as to why that payment happened
- Default Amount: the default amount for the payment option. Insert the number only, do not insert $. This amount can be changed in the Payment page if need be, however for example if a missing part fine is always $5, this will be the default amount.
Once you have finished filling in all the data, click the pink Add a New Payment Option button. You will see the Success message appear or if there is a problem, the Error message. ![]()
Click OK and you will be taken back to the Payment Option List page.
Examples of Payment Options 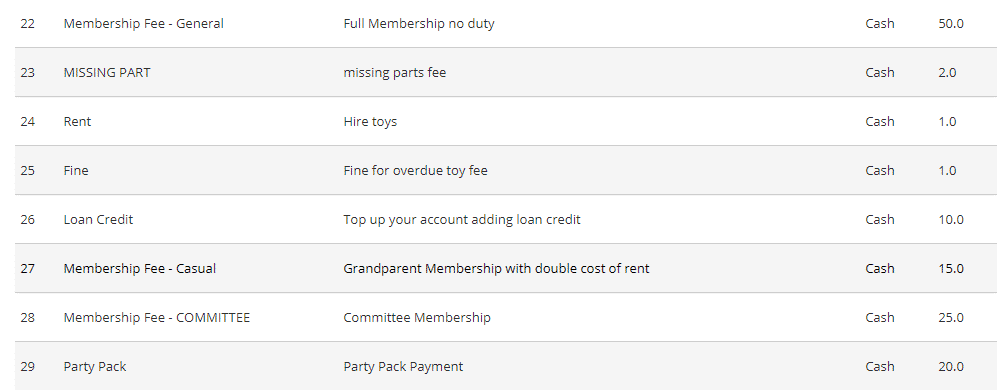
The post Creating Payment Options appeared first on MiBase New Zealand.
]]>