The post Committee Module Home Page appeared first on MiBase New Zealand.
]]>There are two parts to this module.
- The yellow sections, which are free for everyone, include a page where toy libraries can add all their legal information and a page to list all committee members and their details including who has keys or bank access.
- The orange sections are the paid premium module and these include a page to add timesheets for your committee members and a page to add any events and meetings, including the minutes, that is held by the library.
If your library has purchased the premium module, the Home page will display these activities however if no premium module has been purchased the Home page will have no need to display anything.
If you are interested in the Committee premium module, feel free to contact us or read more on the Premium Module Page.
To start using the Committee module, go to Setup -> Committee
Free Module Home Page
This home page will be blank, except for the module information in the blue box.
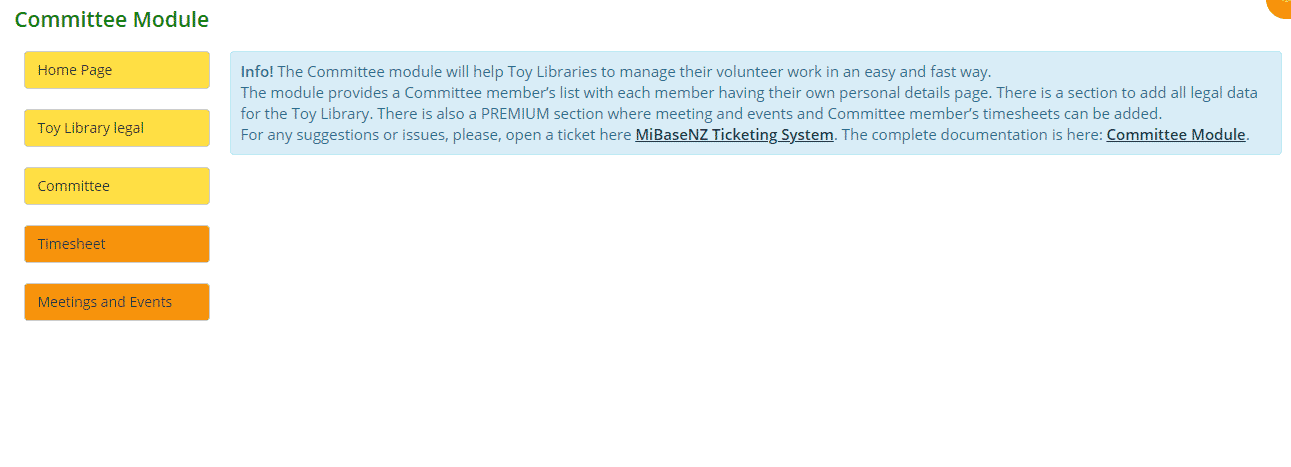
Premium Module Home Page
This Home page will feature the current month’s activities and the Meetings and Events calendar for the current month and the two next months.
At the beginning of each month, the month heading will update and the information recorded here will be removed ready for the new month’s recorded information. This information, although removed from the Home page, will still be listed on their relevant pages.
If you have added any events or meetings you will see different colours for each different type. Clicking the date will display the event or meeting’s information.
It is also possible to click the information to expand and see the complete event’s details with also a link to any documents attached.
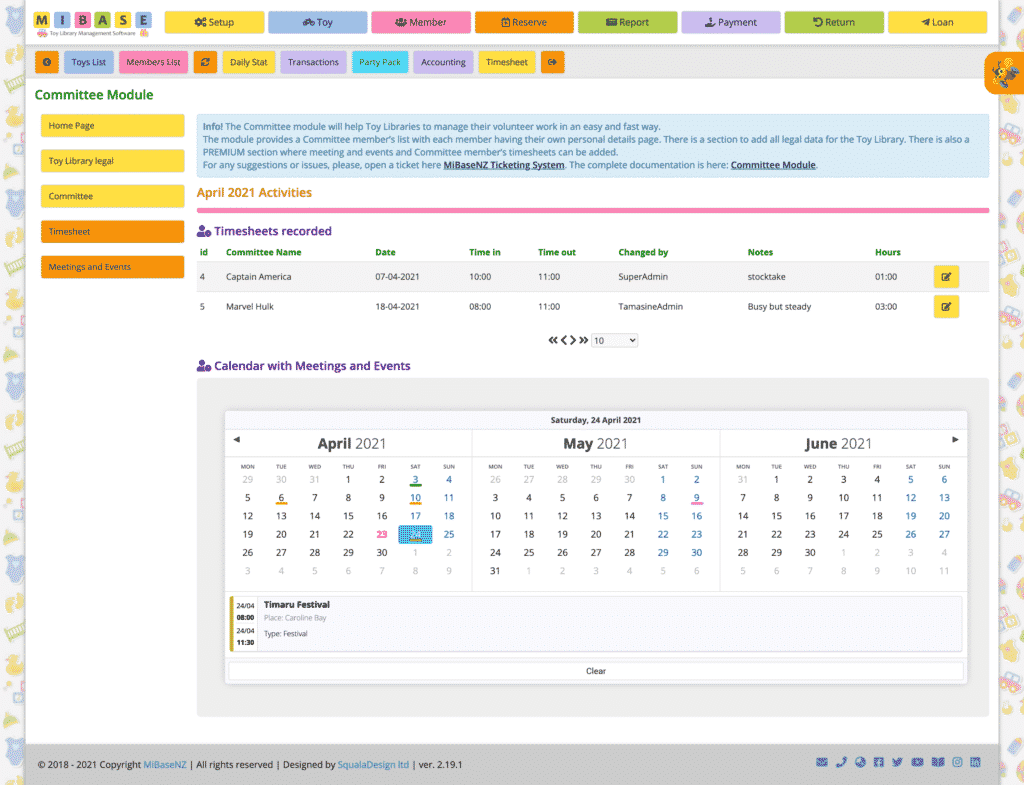
On the left of the Home page, you can see five buttons. As explained above, the yellow buttons are part of the free module, the orange is the premium paid module.
- Home Page: clicking this will bring you back to the home page as shown above.
- Toy Library Legal: this page will list the legal information for your library including registration numbers and links to relevant websites
- Committee: this page is where you add your committee members, as well as edit or resign them and see who has bank access, a key, access to the admin website, and more
- Timesheet: this page is where you add new timesheets for each committee member as well as see timesheets for all the committee
- Meeting and Events: This page is where you add all events, meetings, fundraisers, etc that are held for your library. Any documents related to the event, such as meeting minutes, can also be added
The five buttons will appear on each of the pages so the admin will not need to visit the home page to access them.
Follow the links for more information on each page.
The post Committee Module Home Page appeared first on MiBase New Zealand.
]]>The post Committee page appeared first on MiBase New Zealand.
]]>When viewing the committee member’s detail page, be aware the first part of the page is part of the free module, the second part is the paid premium module which, if your library decides to have this, will show the list of timesheets entered. This is further explained below.
To start adding your committee members, go to Setup -> Committee -> Committee
Adding a Committee member
Click Add New.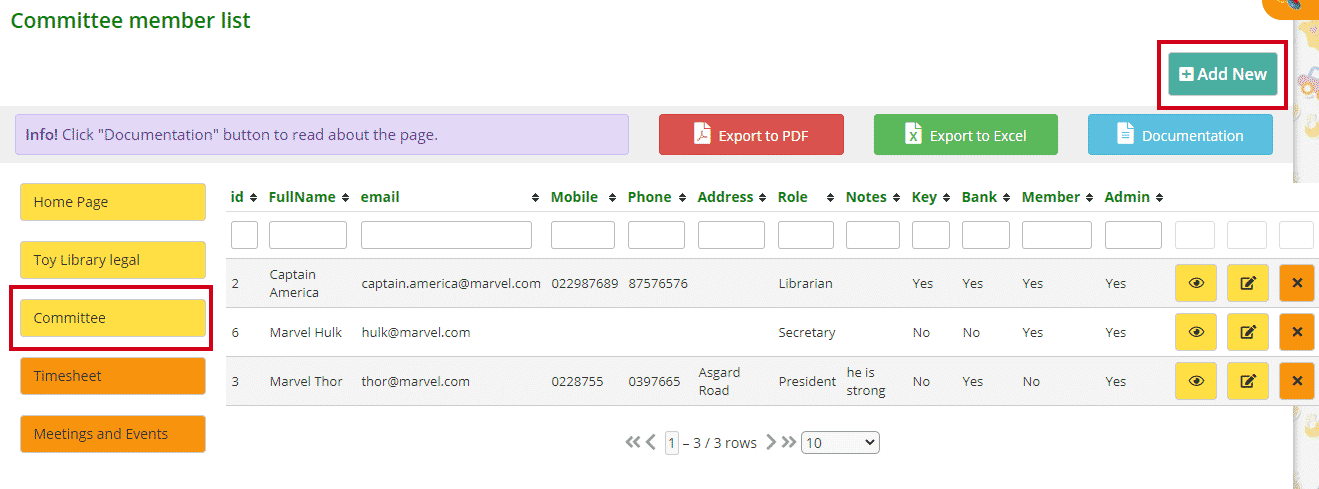
Fill in the boxes. The only fields that are compulsory are the first and last name however it would be best if you could fill in as much as possible.
The bonus extras to this page are the four fields outlined below. Now you can keep on top of what Committee member has a key to the library, access to the bank accounts and to MiBaseNZ, and whether they are a library member.
The Thumbnail field also outlined is where you can add an image or photo of the Committee member which can be seen on their details page.
Before you do this, you will need to first upload their photo in the Upload Files page under Setup under the heading Running your Toy Library.
Follow this link to learn how to upload files to MiBaseNZ.
If you have already uploaded photos of your Committee for the Our Team or News page on the Public Website, then you will not need to do it again. Just copy ‘image name.jpg’ as outlined below and paste it into the Thumbnail field (see above).
If you have not uploaded photos already, when you do, the last two boxes ‘Access to file’ and ‘Category’ must have the selection as shown below. When the photo has been uploaded, then copy ‘image name.jpg’ as outlined below and paste it into the Thumbnail field (see above).

Once you have added all that you can click Save.
A Success box will appear. Click OK and it will take you back to the Committee member list page where the member will be listed.

Viewing a Committee member’s detail page
In the Committee member list, alongside each of the member’s details, you will see three buttons.

The first button allows you to view the member’s detail page.

As explained above, the details are part of the free module. Underneath these details is where you will see the list of timesheets entered for this Committee member if your library decides to purchase the premium module.
It will look like this.

You also have the ability to edit these timesheets from this page as well. Click the yellow Edit button, make the changes and click Save.
If your library has not purchased the premium module it will have this message.

To go back to the Committee member list page, click the Committee button.
Editing or resigning a Committee member
The second and third button alongside the member’s details allows you to edit or resign the member.

If you have made a mistake or would like to update any information, click the second button, make the changes and click Save.
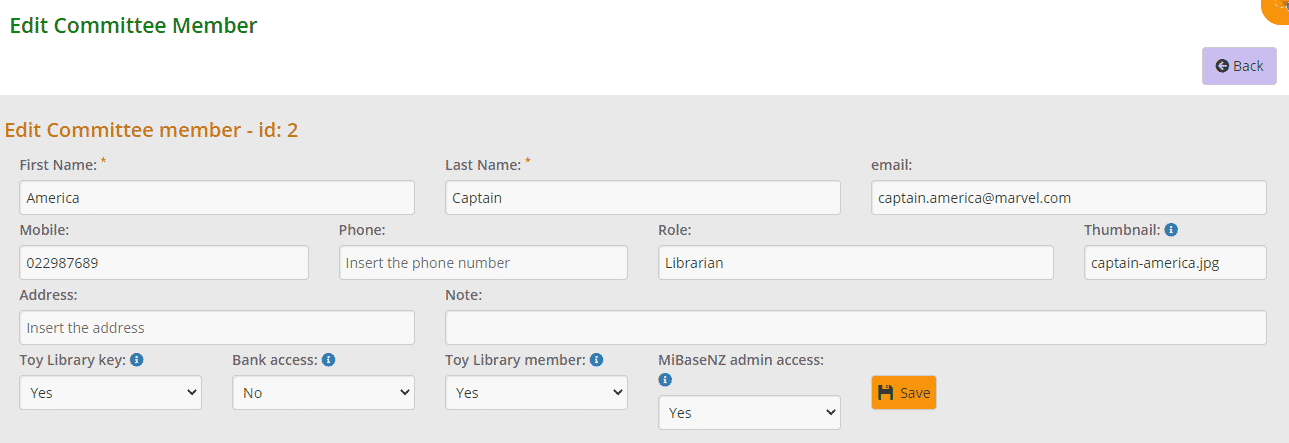
A Success box will appear. Click OK and it will take you back to the Committee member list page.
![]()
The third button allows you to resign the member when they no longer want to be on the committee. When resigning the member they will be hidden from the page as you cannot completely delete a committee member. If the member would like to come back on the committee, however, you will need to contact us and we can activate them for you again.
Sort/filter/download the Committee member list
To sort or filter the list, click the arrows next to the heading you want to sort or filter the list by or type in the search boxes underneath the headings.
You can also download the list to PDF and/or Excel by clicking the Export to PDF or Export to Excel buttons. This will export the full list, not a filtered list. If you want to download a filtered list, export to excel and sort or filter through there.
Next to these buttons is the blue Documentation button. Clicking this, a short page instruction will appear giving you a quick overview of this page.
The post Committee page appeared first on MiBase New Zealand.
]]>The post Timesheet page – paid module appeared first on MiBase New Zealand.
]]>Before using this page you must ensure you have added your committee members. Follow this link to see how to Add Committee Members.
To start adding timesheets, go to Setup -> Committee -> Timesheet.
Click Add New.
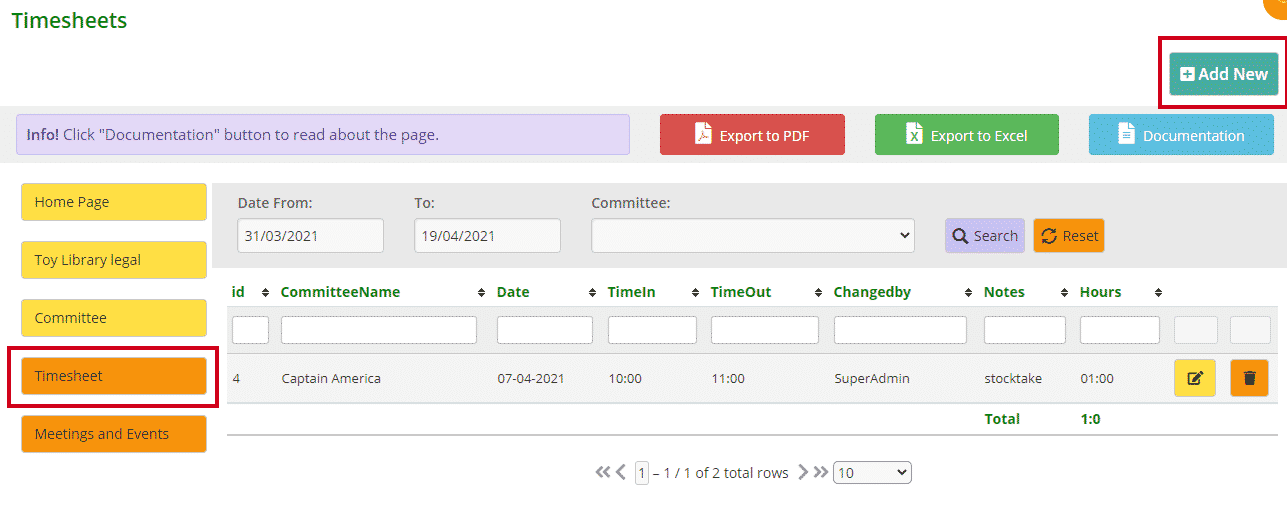
Fill in the boxes.

- Committee’s Name: select from the dropdown menu
- Date: this is compulsory. Click the box and select the date from the calendar that appears
- Time in/out: either type in the time and whether it is AM or PM or click the clock and select a time scrolling up or down till you find the correct hour/minutes.
- Note: add something if you would like but not necessary otherwise
Click Save.
A Success box will appear. Click OK and it will take you back to the Timesheets page where you will see the timesheet you have added.

If you have made a mistake or would like to update a timesheet, click the yellow Edit button alongside it make the changes and click Save.
If you would like to delete a timesheet, click the orange Delete button.
There are a couple of ways to sort or filter this table.
- Use the date range fields at the top of the page. Select the dates whether it’s weekly, monthly or fortnightly, and then select a committee member from the dropdown menu. Click Search. To download this list to PDF or Excel, click the relevant buttons. Click Reset to see the full list again
- Click the arrows next to the heading you want to sort or filter the table by or type in the search boxes underneath the headings. This filtered list cannot be exported to PDF or Excel as it does for the above example. It will export the full list. If you want to download this filtered list, export to excel and sort or filter through there.
Next to these export buttons is the blue Documentation button. Clicking this, a short page instruction will appear giving you a quick overview of this page.
The post Timesheet page – paid module appeared first on MiBase New Zealand.
]]>The post Meetings and Events page – paid module appeared first on MiBase New Zealand.
]]>The aim of this page is to help the Committee to organise and schedule the various events where toy libraries are involved in.
To add an event or meeting, go to Setup -> Committee -> Meetings and Events
Adding an event
Click Add New.
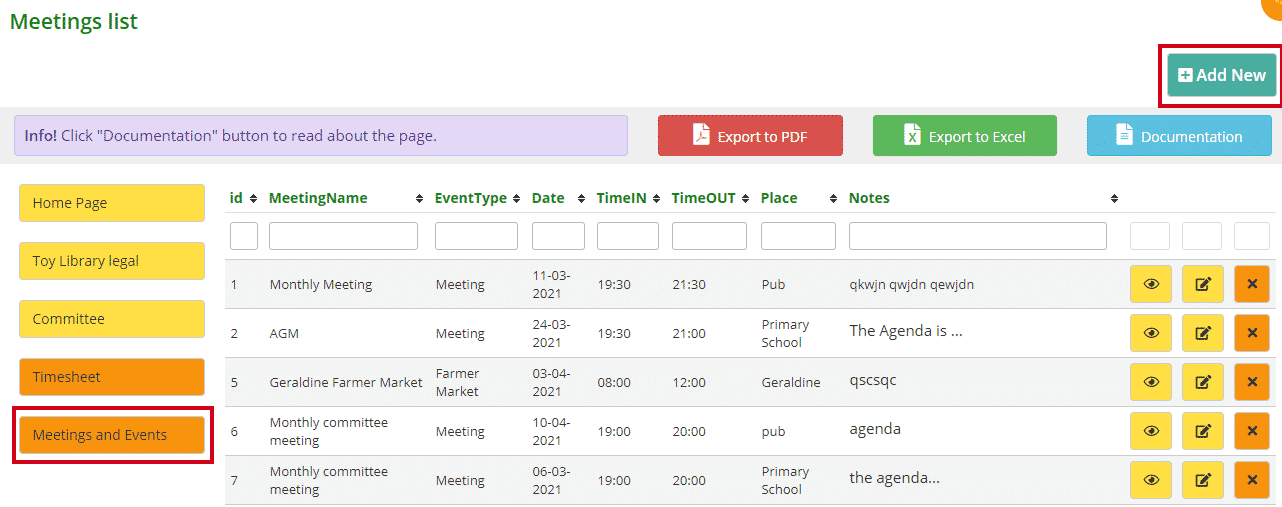
Fill in the boxes.
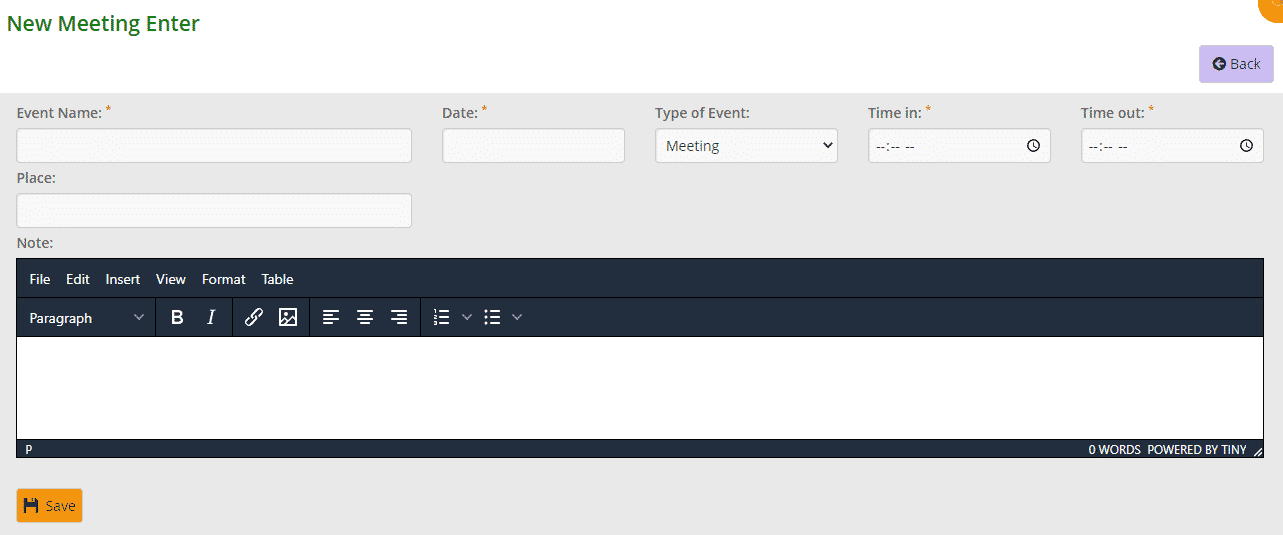
- Event Name: this is compulsory
- Date: this is compulsory. Click the box and select the date from the calendar that appears
- Type of Event: select from the dropdown menu
- Time in/out: either type in the time and whether it is AM or PM or click the clock and select a time scrolling up or down till you find the correct hour/minutes.
- Place: type in the venue where the event is being held if you would like but not necessary otherwise
- Note: add something if you would like but not necessary otherwise
Click Save.
A Success box will appear. Click OK and it will take you back to the Meetings List page where you will see the event you have added.

Viewing an event’s detail page
In the Meetings list, alongside each of the event’s details, you will see three buttons.

The first button allows you to view the event’s detail page which shows all the details previously entered in the form when you created the event.

You will see there is another heading called Document which was not on the Add New event form. This is where, if you would like to add minutes, an agenda or any other document to this event, it will appear here for any Committee member to access.
To add a document you will need to first upload the file before saving it to the event.
Adding a document to an event
The first step will be to upload the document to the Upload Files page under Setup.
Follow this link to learn how to upload files to MiBaseNZ.
When you upload a document, the last two boxes ‘Access to file’ and ‘Category’ must have the selection as shown below.

Once you have uploaded the document go back to Setup -> Committee -> Meetings and Events.
Find the event you wish to add the document to and click the Edit button.

You will now see an extra dropdown field called Minute which you do not see when adding a new event.
Select the document that you have uploaded and click Save.

A Success box will appear. Click OK and it will take you back to the Meetings list page.

Editing or deleting an event
As already mentioned above, the second button alongside an event is the Edit button. The third button is the Delete button.

If you have made a mistake or would like to update an event, click the Edit button, make the changes and click Save.
If you would like to delete an event, click the orange Delete button.
Sort/filter/download the Meetings list
To sort or filter the list, click the arrows next to the heading you want to sort or filter the list by or type in the search boxes underneath the headings.
You can also download the list to PDF and/or Excel by clicking the Export to PDF or Export to Excel buttons. This will export the full list, not a filtered list. If you want to download a filtered list, export to excel and sort or filter through there.
Next to these buttons is the blue Documentation button. Clicking this, a short page instruction will appear giving you a quick overview of this page.
The post Meetings and Events page – paid module appeared first on MiBase New Zealand.
]]>The post HR Module Home Page appeared first on MiBase New Zealand.
]]>To start using the HR module, go to Setup -> Human Resources (under the heading Running your Toy Library)
The home page will be blank, however, once you start adding in your timesheets and employees, they will be listed here.
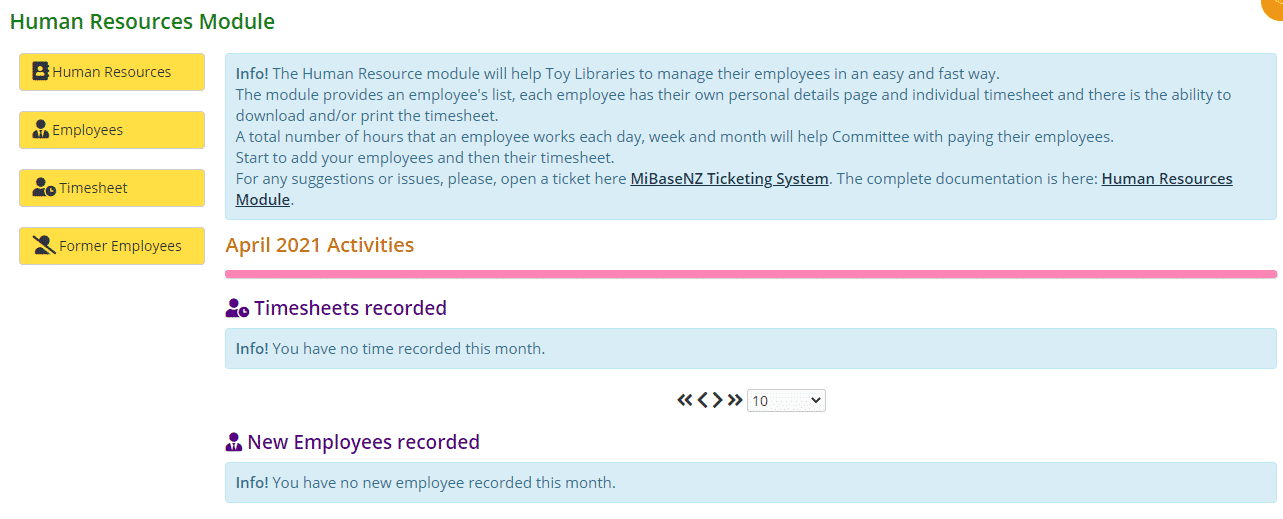
On the left of this page, you can see four yellow buttons.
- Human Resources: clicking this will bring you back to the home page as shown above. See below for further explanations
- Employees: this page is where you add new employees, as well as edit or resign them, and see the full list of your current employees
- Timesheet: this page is where you add new timesheets for each employee as well as see all timesheets for all employees
- Former Employees: this page lists all your ex-employees
Home Page
The four yellow buttons will appear on each of the pages so admin will not need to visit the home page to access them.
Next to the buttons, you will see a short description of what the HR module entails and how you can benefit from it.
Underneath the description, you will see the heading April 2021 Activities. Under that are the headings Timesheet/New Employees recorded. What this means is any timesheets or new employees recorded during the month of April will be listed here as well as on their main pages. At the beginning of each month, this heading will update with the name for that month and the information recorded here will be removed ready for the new month’s recorded information.
This information will not be deleted, as mentioned above it will be listed in their relevant pages.
Follow the links for more information on each page.
The post HR Module Home Page appeared first on MiBase New Zealand.
]]>