The post Settings for the Roster page appeared first on MiBase New Zealand.
]]>To see the options, go to Setup -> Members.
Type the word “roster:” in the Description box. The list will be filtered to show all settings related to the Roster page. Each setting can be easily changed by clicking the Edit button alongside it, making the change if necessary and clicking Save.
Once the settings are changed you must log out and then log back in again for the settings to take effect.
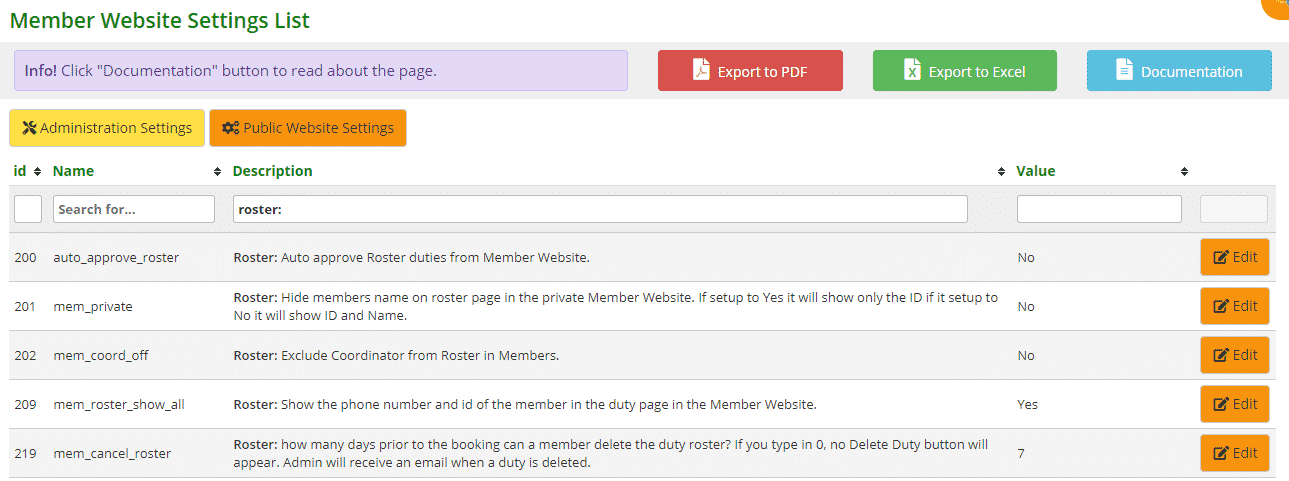
- #200 – auto_approve_roster: When a member selects a duty session on the calendar, this setting will allow it to be automatically approved rather than waiting for the admin to approve it. Select No if you do not want this to automatically happen
- #201 – mem_private: When a member logs on to the Member Website and views the roster calendar, you can decide if they can see the details of other members who have selected a duty, or not. Yes will show ID number, No will show ID number and member’s name
- #202 – mem_coord_off: this setting will exclude coordinators (committee members) from roster duties, select Yes to exclude, No to include
- #209 – mem_roster_show_all: if you have selected No for setting #201, you can also add the member’s phone number as well by selecting Yes for this option.
Toy Libraries show other members details to allow them to call each other if they need to swap their duties. Remember to ask for your members’ permission to show their details. - #219 – mem_cancel_roster: you can decide up to how many days prior to the duty a member is able to delete it. When a member deletes the duty, the admin will receive an email notification. If you do not want any member to be able to delete a duty, type in 0. The Delete My Duty button will not appear on the Member Website

If you are using the Roster System in the Member Website, you should then activate this below setting for the Admin Website.
Go to Setup -> Administration
 Type in ‘roster’ and change the setting to Yes.

What this will do is activate the two tables below on the admin Home page.

- Members on Duty Today: will list what members will be completing their duty today
- Member signed up for duty online: will list the members that have signed up for duty in the Member Website.
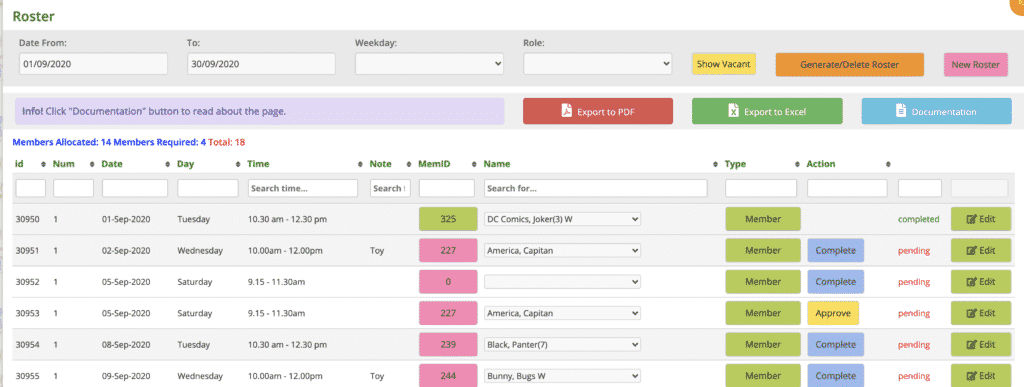
If you have selected Yes for setting #200 above, this duty will automatically be approved. If you have selected No, an admin will need to approve it by clicking the pink Go to Duty Page button which takes you to the Duty Roster page where you can click the yellow Approve button (see below).
The post Settings for the Roster page appeared first on MiBase New Zealand.
]]>The post Activating the Temporary Closure Module appeared first on MiBase New Zealand.
]]>It will calculate the total number of days closed and extend your members’ membership for the same amount of days. This will update daily (during the night) on the admin website until the library re-opens.
It will also automatically turn off all automatic emails so members will not be bombarded with toy overdue or membership expired emails.
Note: If your toy library does not want to activate this module but would like the automatic emails to be deactivated, go to Setup -> Automatic Email and above the emails, you will see a red Deactivate All button. Click this to deactivate all emails.

There are two simple steps to follow to ensure the Temporary Closure module is activated correctly.
Step 1:
Go to Setup -> Temporary Close

Step 2:
Click the Activate button. A Success message will appear underneath.
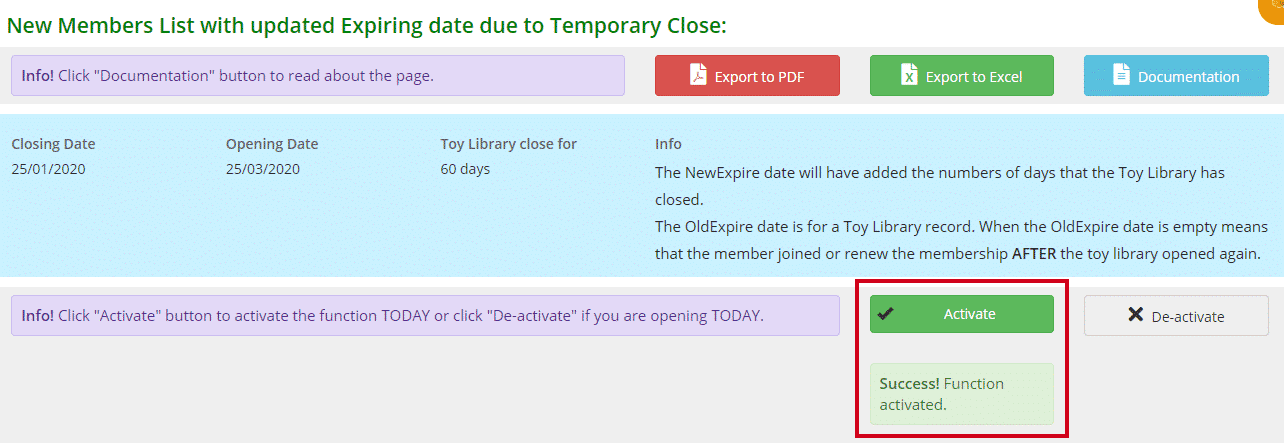
Refresh your page for the Closing Date to update to the current date. The Opening Date will be blank and the Toy Library close for will have 0 days. The Activate button will no longer be green (see below).
If this page doesn’t update, log out and then log back in again.

Once this button is activated it automatically changes two other important functions linked with the closure.
- Go to Setup -> Administration
Type in ‘covid’ in the Description field.
The setting closing_date will now have the current date.
The setting opening_date will be blank.
- Go to Setup -> Automatic Email
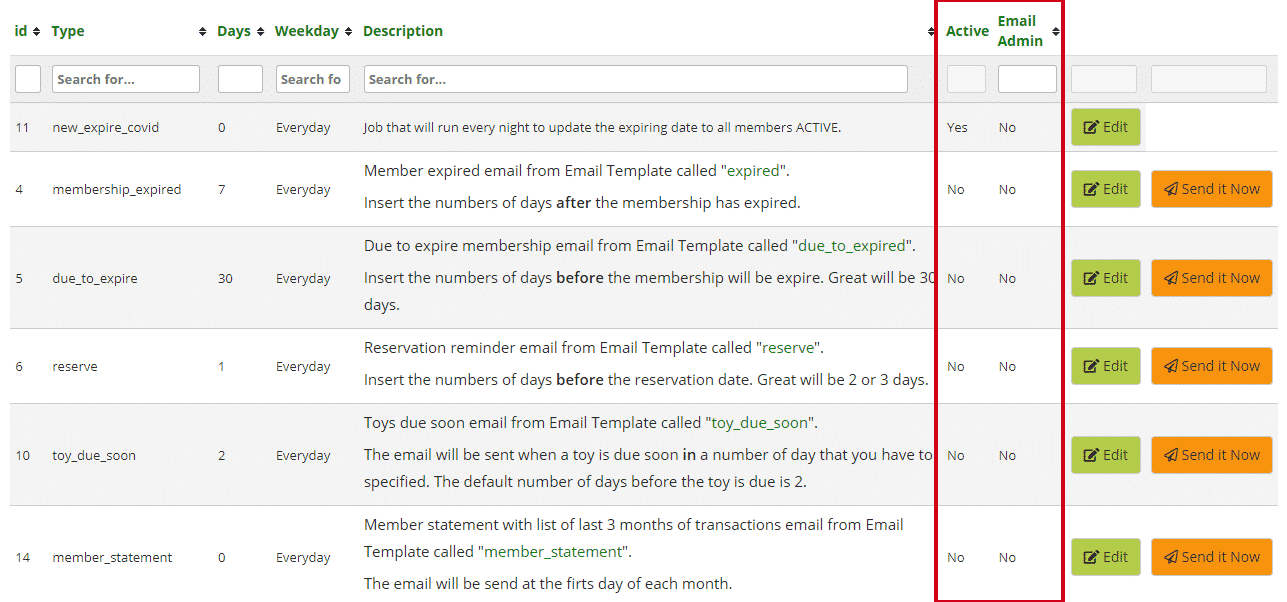
You will see all the automatic emails will now be deactivated except for new_expire_covid which will now be active.
Note: new_expire_covid is not an automatic email despite being listed under the automatic emails page. It is a server job that is linked with the temporary closure module which updates the memberships daily whilst your library is closed.
You will also see Email Admin which refers to the email reports you are normally sent, will automatically be set at No. If you would still like to receive them even though members will not, you will need to manually click Edit and change the setting to Yes for each automatic email you would still like to receive.
Now the module is activated, the number of days your library is closed will update daily.
You will see a list of all your active members with the new expiry date and the old expiry date. The NewExpire date updates daily adding one more day every day until your library opens again.
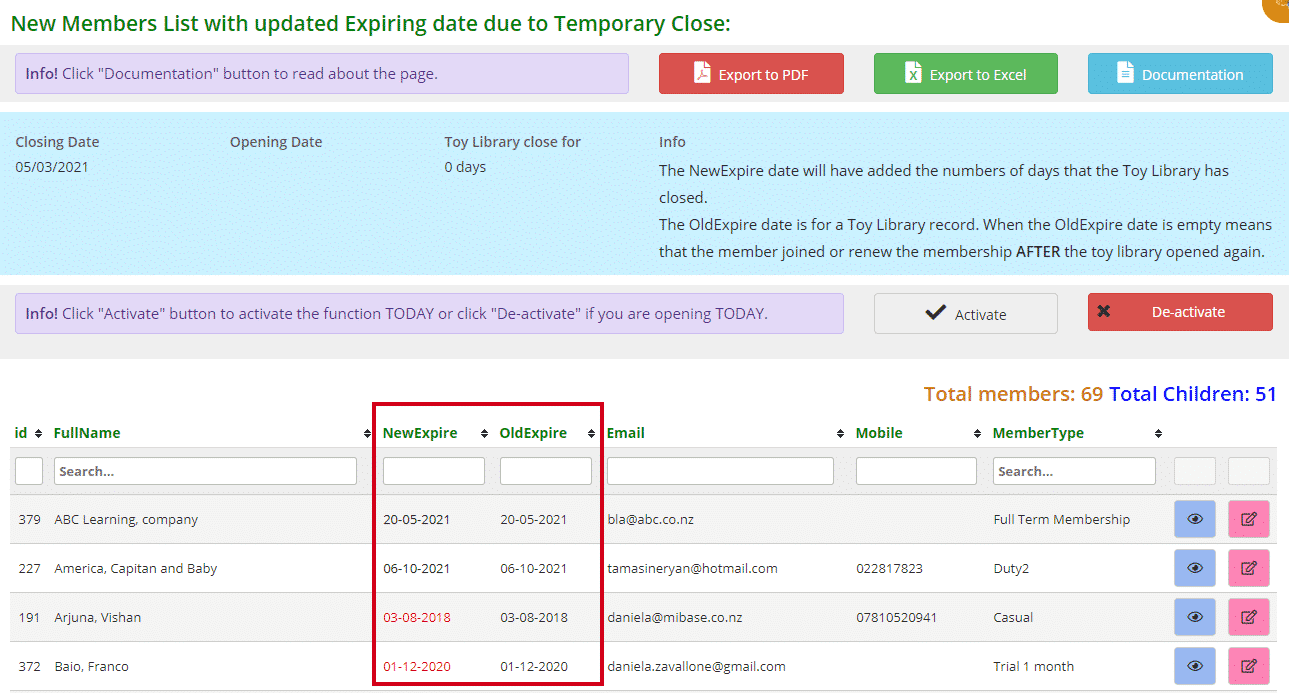
Also, every time you log into your admin website, a pop-up screen will automatically appear on the home page letting you know the Temporary Closure module is still active.

When your toy library is ready to open, this module will need to be deactivated.
Go to Deactivating the Temporary Closure Module
The post Activating the Temporary Closure Module appeared first on MiBase New Zealand.
]]>The post De-activating the Temporary Closure Module appeared first on MiBase New Zealand.
]]>You will also need to activate the automatic emails which will not happen automatically when the module is de-activated as each toy library uses different emails.
IMPORTANT: De-activation must happen on the FIRST day of re-opening, not any time before or after.
The reason for this is to allow MiBaseNZ to accurately record the total number of days the library was closed and add this to your members’ membership.
There are three simple steps to follow to ensure the module is de-activated correctly.
Step 1:
Go to Setup -> Temporary Close

Step 2:
Click the De-activate button. A Success message will appear underneath.
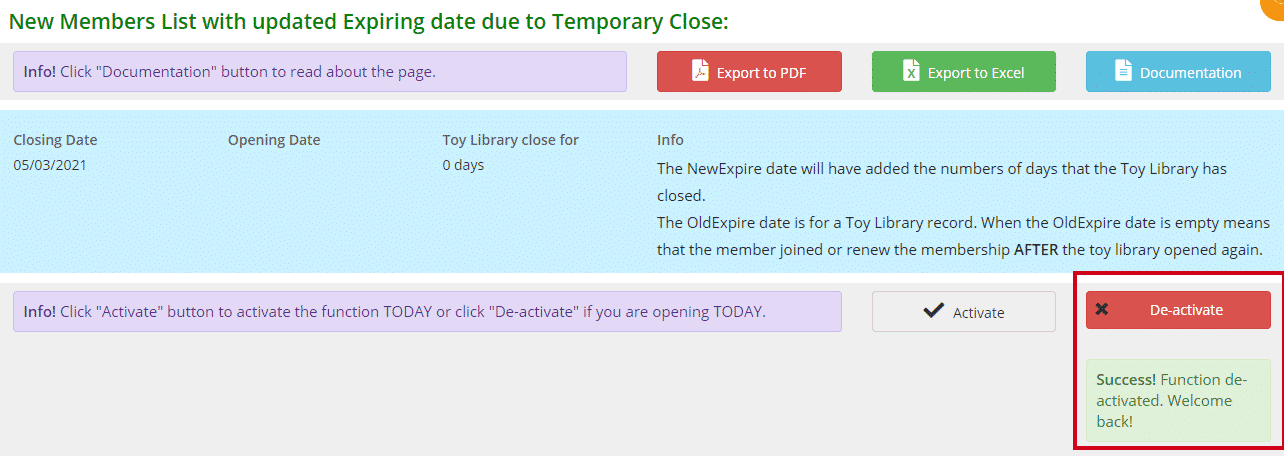
Refresh your page for the Opening Date to update. The Toy Library close for will show the number of days your library was closed. The De-activate button will no longer be red (see below).
If this page doesn’t update, log out and then log back in again.

Once this button is de-activated it automatically changes two other important functions.
- Go to Setup -> Administration
Type in ‘covid’ in the Description field.
The setting closing_date will have the date your library closed.
The setting opening_date will now have the date your library reopened.
- Go to Setup -> Automatic Email
You will see 11 new_expire_covid will no longer be activated.
Step 3:
While you are on the Automatic Emails page, you will need to manually activate each of the automatic emails your toy library uses unless that is if your library uses them all then you will just need to click the Activate All button. The Email Admin which refers to the email reports you are sent will also need to be set to Yes if you would like to receive them.
Click Edit alongside each email you would like to activate, make the changes and click Save.
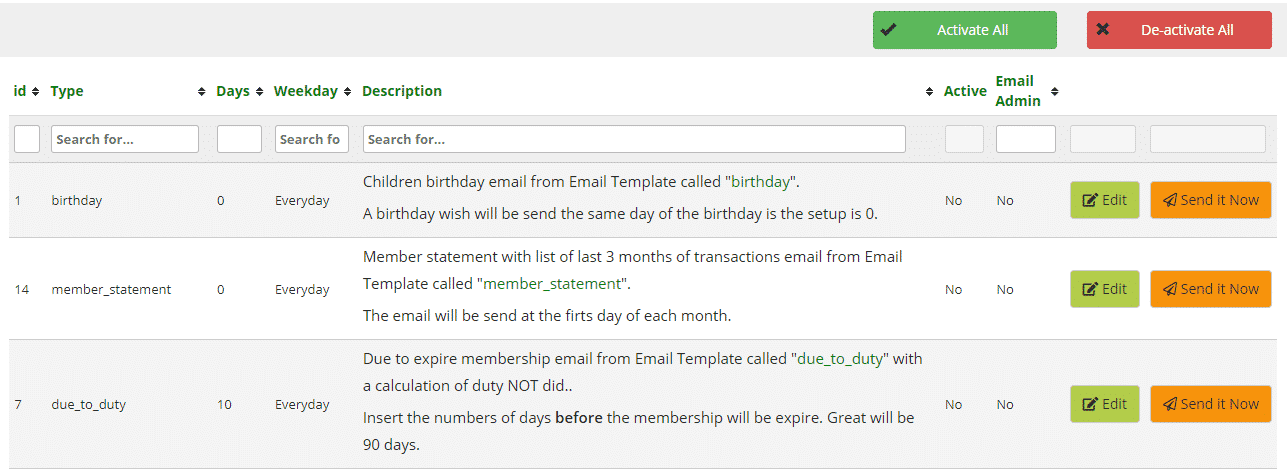
Automatic emails run during the night, so this will not take effect until the next day.
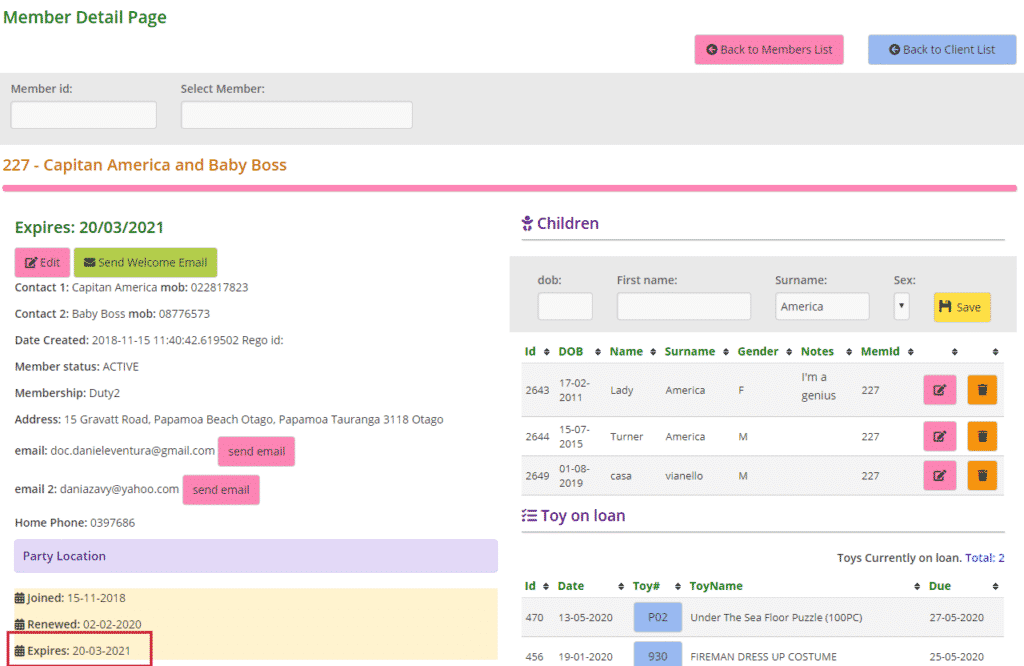
Now the module has been de-activated, you will see for each member, their new membership expiry date. This date is the date that will be shown on the Members List page and the Member Detail Page (see below). The old expiry date under the Temporary close page is there for your toy library’s record.
Members List page

Member Detail Page
Depending on how long your toy library has been closed, toys that have been hired over this closed period will also be accruing overdue fines. To avoid your members being charged these fines, you will need to temporarily turn off the fine system. To do this, go to De-activating Overdue Fines
The post De-activating the Temporary Closure Module appeared first on MiBase New Zealand.
]]>The post How to setup your default region appeared first on MiBase New Zealand.
]]>
Type the word ‘region’ in the description box. Click Edit.

Add the region and click Save.

You will see the Success message appear. An Error message may appear if there is a problem. 
Once the setting is changed you must log out and then log back in again for the setting to take effect.
The post How to setup your default region appeared first on MiBase New Zealand.
]]>The post Days and Times page appeared first on MiBase New Zealand.
]]>Go to Setup -> Days and Times

PLease note, once the settings are changed you must log out and then log back in again for the settings to take effect.
Days and Times
As you can see from the image below, there are 4 dropdown menus you will need to select from.
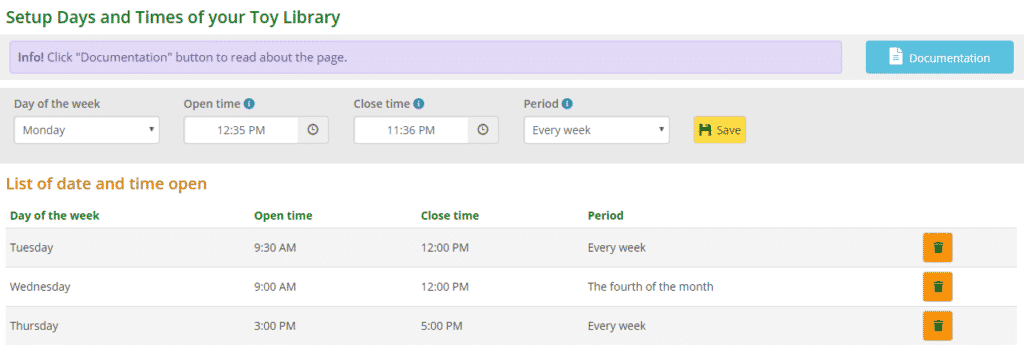
- Day of the Week: select the day you are open
- Open / Close Time: by clicking on the individual box, a time select or dropdown menu will appear. You can either use the arrows to select the time or click directly on the hour or minutes and another box will appear for you to choose from. You will also need to select the time as ‘am’ or ‘pm’ by clicking directly on this button and it will change between options
- Period: select the number of times in a month this day is open
Once done click Save. The day and time will be added to the list below.
You will need to do this every day you are open.
Also, all fields are mandatory. If you do not fill in all the fields, you will not be able to save them, and the fields will be highlighted to remind you.

If you make a mistake after saving it, you will need to delete it and start again. To remove a day and time, click the Delete button alongside it.
View the video here.
Holidays
Here you can add the holidays or any days you choose for when your toy library closes. Each year you will need to remember to delete the old dates and add the new ones. As you can see from the image below, there are 3 fields for you to fill. 
- Holiday Name: be specific
- Start: add the date the holiday will start. You can either type in the date by clicking in the box or click the calendar icon and select from the calendar that appears
- End: this date only needs to be added if the holiday is over a period of time. If it is one day for a Public Holiday, for example, leave it blank
Click Save.
It will be added to the list below. The first two fields are mandatory! If you do not fill in these fields, you will not be able to save, and the fields will be highlighted to remind you.

If you make a mistake after saving, you will need to delete it and start again. To remove a holiday, click the Delete button alongside it.
The post Days and Times page appeared first on MiBase New Zealand.
]]>The post Setting up the Party Pack module appeared first on MiBase New Zealand.
]]>Click the Party Pack quick access button in the second menu bar.

In the first part of the page, there is a yellow Settings and content button.

Clicking this button will take you to a page with the following 3 sections that you can change and add to.
Client Subscription
All non-members (clients) will have an automatic subscription similar to your toy library memberships but without any membership fees and duties. They will also not receive any automatic emails.

This is the default subscription however your toy library can make any changes they would like by clicking the pink Edit button. The only thing you cannot change is the name of the subscription, CLIENT. This will not be visible online or to a non-member/client.
Remember to click Save once done.

- Description: add whatever you like here or leave it blank
- Expiry Period: type in the number of months
- Rent: choose whether the toy hire is free, normal, double, or half
- Max No Toys: decide how many toys a non-member or client can hire at one time
- Return Period: how many days they can hire the toy
- Visits: if you would like to limit the number of times they can hire add the maximum amount otherwise leave blank if there are no restrictions
- Bond/Levy: if you would like to charge your non-members or clients a bond add in the amount. Do not type in the $ character.
Public Website Content
To personalise your Party Pack page on the Public Website, you can edit to your liking the title and content explaining what a non-member can hire and how. You can also add a link to the online sign up page.

The result on the Public Website is this.
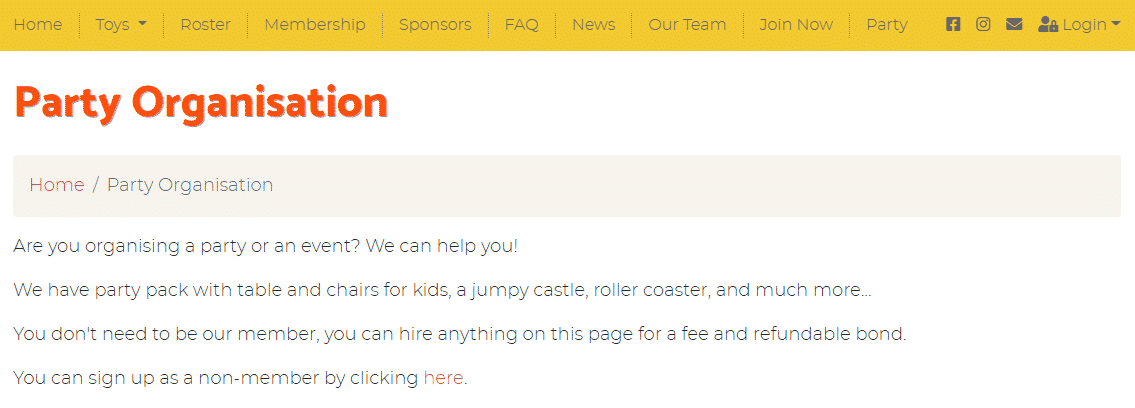
You can also add content to the Signup Page on the Public Website.

The result on the Public website is this.

Once you have set up the Party Pack page, if you have not done so already, you will need to add the toys and/or toy categories that you would like to be seen on the Public Website.
Follow this link to learn how to Add toys and/or toy categories to the Party Pack.
The post Setting up the Party Pack module appeared first on MiBase New Zealand.
]]>The post Add a new Administrator appeared first on MiBase New Zealand.
]]>There are various pages within MiBaseNZ where the admin’s username is recorded allowing you to see who has worked in the system on what day or who has made the most recent changes. Some examples of these pages are the loan and payment page, activity log, stocktake page, and toy detail page.
To add an admin go to Setup -> Add Admins

Any administrators already added will be listed in the Administrator’s List (see below).
To Edit an Administrator, click the pink Edit button. For further information follow the link.
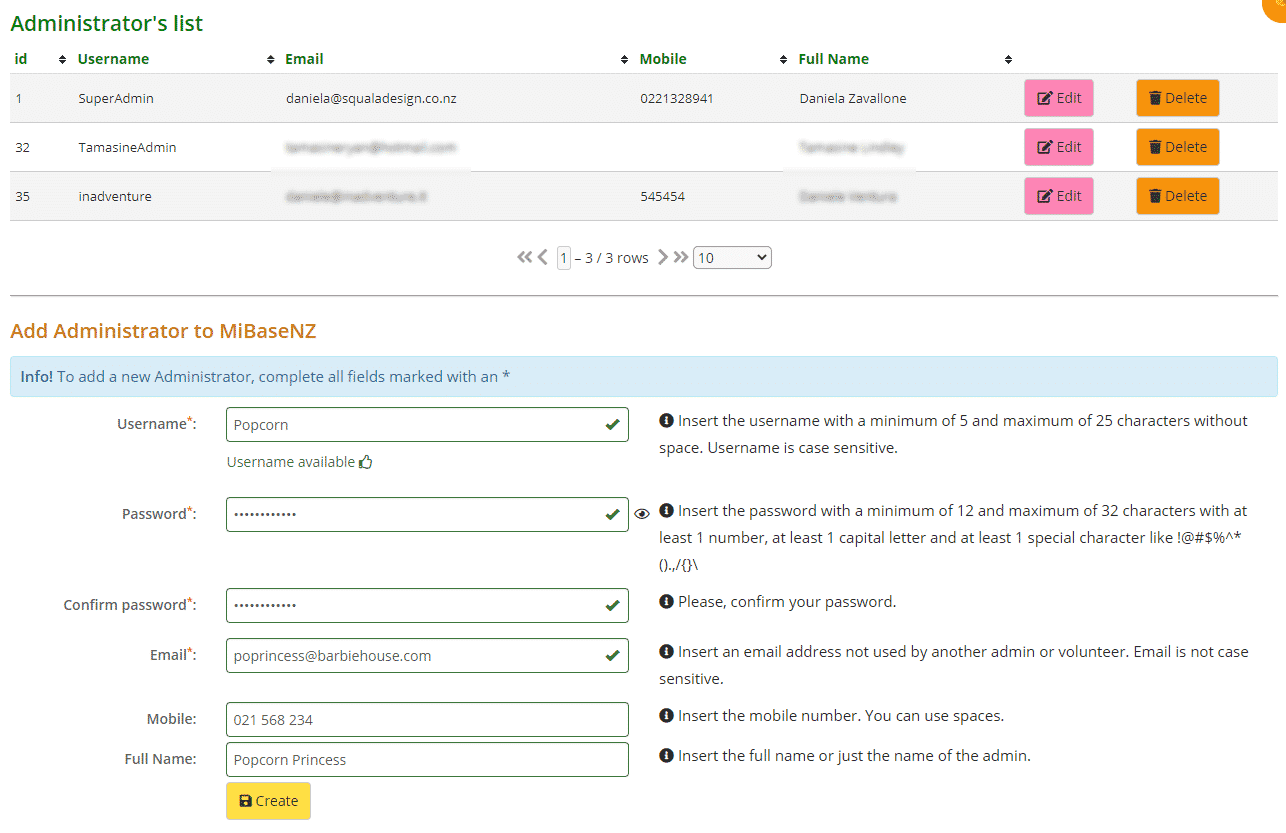
To add a new administrator, you must make sure you fill in the fields with a red *.
- Username: without any space or special characters. This must be unique, no administrators (including volunteers) can have the same username
- Password: minimum of 12 and maximum of 32 characters using at least 1 number, 1 capital letter, and 1 special character, with no spaces. Passwords must be unique, no administrators (including volunteers) can have the same password
- Confirm password: this is a newly added feature
- Email: this address must be unique, it cannot be the same as any other administrators or volunteers
- Mobile number, you can use spaces here
- Full Name: you can use spaces here
If you have not followed the requirements for each field, a pop-up box will appear letting you know what needs to be changed along with a red cross.


Alternatively, if you have met the requirements you will see a message along with a green tick

Once all fields have been completed, click Create. Their name will now be added to the Administrator’s List. A Success message will also appear.

The post Add a new Administrator appeared first on MiBase New Zealand.
]]>