The post Settings for Toy Loans appeared first on MiBase New Zealand.
]]>The following settings are related to how often a member can renew a toy and whether they can renew a toy that is overdue.
Go to Setup -> Members
Type the word “loan” in the Description box. The list will be filtered to show the settings related to toy renewals. Each setting can be easily changed by clicking the Edit button alongside it, making the change if necessary and clicking Save.
Once the settings are changed you must log out and then log back in again for the settings to take effect.

- #206 – mem_times_renew: how many times would you like a member to renew a toy, type in the number. If you do not want this option available to your members, leave the field blank or add a 0. On the Member Website, instead of a Renew button, it will say “Renews not activated”
Follow the link to see how to Renew a toy on the Member Website - #211 – overdue_toy_member_renew: if a toy is overdue, would you like the member to still be able to renew it? Select Yes if so, No if not. They will either have to return the toy or contact your librarian to renew it
- #220 – mem_block_loan: if a membership has expired and the member still has a toy on loan, this setting will block the member from renewing the toy. Select No if you do not want the toy to be renewed.
The post Settings for Toy Loans appeared first on MiBase New Zealand.
]]>The post On Loan page appeared first on MiBase New Zealand.
]]>There are two places this list can be accessed from:
- in the admin home page under the heading Info, there are two quick access links

- go to Toy -> OnLoan

You can see to the right, above the table, is the total number of toys currently on loan.
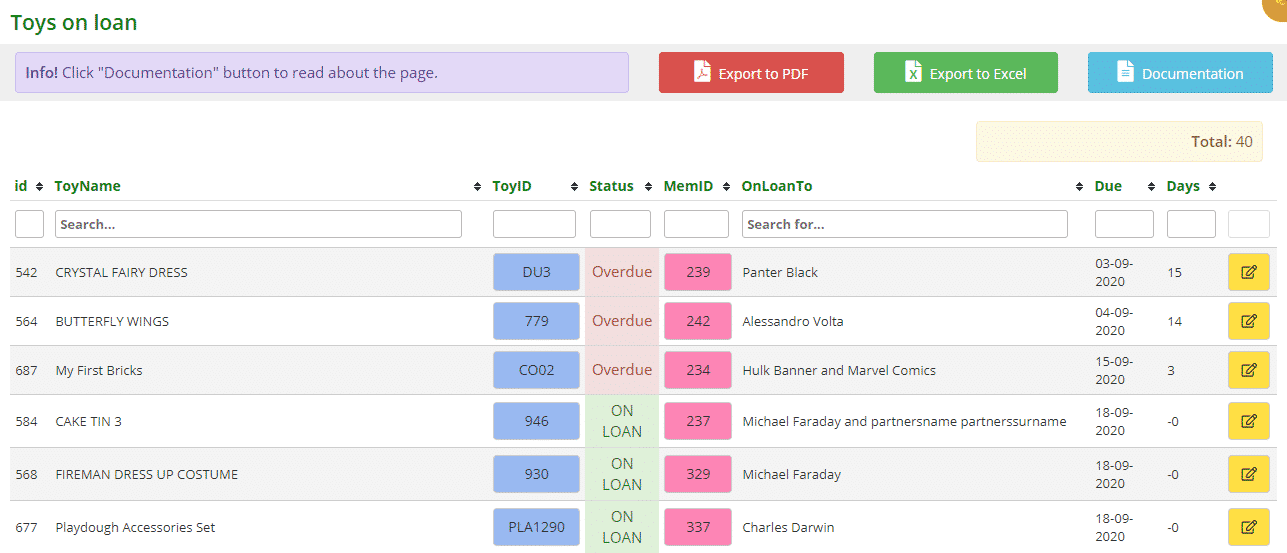
- id: the number to identify/record the loan
- ToyName: self-explanatory
- ToyID: the toy’s individual id. If you hover your mouse over the blue box the image will appear. If you click the box you will be taken to the toy’s detail page
- Status: either Overdue or OnLoan. As you can see all overdue toys are listed first and highlighted red followed by the loaned toys highlighted in green
- MemID: the member’s id number. If you click the box you will be taken to the member’s detail page
- OnLoanTo: the name of the member who the toy has been loaned to
- Due: due date of the toy. The page lists the overdue toys first and then these are listed by the due date, the toys that are due first
- Days: a negative number means the number of days till the due date, for example, -0 means the toy is due that day. -3 means till the toy is due in 3 days. A number that is positive means it is overdue, for example, 3 means the toy is overdue 3 days
- Edit: clicking the yellow edit button will take you to the Edit Loan Date page where you can change the loan dates for the toy. Remember to click Save
To sort or filter the list, click the arrows next to the heading you want to sort or filter the list by or type in the search boxes underneath the headings.
You can also download the list to PDF and/or Excel by clicking the Export to PDF or Export to Excel buttons. This will export the full list, not a filtered list. If you want to download a filtered list, export to excel and sort or filter through there.
The post On Loan page appeared first on MiBase New Zealand.
]]>The post Understanding the Loan page and all its functions appeared first on MiBase New Zealand.
]]>To access the Loan page, click on the yellow Loan button in the top menu.

You will then need to select the member who you will be loaning a toy to. There are two ways to do this:
Member id: type in the Member id number if you know it and press Enter.

Search Member: search by name and select from the dropdown menu when it appears.

You will now see all information related to this member as well as the extra functions mentioned above.
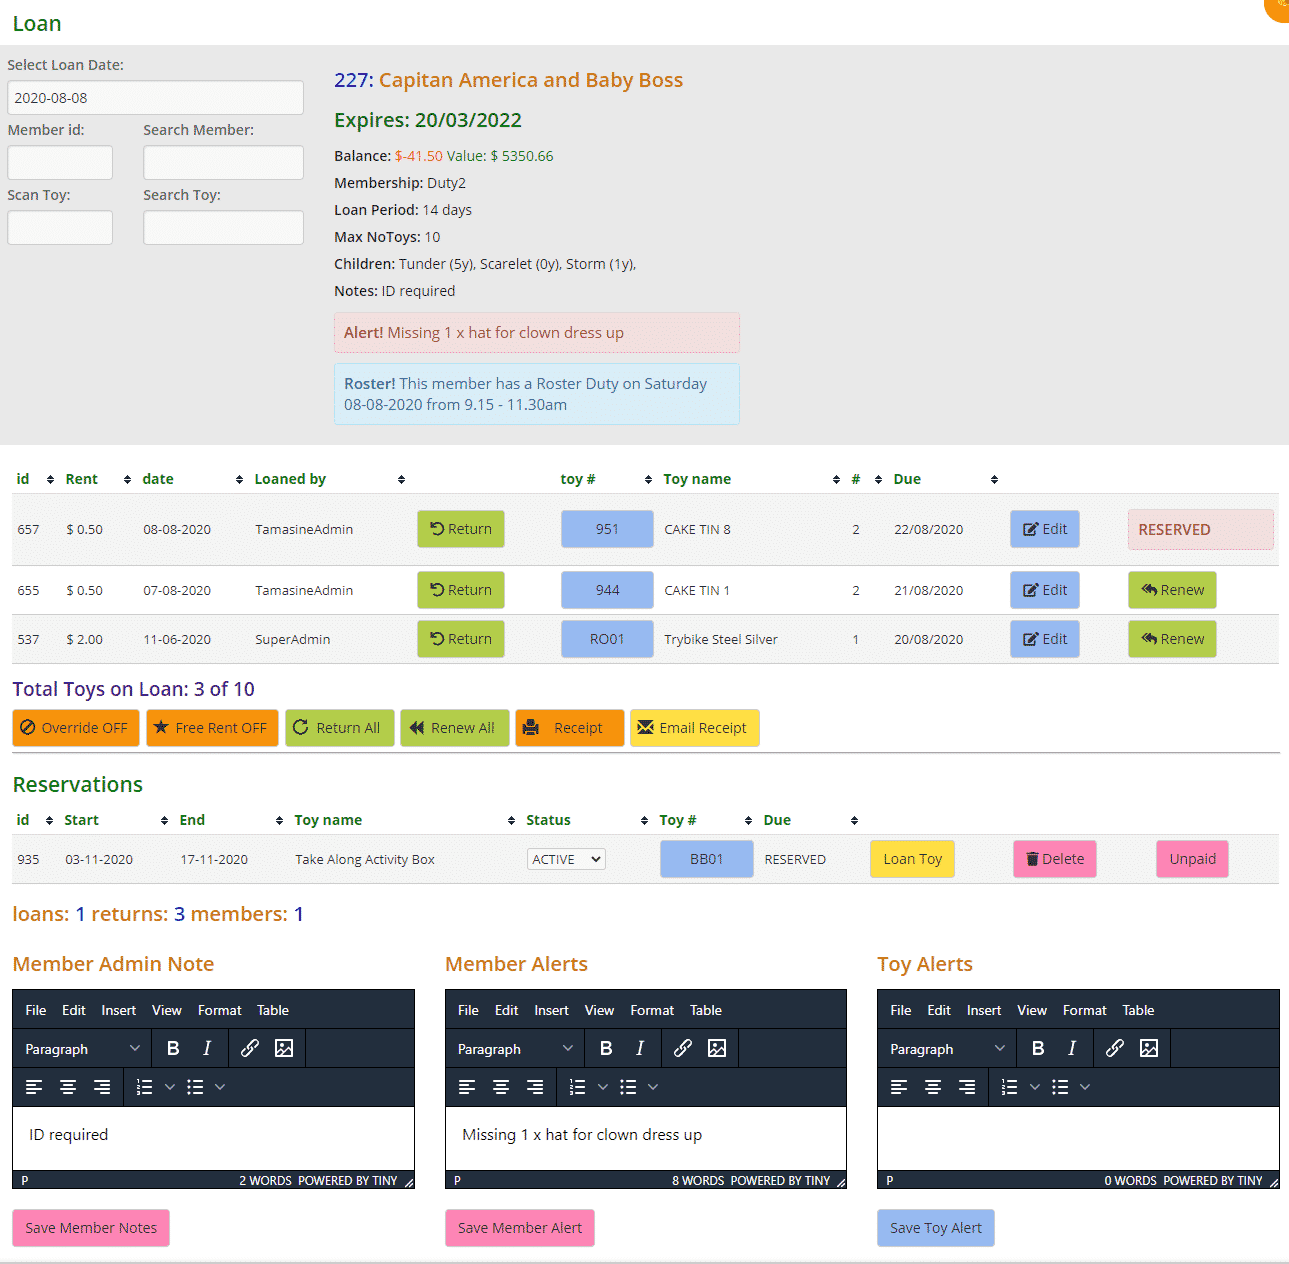
As you can see there is a lot of information in the Loan page, so to break it down to more manageable descriptions, follow the links below:
- Explaining the details at the top of the Loan page
- How to loan a toy to a member
- How to loan a reserved toy to a member
- How to renew or return a toy in the Loan page
- How to email a toy loan receipt
- How to print a toy loan receipt
- Using the Admin, Member & Toy Alert boxes
The post Understanding the Loan page and all its functions appeared first on MiBase New Zealand.
]]>The post Explaining the details at the top of the Loan page appeared first on MiBase New Zealand.
]]>When you search for a member, their details will appear alongside these search boxes.
When a toy is loaned, returned or renewed, the details of this toy will then appear alongside the member’s details.
Some of the information you see is self-explanatory however some require further explaining.

Search Boxes
- Select Loan Date: automatically auto-fills today’s date but you can change it if you forgot to record a loan prior to that
- Member id: type in the member’s id number if you know it
- Search Member: type in the start of the member’s name (first or last) and select from the dropdown menu when it appears
- Scan Toy: as you can see this box is outlined in black meaning every time you go to the Loan page, the ‘focus’ will always start at this box. This is where you type in the toy id number
If you do not want to have the ‘focus’ on Scan Toy, you will need to change the setting “focus_loan_page”. Go to Setup -> Administration, search for “focus_loan_page” and change the setting to No - Search Toy: if you don’t know the toy id, you can type in the name of the toy and select from the dropdown menu
Member’s Details
- Member’s id and name/s
- Expires: date when membership expires
- Balance: balance of the member’s account. If in red and has a minus sign at the beginning, the member owes that amount. Black, the account is in credit
- Value: this is the total cost of all the toys the member has hired or the amount the member has not had to spend purchasing the toys themselves. The cost will only be accumulated once for each toy hired so if the same toy is hired multiple times, the cost will only be added once. Great to share with members how much they save and the benefits of using a toy library.
Note, this will only be accurate if a cost has been added for the toys - Membership type
- Loan Period: how long toys are hired for, linked with membership type
- Max No Toys: maximum amount of toys a member can loan, again linked with the membership type
- Visits (cannot see above): this will only appear if a membership has limited number of visits.
It will look like this Visits: 2 of 3
A red alert box will appear when this member has reached their maximum visits.
It will look like this Alert! No more visits available - Children: name of the member’s child/ren and their ages and date of birth in brackets after
- Notes & Alert!: see Using the alert boxes in the Loan page for further explanation. If no alerts have been created this box will not appear
- Roster!: shows the date of the next duty the member is rostered on for. If no duties have been selected this box will not appear
Toy’s Details
- An image will appear of the toy if one has been saved otherwise it will be blank
- Toy’s id and name
- Looking at the image above you will see “657 On Loan: Capitan America & Baby Boss:”
657 is an allocated number used to identify/record this particular toy loan to this member. Each loan has its own number - Pink Box with a number: the member’s id number. Clicking this box, the member’s details will appear if not already
- Yellow Return box: another way to return the toy, click it to do so
- Rent: toy hire fee
- Alert!: see Using the alert boxes in the Loan page for further explanation. If no alerts have been created this box will not appear
The post Explaining the details at the top of the Loan page appeared first on MiBase New Zealand.
]]>The post How to loan a toy to a member appeared first on MiBase New Zealand.
]]>There are three ways to loan a toy:
- Barcode Scanner: if you are fortunate enough to have a scanner, all you need to do is scan the barcode on the toy label, hit Enter on the keyboard and the toy will be added to the toy loan list.
- Scan Toy: type in the toy id number and press Enter. The toy will be added to the toy loan list.

- Search Toy: type in the name of the toy and select from the dropdown menu.

The toy will appear next to the member’s details. You will need to click the yellow Loan Toy button for it to be added to the toy loan list.

The information listed for this toy will update and change as shown below.

A Successful Toy Loan
When you have loaned the toy, a Success message will appear above the table of listed toy loans.

An Unsuccessful Toy Loan
There are some cases where you will be unable to loan a toy and the system will block you.
- When you want to loan a toy that is already reserved

- When you are adding a toy id that does not exist

In these cases, the Loan Toy button will not appear and if you have used the Scan Toy search box, the system will block you to prevent mistakes.
Table of Listed Toy Loans
- id: the number to identify/record the loan
- Rent: toy hire fee
- Date: the date the toy was loaned
- Loaned By: the name of the admin or volunteer loaning the toy
- Green Return button: follow this link to see how to return toys
- Toy #: the toy id number, it will appear blue if there is an image for the toy, white if the toy does not have an image
- Toy Name: self-explanatory
- #: number of pieces in the toy
- Due: the date the toy is due. It will state when it is overdue and will appear in red
- Blue Edit button: by clicking this button, you can select a new loan date and/or a new due date.

- Green Renew button: follow this link to see how to renew toys
- Red Reserved box: follow this link to see how to loan reserved toys
Underneath the table of listed toy loans, you will see ‘Total toys on Loan’. The number 10 is the maximum amount of toys this member can hire out. So far they have only loaned 4 out of the 10 toys they are allowed.
If a member, however, would like to loan out more toys then their membership allows, you can override the settings by clicking the orange ‘Override OFF’ button before loaning the toy. It will change to ‘Override ON’. Click the button again to turn it off.

If you would like to offer the member free rent on a toy, click the ‘Free Rent OFF’ button before loaning the toy.
Remember to click it back on again once done otherwise every toy will be free.
The post How to loan a toy to a member appeared first on MiBase New Zealand.
]]>The post Emailing a toy loan receipt appeared first on MiBase New Zealand.
]]>It is as simple as clicking the yellow ‘Email Receipt’ button under the toy loans list.

The email is automatically sent and a Success message appears above the toy loan list

Email template
The first important step you need to do before using this function is to create/modify the email template called ‘email_receipt’.
Go to Setup -> Email Template and click the yellow edit button alongside it

Then change the content in the email and click ‘Save’
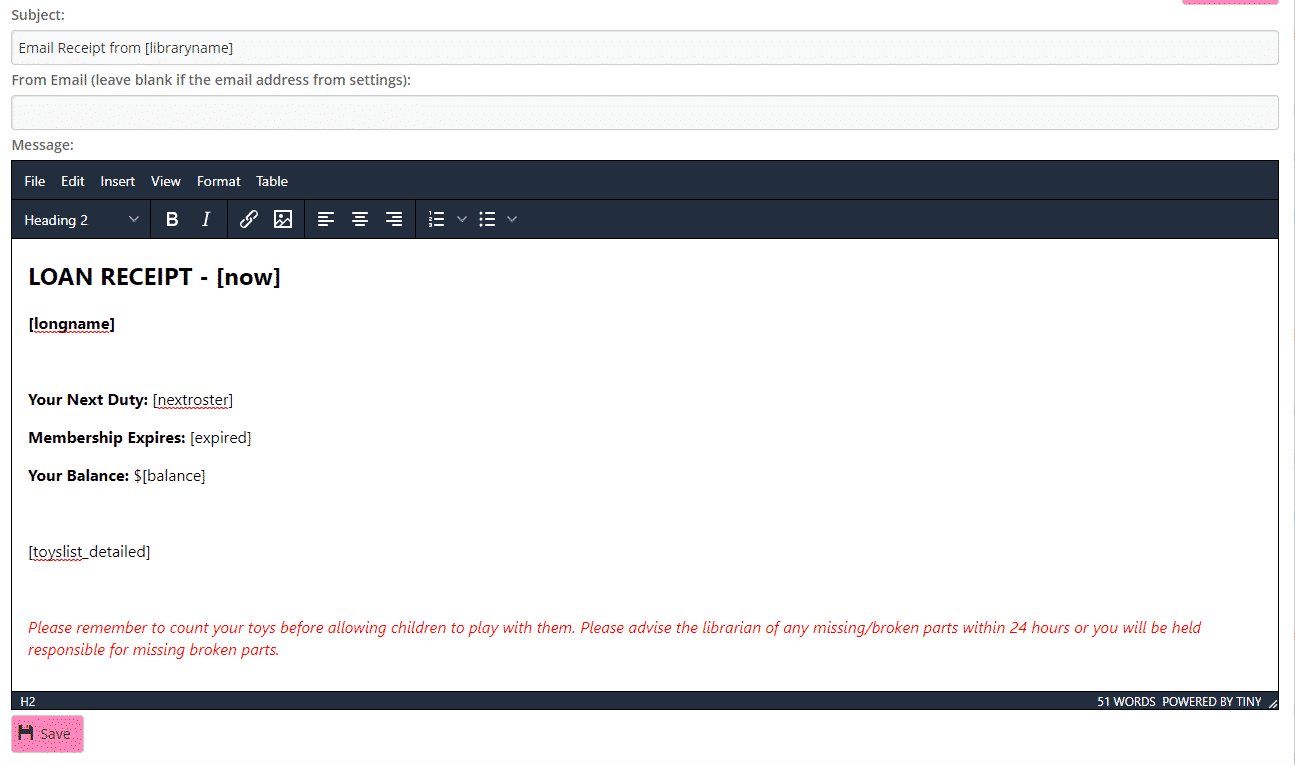
You can add any generic shortcode you would like displayed, for example, in the above email, you can see [longname] or [balance].
Look at our documentation here https://mibase.co.nz/knowledge-base/use-shortcode-in-the-email/ for the whole list of shortcodes.
Toy Loan List shortcodes
For the list of loaned toys inside the email you can use these specific shortcodes:
- [toyslist_pieces]: Toy on loan list with description

- [toylist]: Toy on loan

- [toyslist_detailed]: Toy on loan list very detailed

- [toyslist_small]: Toy on loan list small

- [toyslist_very_short]: Toy on loan list very short

The post Emailing a toy loan receipt appeared first on MiBase New Zealand.
]]>The post Printing a toy loan receipt appeared first on MiBase New Zealand.
]]>It is as simple as clicking the orange ‘Receipt’ button under the toy loans list, checking the settings in the print box that appears and clicking ‘Print’

Email template
The first important step you need to do before using this function is to create/modify the email template called ‘loan_receipt’.
Go to Setup -> Email Template and click the yellow edit button alongside it.

Then change the content in the email and click ‘Save’
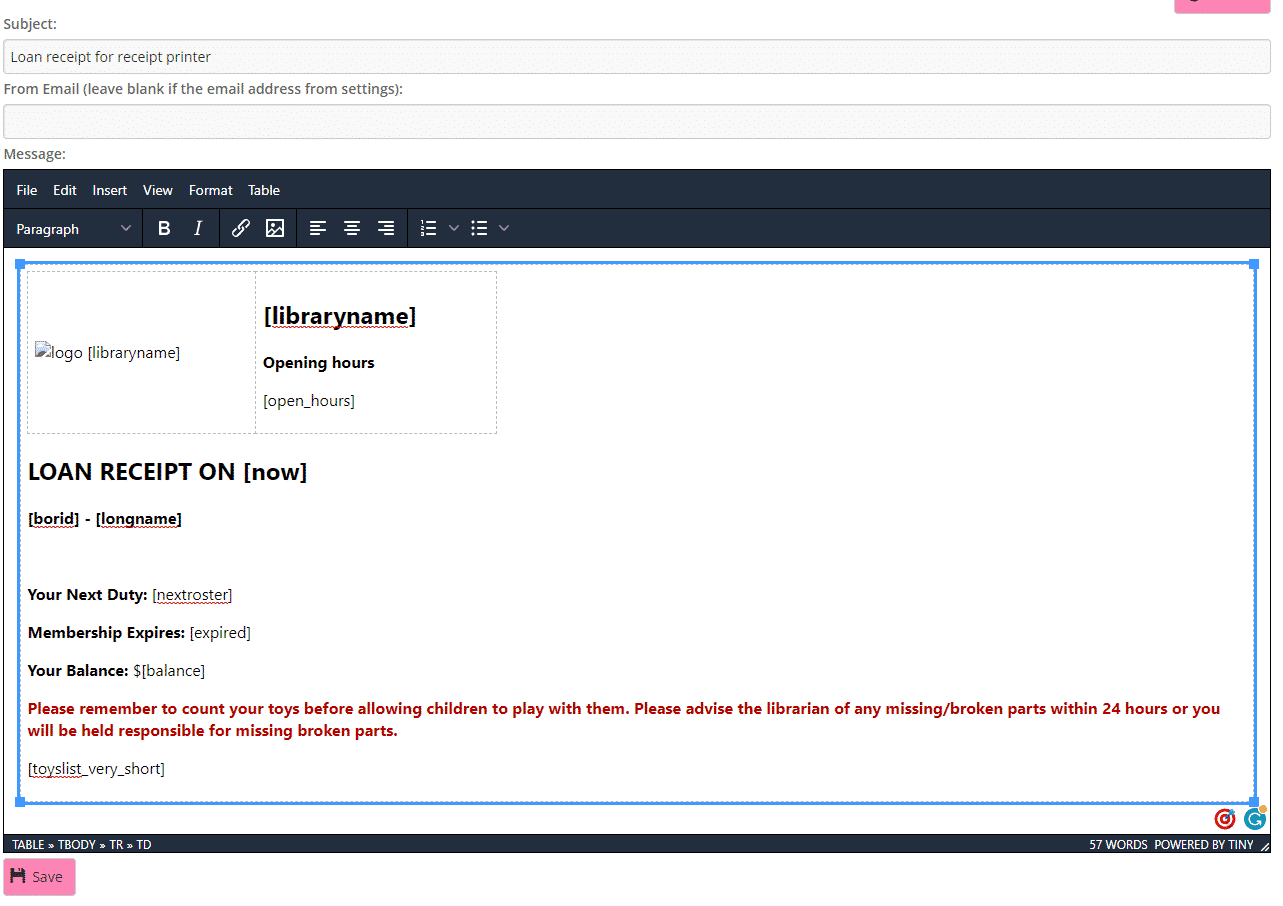
You can add any generic shortcode you would like displayed, for example, in the above email, you can see [longname] or [balance].
Look at our documentation here https://mibase.co.nz/knowledge-base/use-shortcode-in-the-email/ for the whole list of shortcodes.
Toy Loan List shortcodes
For the list of loaned toys inside the email you can use these specific shortcodes:
- [toyslist_pieces]: Toy on loan list with description

- [toylist]: Toy on loan

- [toyslist_detailed]: Toy on loan list very detailed

- [toyslist_small]: Toy on loan list small

- [toyslist_very_short]: Toy on loan list very short

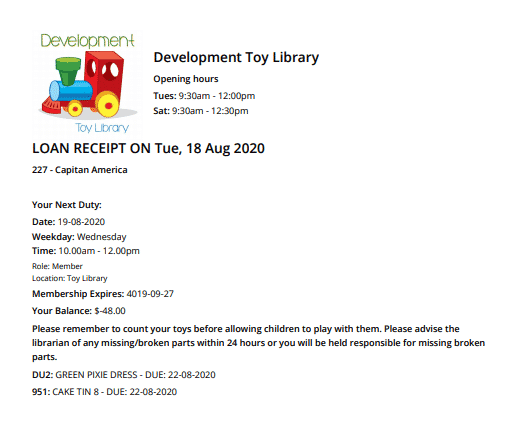
The result is:
The post Printing a toy loan receipt appeared first on MiBase New Zealand.
]]>The post How to loan a reserved toy to a member appeared first on MiBase New Zealand.
]]>
Click the yellow ‘Loan Toy’ button. The toy will be added to the Toy Loan list.
A blue Info and green Success message box will then appear above the list.
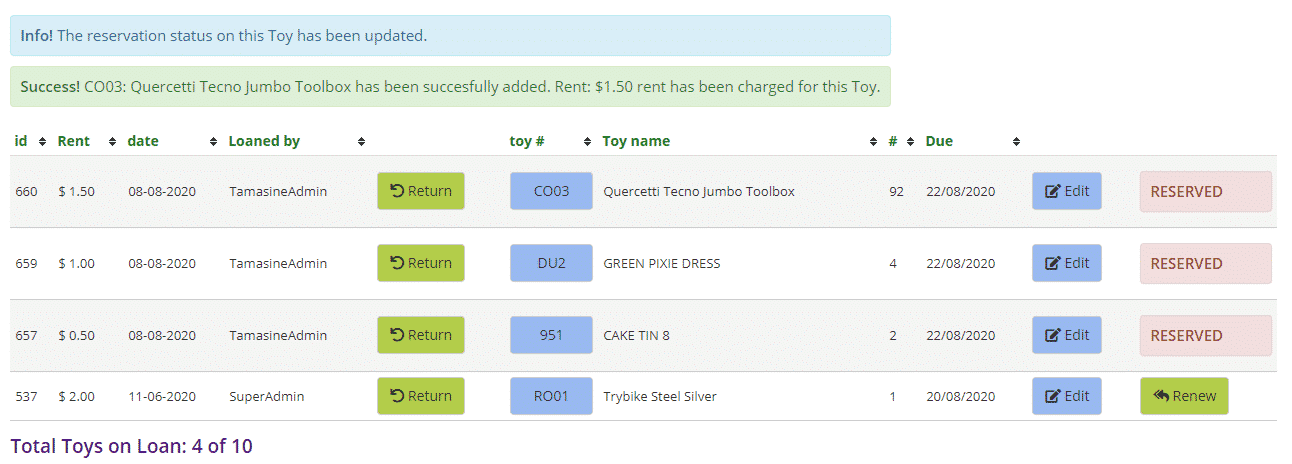
Once the toy is loaned and is on the toy loan list, the toy will disappear from the Reservation list.
The post How to loan a reserved toy to a member appeared first on MiBase New Zealand.
]]>The post Using the alert boxes in the Loan page appeared first on MiBase New Zealand.
]]>
To add an alert or note, simply type in the relevant box and click the Save button directly underneath.
Note, each save button only works for its individual alert or note.
Member Admin Note
The information in this box can only be seen by admin and appears in the member’s details at the top of the Loan page. It will also appear under ‘Admin Notes’ on the Member Detail page.
Member Alerts
The information in this box can be seen by both admin and member. It appears in the member’s details at the top of the Loan page in a red ‘Alert’ box, in the Member Detail page in a red ‘Alert’ box and it also appears on the member website on the member’s home page in a red box.
Toy Alerts
This alert only appears when the toy’s details are at the top of the Loan page. The details appear when a toy has been loaned or returned or you can click the toy’s id number in the toy loan list. The alert appears in a red ‘Alert’ box. It also appears on the Toy Detail page in a red ‘Alert’ box as well as on the public and member websites when you view the toy.
The post Using the alert boxes in the Loan page appeared first on MiBase New Zealand.
]]>The post How to override the loan period for holiday closures appeared first on MiBase New Zealand.
]]>The holiday mode needs to be set up a week before you are going to close or before you start hiring the toys for the holiday period.
Please note: these settings will only affect the due date of toys loaned after they have been changed. It will not update any due dates of toys loaned before the settings are changed. These due dates will need to be updated manually.
To set up the holiday mode, go to Setup -> Administration.

You will need to change 2 settings:

- #36: needs to change to Yes
- #47: is the date your library will open. The date must have the format mm/dd/yyyy. Once you have changed the setting, every toy will have this date as its due date
Once the settings are changed you must log out and then log back in again for the settings to take effect.
**Remember to change the settings back when you open again**
The post How to override the loan period for holiday closures appeared first on MiBase New Zealand.
]]>