The post Understanding and using the Payment System appeared first on MiBase New Zealand.
]]>Before you start using the Payments page it is important you create specific Payment Options for each of your membership types as well as for other forms of payments, for example, toy hire payments, missed duty fine, birthday bonus. This will not only make using the Payments page easier but it will also speed up the process. To find out how to Create Payment Options, follow the link.
To access the Payments page, click on the purple Payment button in the top menu. 
You will need to then select the member. There are two ways to do this. 
- Member id: type in the Member id number if you know it and press Enter on your keyboard.
- Search Member: search by name and select from the dropdown menu when it appears.
As you can see below, not only will you see all the transactions for this member but you will now be able to make a payment, and edit or delete them if necessary, and you will have the option to email or print a receipt for the member.
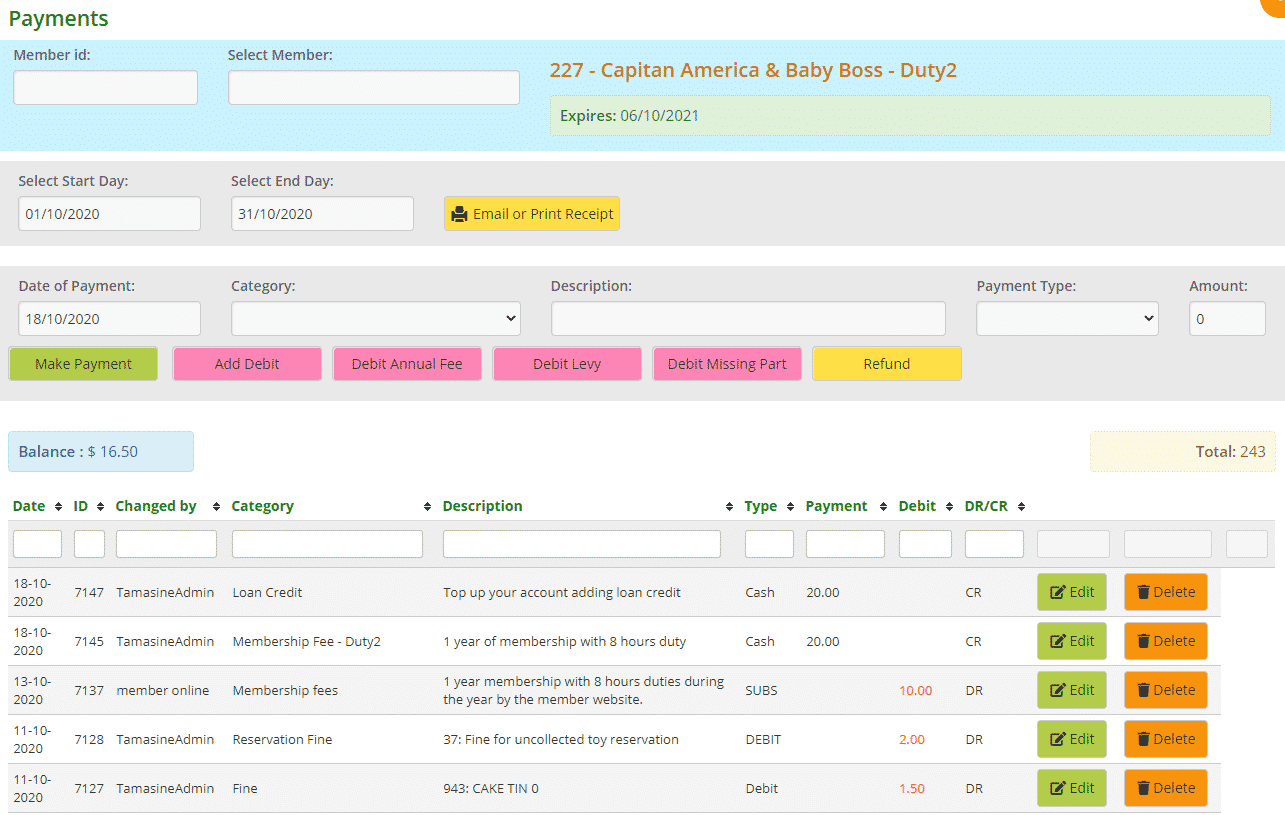
In the first grey row, you will see Select Start/End Day and the yellow Email or Print receipt button. To email or print a receipt for your member, a date range is required. Once selected, clicking the button will take you to the preview page. To learn more about being able to Email or Print a Receipt, please follow this link.
In the second grey row, this is where the payments are made for the member. To learn about these different transactions, please follow this link, How to make a payment. In the table underneath, you will see the green Edit button and the orange Delete button. Following this link will also explain these further.
Underneath these grey rows, you will see to the left the account Balance. If it is red, the member is owing.
To the right is the Total number of transactions the member has made for the entire duration of their membership with the library whether it has been one year or several (their “life” membership).
At the bottom of the table, you will see the word Total. The two figures alongside it are the total credits/payments and the total debits for this account for the entire duration of their “life” membership.
The post Understanding and using the Payment System appeared first on MiBase New Zealand.
]]>The post How to make a payment appeared first on MiBase New Zealand.
]]>There are two types of payments that occur on MiBaseNZ’s Payments page.
- Manual payments which warrant admin putting them through
- Automatic payments which once set up, MiBaseNZ automatically processes
Manual Payments
For Manual Payments to work, you need to make sure you have set up your Payment Options. Once this is done, Manual Payments should be quite quick and easy to do.
Follow this link to find out how to make Manual Payments in the Payments page.
Automatic Payments
Automatic payments are linked with various settings, pages and buttons within MiBaseNZ and will automatically occur when activated or selected.
Follow this link to find out about each type of Automatic Payment and how and when it appears in the Payments page.
You also have the option of editing a payment or if there has been a mistake, deleting a payment.
You will see next to every transaction on the Payment page a green Edit button and an orange Delete button.

Editing a payment
To edit a payment for whatever reason you decide whether its to add more details, change the amount or payment type, you just need to click the Edit button and make the changes. You can either type in the fields or select another option from the dropdown menus. Once done, click Save.

A Success message will appear.

Deleting a payment
If an incorrect payment has been made you could either refund the payment or simply just delete it. It is a two-step process to firstly, avoid accidentally clicking the Delete button and losing all information, and secondly, give you the option of recording a reason as to why you are deleting the payment.
Click the Delete button, add a reason and click Delete.

A Success message will appear.

The post How to make a payment appeared first on MiBase New Zealand.
]]>The post Manual Payments appeared first on MiBase New Zealand.
]]>Go to the Payments page and select your member, if they are not there already. Go to the second grey row. You will see the following fields and buttons. 
Description of the fields:
- Date of Payment: automatically auto-fills today’s date but you can change it if you forgot to record a payment prior to that
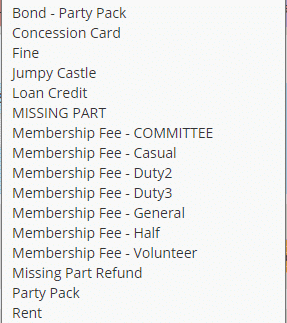
- Category: select from the dropdown menu the type of payment you are making. Once you have made a selection, the next three fields/headings will automatically update according to the payment option you created for this category. Below are some examples
- Description: automatically updates if a description was added in the Payment Options page otherwise you can type in your own description or edit the one that has been added
- Payment Type: automatically updates if a payment type was added in the Payment Options page otherwise you can select another option from the dropdown menu
If you forget to select a Payment Type before clicking one of the payment buttons an alert box will appear
 Note: to add or delete Payment Types from this dropdown menu, follow this link, Payment Types – add or delete, to find out how to do so
 - Amount: automatically updates if an amount was added in the Payment Options page otherwise you can use the arrows to change the amount or just type in another amount
Description of the payment buttons:
- Make Payment: click this if the member is paying money for fees or toy hire, for example
- Add Debit: click this if the member is being charged or fined for something. The payment type will always appear as DEBIT
- Debit Annual Fee: when adding or renewing a member and the system doesn’t work for some reason you can always click this button to add the fee. The payment type will always appear as SUBS
- Debit Levy: if you would like to create a levy for a certain membership, for example, a member doesn’t show up for duty, you need to make sure this field is completed in the Membership page otherwise the payment won’t work and the below warning will appear
 To edit the membership, go to Member -> Membership and click the edit button alongside the membership you would like to add a levy to. Add the amount in the Bond/Levy field
This is further explained in these two articles, How important is the Membership Page and Creating a New Membership - Debit Missing Part: when a missing part has been added and a member is allocated it should automatically add the fine to their payment page. If this does not happen then this button can be used to add the fine to the account
- Refund: this button can be used for a number of reasons. For example, a member no longer wishes to continue their membership or a toy isn’t what they expected. Before clicking this button, however, you will need to choose a category and check the description, type and amount fields are correct
How to make a payment
Step 1:
Select the payment you are making in the Category dropdown box. Review the information in the Description, Payment Type and Amount fields. Make changes if necessary.
Step 2:
If you are happy with the information added in the fields, select and click the appropriate button to complete the payment. The Make Payment, Add Debit and Refund buttons will only work if the fields have been filled in otherwise this Warning message will appear.  The Debit Annual Fee, Debit Levy and Debit Missing Part buttons do not need the fields to be filled in, they are linked with certain settings in the system as explained above.
Once you have clicked the appropriate button, the payment will be added to the list/table underneath and the Balance and Totals will update accordingly.
Examples of how each payment button appears in the list/table
You will see the last column for each payment will either have DR for debit or CR for credit. The payment amount for debits will be red, credit will be black. A Success message will also appear when the payment goes through as shown under each of the examples below.
- Make Payment:


- Add Debit:


- Refund:


- Debit Annual Fee:


- Debit Levy:


- Debit Missing Part: you will see after clicking this button, a yellow Refund button will appear.
 If the member returns the missing piece, clicking this Refund button will automatically credit the fine back to the member.
  No success message appears for this payment
The post Manual Payments appeared first on MiBase New Zealand.
]]>The post Automatic Payments appeared first on MiBase New Zealand.
]]>There may be some occasions when these Automatic Payments do not work. If this does happen you will need to manually add them. Please refer to the article Manual Payments for further information. Listed below are the different Automatic Payments MiBaseNZ provides.
Membership Fee
The most important automatic payment is the membership fee. When a new member is added or a membership is renewed, the membership fee will automatically be added to the member’s account/payments page.
It will appear in the table as shown:
- Category: Membership Fees or Renew
- The description depends on what you have added when setting up your Membership Types
- Payment Type: SUBS

If you have not already Set up your Membership Types please follow this link. When adding or renewing a member and the system doesn’t work you can click the Debit Annual Fee button on the Payments page to add the fee.
Loaning a Toy
If your library has a toy hire fee when loaning a toy in the Loan page the rent will automatically appear in the Payments page.
It will appear in the table as shown:
- Category: Rent
- The description will be the toy id and name
- Payment Type: Debit

The amount debited from the member’s account will depend on the Toy Cost you allocated when adding the toy to the system. The amount also depends on the Membership Type, is the rent free, normal, double or half?
Overdue Toy Fee
If your toy library chooses to charge your members an overdue toy fee you will need to activate the setting.
If you have not done this already please follow this link Activating the Fine System.
When an overdue toy is returned either via the Loan page or the Return page, the fee will automatically appear on the Payments page.
It will appear in the table as shown:
- Category: Fine: Late fee
- The description will be the toy id and name
- Payment Type: Debit

The amount debited from the member’s account all depends on the Fine Amount you allocated when setting up the fine system.
When returning an overdue toy on the Return page, if you use the Search Toy Name field, you will see the Fine Status. This does not appear when using the Toy ID nor will you see this on the Loan page.

Missing Parts Fee
If a member returns a toy with missing or broken pieces, it will need to be recorded.
If you do not know how to do this, follow this link How to record missing parts to see how.
When you record a missing or broken piece, you can allocate the member responsible for it and add the fee if your toy library chooses to have one. When you click Save, the fee will automatically appear on the Payments page.
It will appear in the table as shown:
- Category: Fine: Missing Part or Fine: Broken
- The description will be the toy id and details of the missing part
- Payment Type: Fine

As you can see from the image, a yellow Refund button appears. If the member returns the missing piece, clicking the Refund button will automatically credit the fine back to the member. For toys/pieces that have been broken, however, the Refund button will not appear, as seen below.
![]()
If the system does not work and the fine is not automatically added to the member’s Payment page, you can click the Debit Missing Part button to add the fine to the account. This function will work only on the last missing pieces added.
The post Automatic Payments appeared first on MiBase New Zealand.
]]>The post Emailing or printing a payment receipt appeared first on MiBase New Zealand.
]]>Note: If you are using the Member Website, you can direct your members to view their payments on the Transaction page when they log into their account.
Go to the Payments page by clicking on the purple Payment button in the top menu.

Once you have selected a member, the first thing you will see underneath the member’s name is a grey row with Select Start/End Day fields and the yellow Email or Print Receipt button.
To email or print, a receipt for this member, a date range is required before clicking the button.
Selecting the date range
Depending on what the member would like, you can send or print a receipt just for today, for the last week, for the month, whatever they would like. All you need to do is add in the start date and end date by clicking the fields/boxes and choosing the date from the calendar. See the example below.
 If you need to just send or print for today, the start and end day need to be the same.
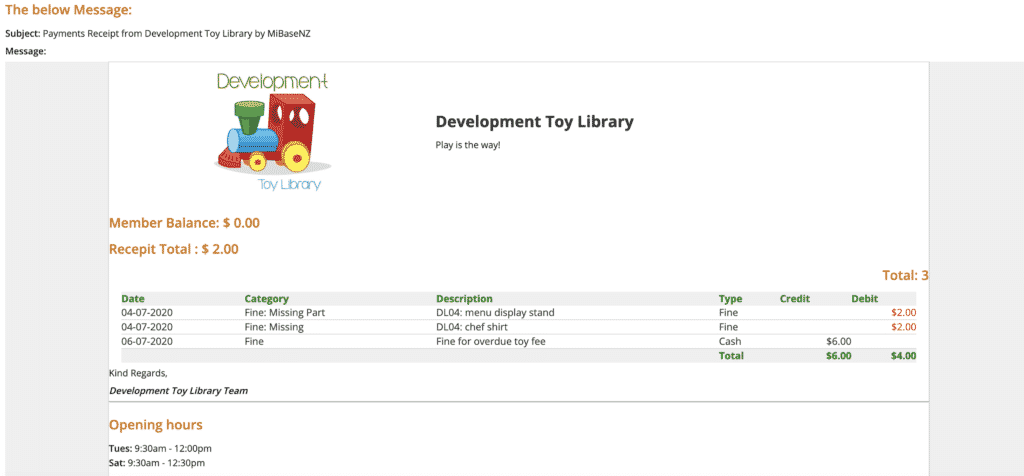
Once you have selected the date range, click the yellow Email or Print Receipt button. You will then be taken to the preview page, as seen below. From here you can decide if you want to print or email the receipt.
Send the receipt by email
If you would like to send the payment receipt by email, click the yellow Send Email Receipt button. Underneath the button, the below result will appear.
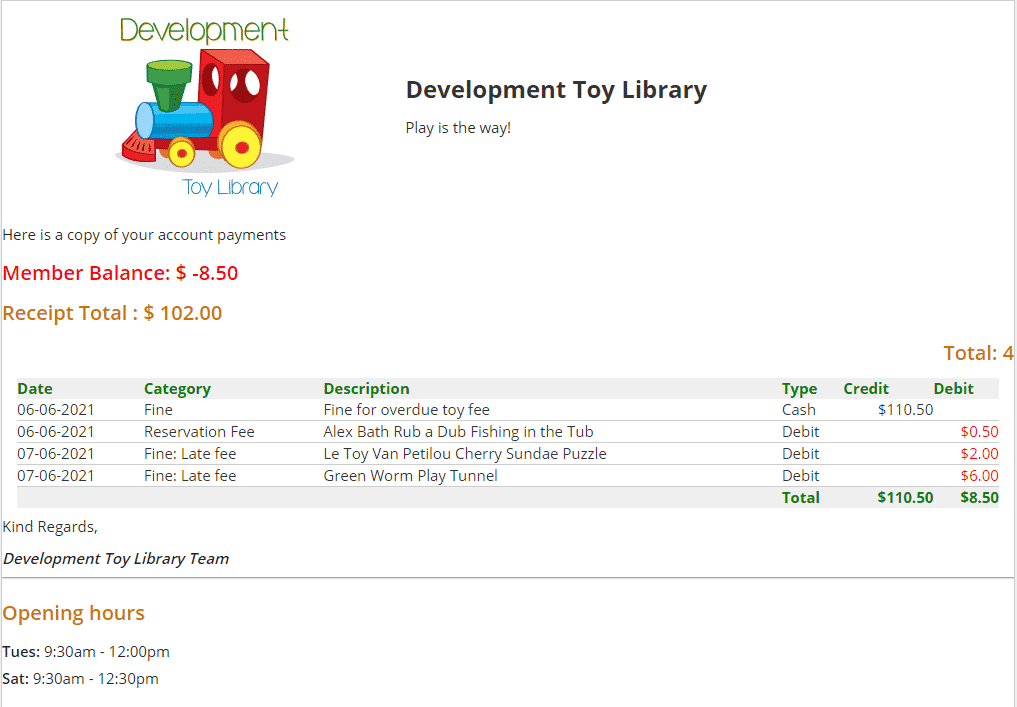
The member will receive the email like this:
Printing the receipt
If you would like to print the receipt to give to the member, click the orange Print Receipt button.
MiBaseNZ will then create a PDF that automatically downloads to your device which you can then print. The PDF receipt will look like the example below.
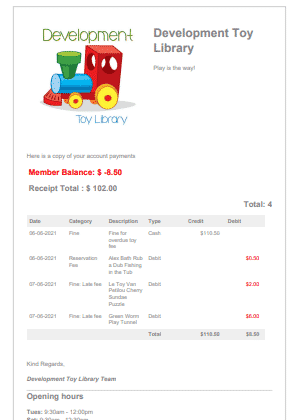
Email Template
The first important step you need to do before using this function is to create/modify the email template called ‘Payments_Email’.
Go to Setup -> Email Templates and click the yellow edit button alongside it.

Then change the content in the email and click Save.
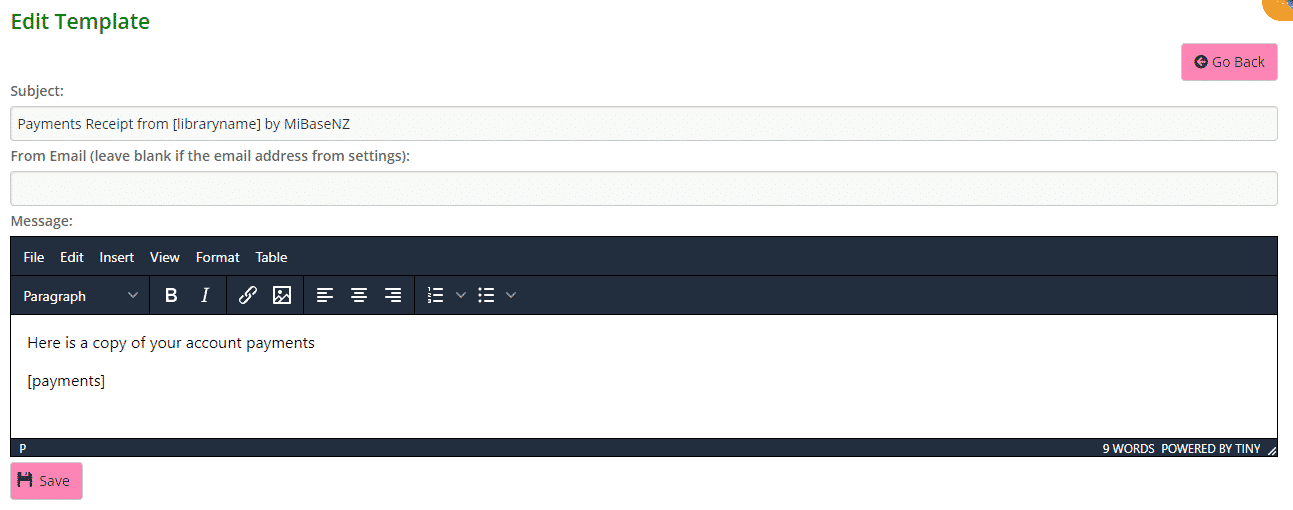
You can add any generic shortcode you like to the email. In this case, there is none however if you would like to see what you could add, follow this link to view our full list of shortcodes.
Payments shortcode
For the member to see their list of payments, you will need to ensure the shortcode [payments] is added as shown above.
It will have the member’s balance, the receipt total, and the list of payments according to the date range.
It will look like this:

The post Emailing or printing a payment receipt appeared first on MiBase New Zealand.
]]>The post De-activating Overdue Fines appeared first on MiBase New Zealand.
]]>You will only need to do this until all toys have been returned that were hired over the closed period.
If these toys are not returned relatively quickly, however, the fine system will need to be turned back on for toys that have been hired since opening. If this needs to happen, then the fines can be deleted manually.
To de-activate MiBaseNZ’s fine system, go to Setup -> Administration

Type in ‘fine’ in the Description search box.
The setting is called recordfine. Click on the Edit button and select No from the dropdown menu. Click Save.
You will then need to log out and log back in again to update the setting change across the system. 
If you have already had toys returned and members have been charged overdue fines, you can delete these manually. To do this click the Payment tab in the top menu bar.
Type in the member’s name or ID for their payments page to appear. 
Scroll down and find the fine. Click Delete.

Type in the reason for deleting the payment and click Delete.

The fine will no longer appear on the member’s payments page and the fine will be deleted from the account balance. If there are multiple fines, you will need to delete them individually.
**Remember to turn the fine system back on when all the toys have been returned**
The post De-activating Overdue Fines appeared first on MiBase New Zealand.
]]>Go to Member -> Payment Type
The post Payment Types – add or delete appeared first on MiBase New Zealand.
]]>Go to Member -> Payment Type Here you can see a list of the different payment types.
To remove a payment type, click the orange Delete button alongside it.
If you would like to add a new payment type, click Add New. 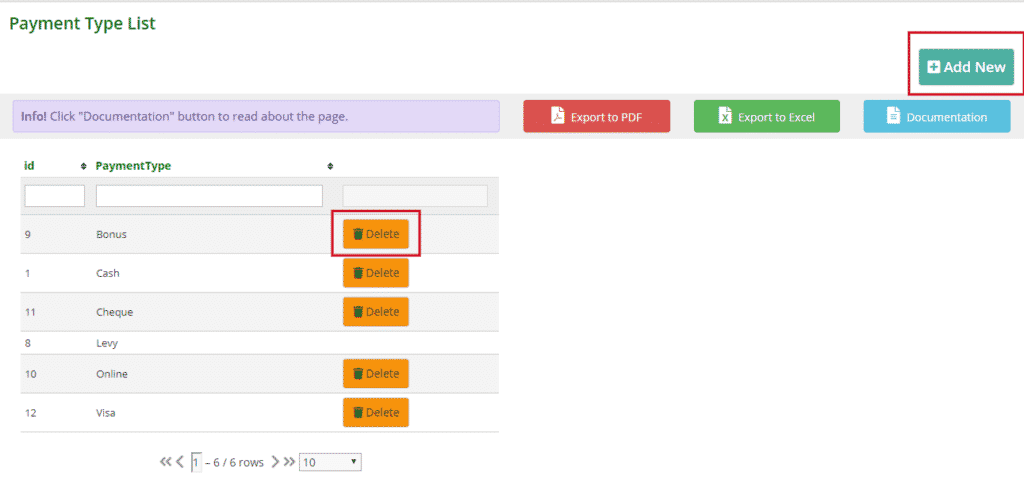 Type in the payment and click the pink Add a New Payment Type button underneath.
  You will see the Success message appear. An Error message may appear if there is a problem.
  When you click OK you will be taken back to the Payment Type List page. Once you have finished adding all payment types, you are ready to Add Payment Options.
The post Payment Types – add or delete appeared first on MiBase New Zealand.
]]>The post Creating Payment Options appeared first on MiBase New Zealand.
]]>The most important Payment Option would be for your memberships, creating a separate one for each membership you have entered in MiBaseNZ.
Other Payment Options may include toy hire payment or account credit, fines, or bonuses, whatever you would like.
Go to Member -> Payment Option 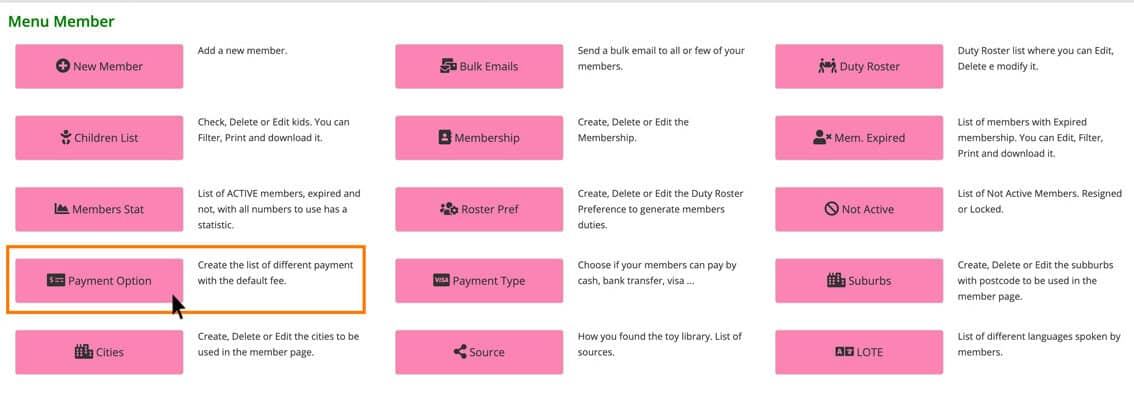
Click the button to the right Add New 
All fields on this page need to be completed. 
- Category: the payment category, for example, Membership Fee or Fines. This will speed up the payment registration during the toy library session as the option can be quickly selected from the dropdown menu.
- Type Payment: cash, internet, bank transfer…
- Description: insert an extensive description of the payment to avoid any confusion in the future as to why that payment happened
- Default Amount: the default amount for the payment option. Insert the number only, do not insert $. This amount can be changed in the Payment page if need be, however for example if a missing part fine is always $5, this will be the default amount.
Once you have finished filling in all the data, click the pink Add a New Payment Option button. You will see the Success message appear or if there is a problem, the Error message. ![]()
Click OK and you will be taken back to the Payment Option List page.
Examples of Payment Options 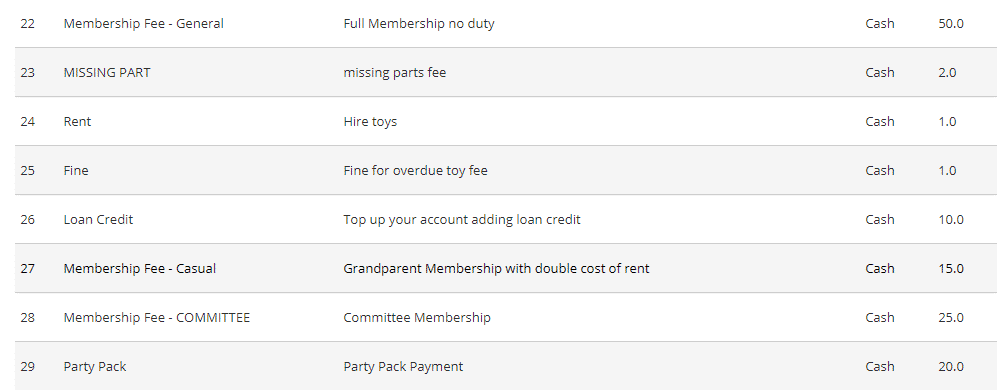
The post Creating Payment Options appeared first on MiBase New Zealand.
]]>