How Can We Help?
As has already been explained in Understanding and using the Payments System and How to make a payment, for Manual Payments to work, you need to have set up your Payment Options. Once this is done, Manual Payments should be quite quick and easy to do.
Go to the Payments page and select your member, if they are not there already. Go to the second grey row. You will see the following fields and buttons. 
Description of the fields:
- Date of Payment: automatically auto-fills today’s date but you can change it if you forgot to record a payment prior to that
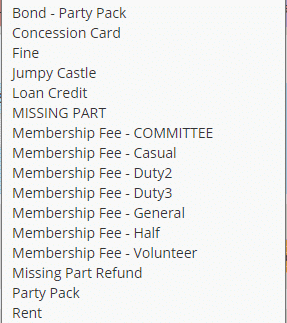
- Category: select from the dropdown menu the type of payment you are making. Once you have made a selection, the next three fields/headings will automatically update according to the payment option you created for this category. Below are some examples
- Description: automatically updates if a description was added in the Payment Options page otherwise you can type in your own description or edit the one that has been added
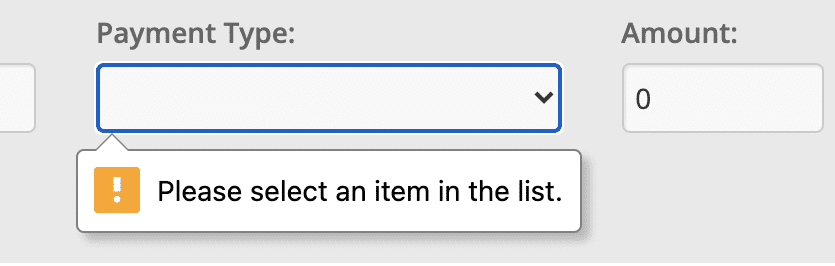
- Payment Type: automatically updates if a payment type was added in the Payment Options page otherwise you can select another option from the dropdown menu
If you forget to select a Payment Type before clicking one of the payment buttons an alert box will appear
 Note: to add or delete Payment Types from this dropdown menu, follow this link, Payment Types – add or delete, to find out how to do so
 - Amount: automatically updates if an amount was added in the Payment Options page otherwise you can use the arrows to change the amount or just type in another amount
Description of the payment buttons:
- Make Payment: click this if the member is paying money for fees or toy hire, for example
- Add Debit: click this if the member is being charged or fined for something. The payment type will always appear as DEBIT
- Debit Annual Fee: when adding or renewing a member and the system doesn’t work for some reason you can always click this button to add the fee. The payment type will always appear as SUBS
- Debit Levy: if you would like to create a levy for a certain membership, for example, a member doesn’t show up for duty, you need to make sure this field is completed in the Membership page otherwise the payment won’t work and the below warning will appear
 To edit the membership, go to Member -> Membership and click the edit button alongside the membership you would like to add a levy to. Add the amount in the Bond/Levy field
This is further explained in these two articles, How important is the Membership Page and Creating a New Membership - Debit Missing Part: when a missing part has been added and a member is allocated it should automatically add the fine to their payment page. If this does not happen then this button can be used to add the fine to the account
- Refund: this button can be used for a number of reasons. For example, a member no longer wishes to continue their membership or a toy isn’t what they expected. Before clicking this button, however, you will need to choose a category and check the description, type and amount fields are correct
How to make a payment
Step 1:
Select the payment you are making in the Category dropdown box. Review the information in the Description, Payment Type and Amount fields. Make changes if necessary.
Step 2:
If you are happy with the information added in the fields, select and click the appropriate button to complete the payment. The Make Payment, Add Debit and Refund buttons will only work if the fields have been filled in otherwise this Warning message will appear.  The Debit Annual Fee, Debit Levy and Debit Missing Part buttons do not need the fields to be filled in, they are linked with certain settings in the system as explained above.
Once you have clicked the appropriate button, the payment will be added to the list/table underneath and the Balance and Totals will update accordingly.
Examples of how each payment button appears in the list/table
You will see the last column for each payment will either have DR for debit or CR for credit. The payment amount for debits will be red, credit will be black. A Success message will also appear when the payment goes through as shown under each of the examples below.
- Make Payment:


- Add Debit:

- Refund:

- Debit Annual Fee:


- Debit Levy:


- Debit Missing Part: you will see after clicking this button, a yellow Refund button will appear.
 If the member returns the missing piece, clicking this Refund button will automatically credit the fine back to the member.
  No success message appears for this payment
