The post Setting up the Booking System Module appeared first on MiBase New Zealand.
]]>MiBaseNZ has created this Booking System to allow admin, members and the public to be able to book a time to visit your toy library. This module is not linked with the Reservation System so toys do not need to be reserved to use it.
Note: if you have the Click and Collect module, you will not need this module.
Before you can start using this system, you will need to complete three steps first.
Step 1
Ensure your toy library’s opening times have been set up correctly. To learn how to do this read the article Days and Times page. Once set up, these opening times will be seen by admin, members and the public when they go to book a time to visit.
Step 2
Set up the Booking System. To do this go to Reserve -> Booking System

Click on the Settings and content button.

There are six settings to change.
To make these changes click the Edit button alongside each setting, use the arrows or type in your preference and click Save.
Once the settings are changed you must log out and then log back in again for the settings to take effect.
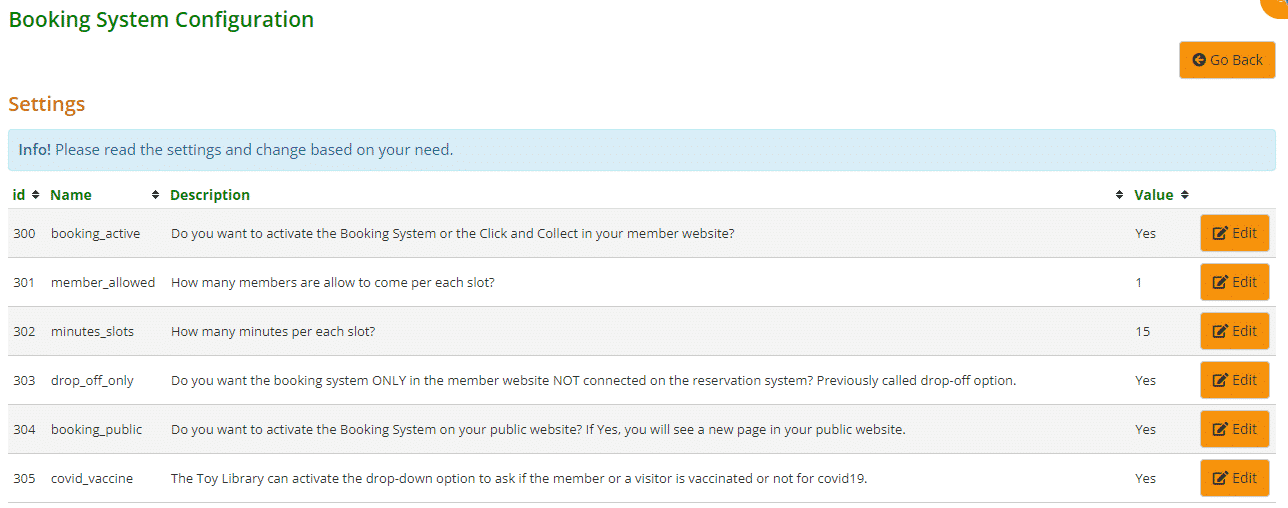
- #300: select Yes for the booking system to be activated
- #301: decide how many members you would like per time slot
- #302: decide how many minutes you would like to allocate to each time slot
- #303: select Yes if you do NOT want the Booking System to be connected to the Reservation System on the Members Website
- #304: select Yes for the booking system to be active on the Public Website
- #305: select Yes to activate the drop-down menu asking members or visitors if they are vaccinated
Select the Go Back button to take you back to the Booking page.
With this part of the setup complete, the module has now added the Booking System page on your Member Website and Public Website, if you have selected this option.

Step 3
Personalise your Booking System page. To do this you will need to edit the title and content of the Member/Public website content page listed under the settings. Once you have made the changes click Save.
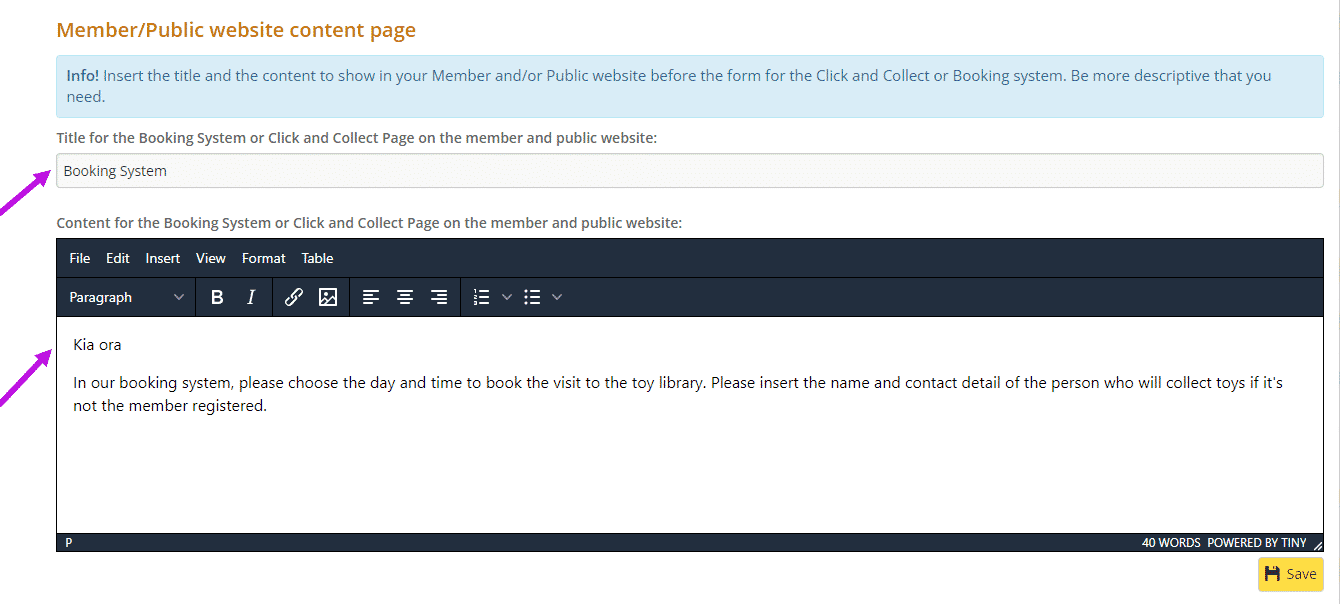
This will automatically update the Member and Public Website and the title and content will appear on the Booking System page.
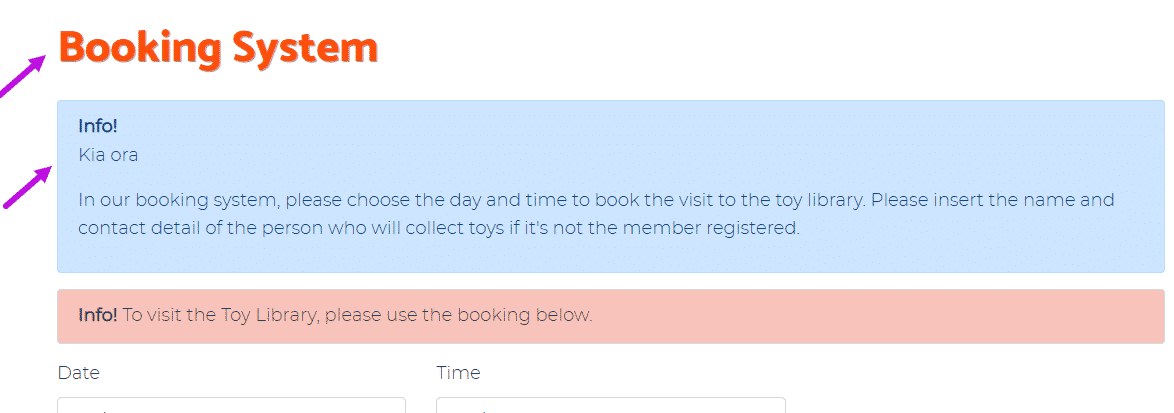
Now that you have set up the Days and Time page and the Booking System page, you are ready to make a booking. The following three articles will tell you how to use the booking system on the Admin Website, Member Website and Public Website.
How to use the Booking System in the Admin Website
How to use the Booking System in the Member Website
How to use the Booking System in the Public Website (article coming soon)
The post Setting up the Booking System Module appeared first on MiBase New Zealand.
]]>The post How to use the Booking System in the Admin Website appeared first on MiBase New Zealand.
]]>Simply go to Reserve -> Booking System

You can see on this page a list of all the bookings made by admin, by members from the Member Website and by visitors on the Public Website.
You can delete a booking by clicking the yellow ![]() Delete button alongside it.
Delete button alongside it.
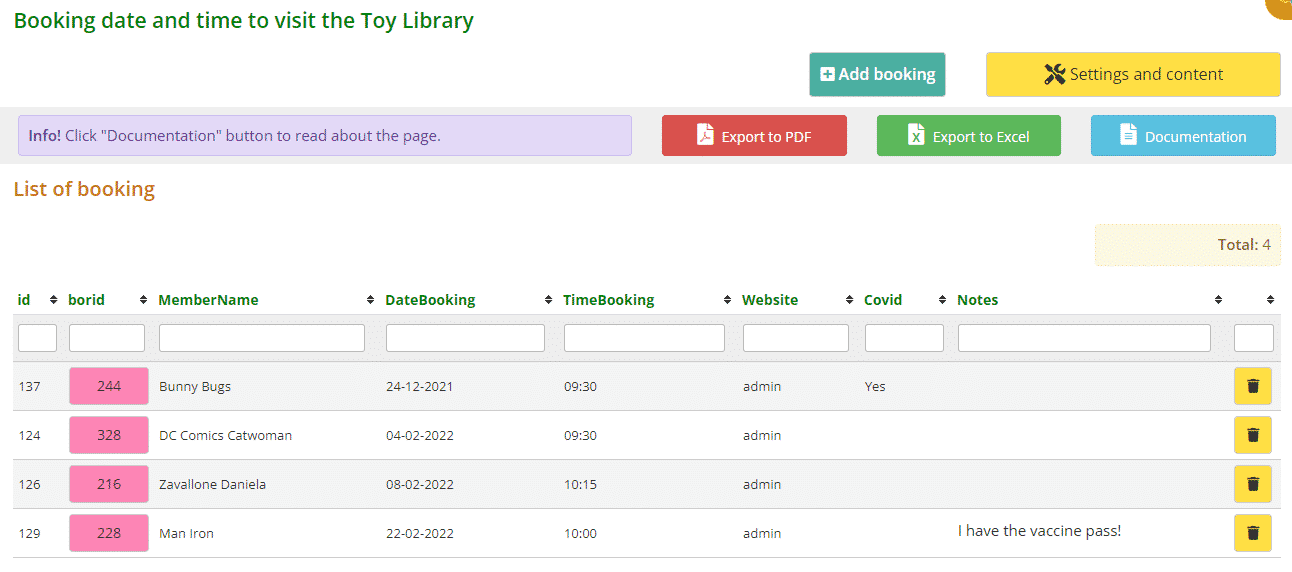
To add a new booking, click on the Add booking button.
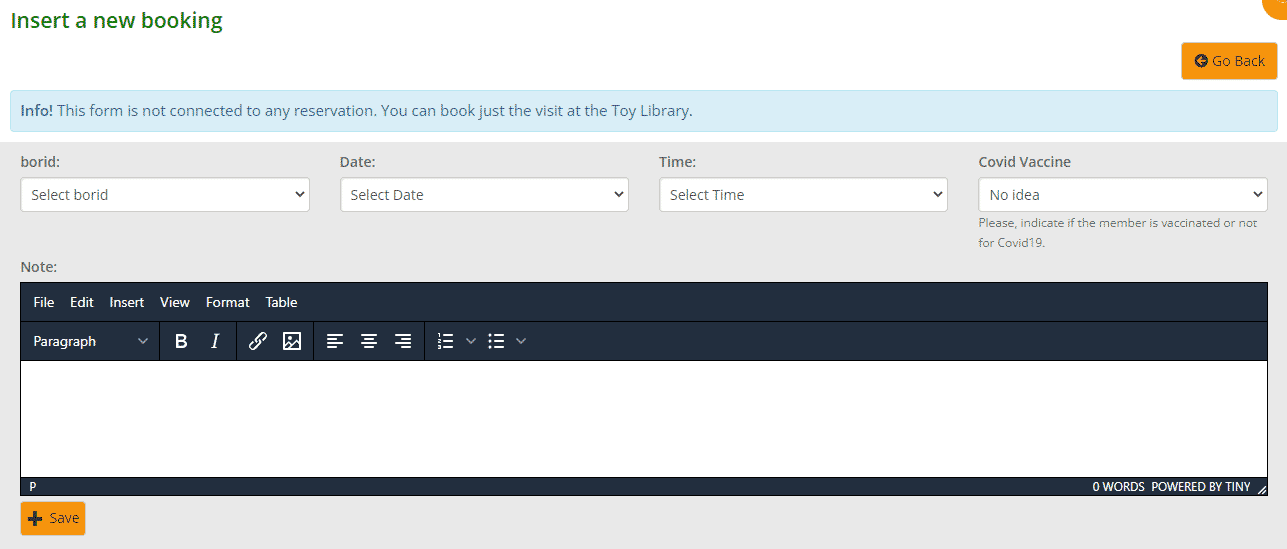
Fill in all fields from the dropdown menus:
- Borid: lists all your members. Select the member you are making the booking for
- Date: select a date
- Time: lists the time slots that were set up in the Settings and content page, choose a time
- Covid Vaccine: select an option relevant to the member
- Note: type in any notes you think are relevant
Remember, the note will show up on the Member Website on the My Library page under Bookings
Click Save once all fields have been completed.
You will see the Success message appear underneath. An Error message may appear if there is a problem.
Click Go Back and you will be taken back to the Booking date and time page.
Your booking will now be added to the Booking List. If it is a rather long list, you can search for the member by typing the name in the “MemberName” box.
You can also sort this list by the categories listed depending on your preference. Click the arrows next to the category you want to sort the list by.
You can also download/print the list to PDF and/or Excel by clicking the Export to PDF or Export to Excel buttons.

The post How to use the Booking System in the Admin Website appeared first on MiBase New Zealand.
]]>The post How to use the Booking System in the Member Website appeared first on MiBase New Zealand.
]]>Step 1
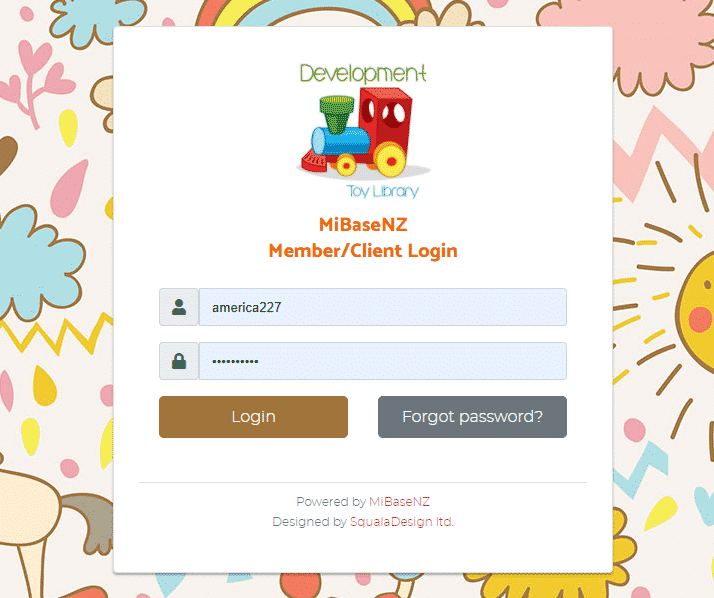
Log in to the Member Website using their login details.
Step 2
Select Booking at the top of the page.
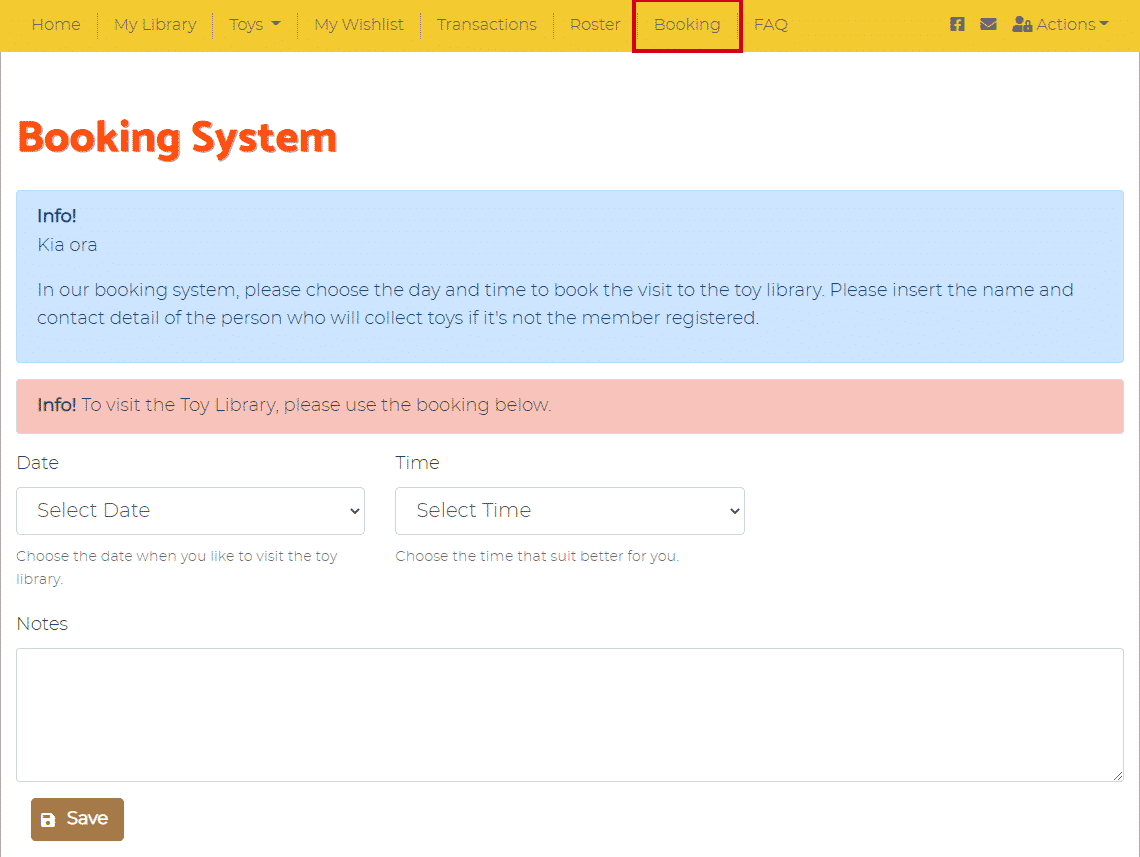
Fill in all fields from the dropdown menus
- Date: select a date to visit the library
- Time: select a time to visit the library
Note – if there are no times available it means all time slots have been taken for that day and the member will need to select another date - Notes: type in any notes they think are relevant
Click Save once all fields have been completed. They will see the Success message appear underneath. An Error message may appear if there is a problem.

Step 3
Select My Library at the top of the page.
Scroll down to Booking. They will now see a list of all their bookings.
If a member has made a mistake or would like to change the booking, they will need to delete the booking by clicking the yellow Delete button alongside it and start from Step 2 again.
Once a member has made a booking, a confirmation email will be sent to their email address.
Admin can edit this template to their liking by going to Setup -> Email Templates and editing the template “click_collect_booking “. For more information read the article Booking Confirmation – Email template.
An email will also be sent to the toy library email address informing admin a new booking has been registered.
The post How to use the Booking System in the Member Website appeared first on MiBase New Zealand.
]]>The post How to use the Company as a Member module appeared first on MiBase New Zealand.
]]>If you are reading this because you are interested in the Company as a Member premium module, feel free to contact us or read more on the Premium Module Page.
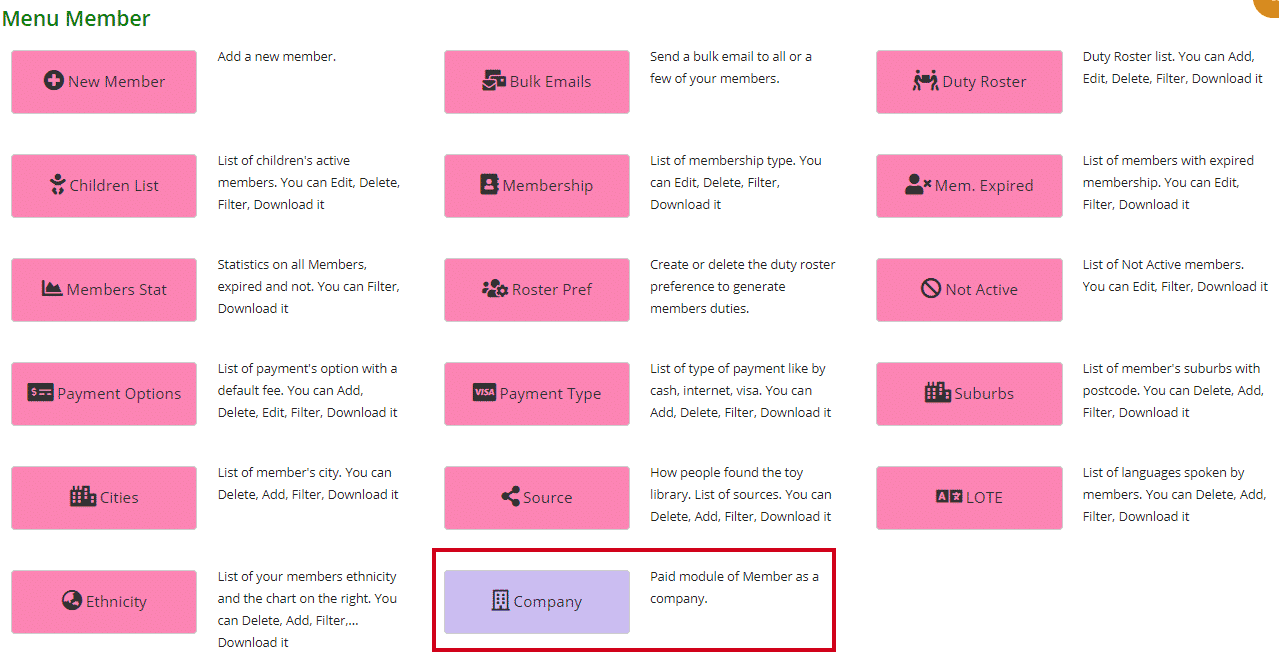
This module will allow toy libraries to add a company such as childcare, a recreation centre or a school to their list of members.
Once the module is activated and set up, all you will need to do is add your companies and once added they can use MiBaseNZ just like your members. The only difference between the companies and the members is that the Company List is separate from your toy library’s Member List.
Follow the link to see where the Company List can be accessed.
Follow the link to see how to Add a New Company.
Follow the link to view a Company’s Detail page.
Follow the link to see how to Edit a Company’s details.
Follow the link to see how to Renew a Company’s Membership.
Follow the link to view Expired, Resigned or Locked Companies.
Follow the link to view the Member Website – different home page.
The post How to use the Company as a Member module appeared first on MiBase New Zealand.
]]>The post Company List – separate from Member List appeared first on MiBase New Zealand.
]]>Resigned or lock companies can be seen on the Not Active page. Read the following article Resigned or Locked Company for further information.
The Company List can be accessed from two places:
- Go to Member -> Company
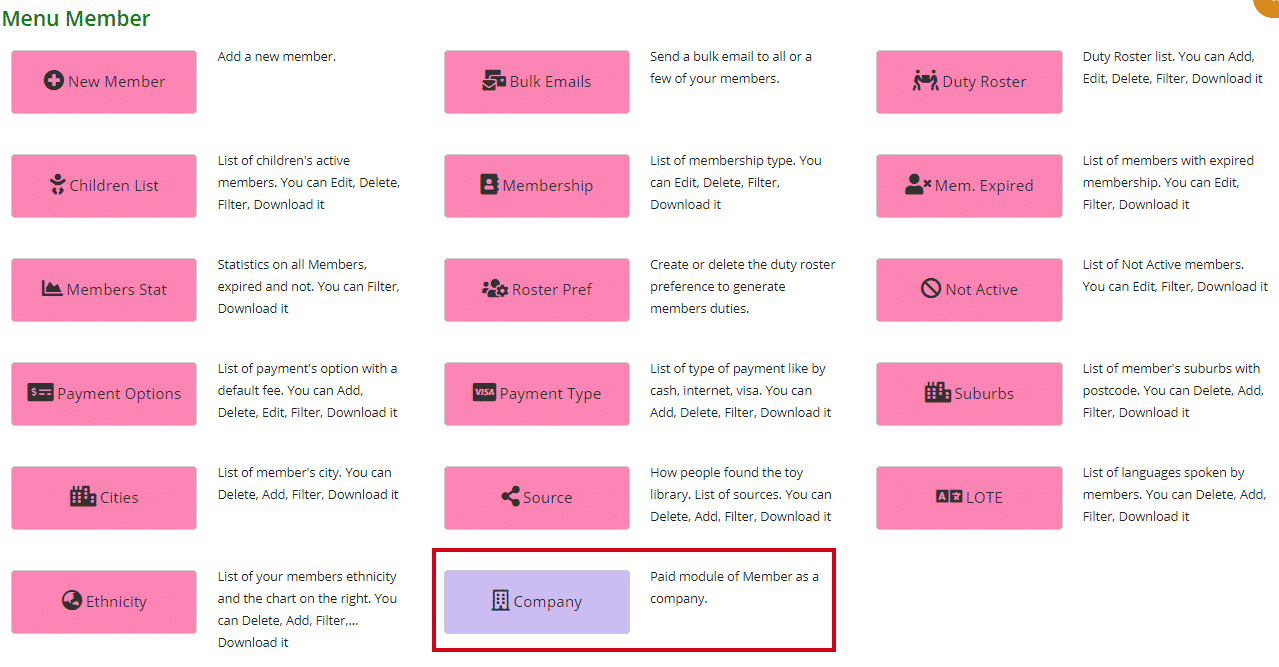
- Via the Home page
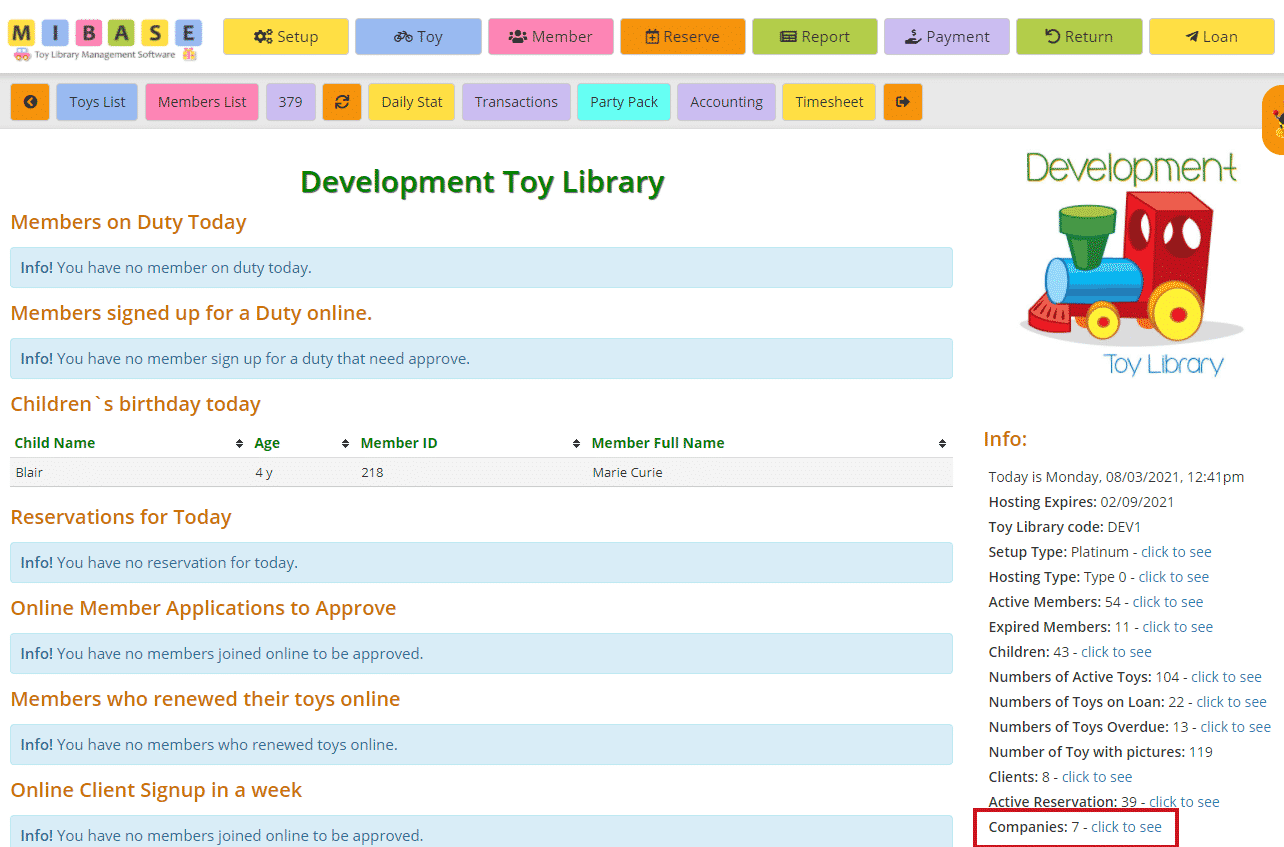
At the top of the page, you can see an Add New button. If you would like to add a new company, click this button. For further information, follow the link Add a new Company.
Underneath this, you will see three buttons; Export to PDF, Export to Excel, and Documentation.
If you would like to download the Company List you can select to PDF and/or Excel by clicking the relevant buttons. This will export the full list, not a filtered list. If you want to download a filtered list, export it to excel and sort or filter through there. The Documentation button gives you a little summary of the page.
The total number of members is displayed in the top right corner above the table.
You can also sort or filter the list by clicking the arrows next to the heading you want to sort or filter the list by or just type in the search boxes underneath the headings.
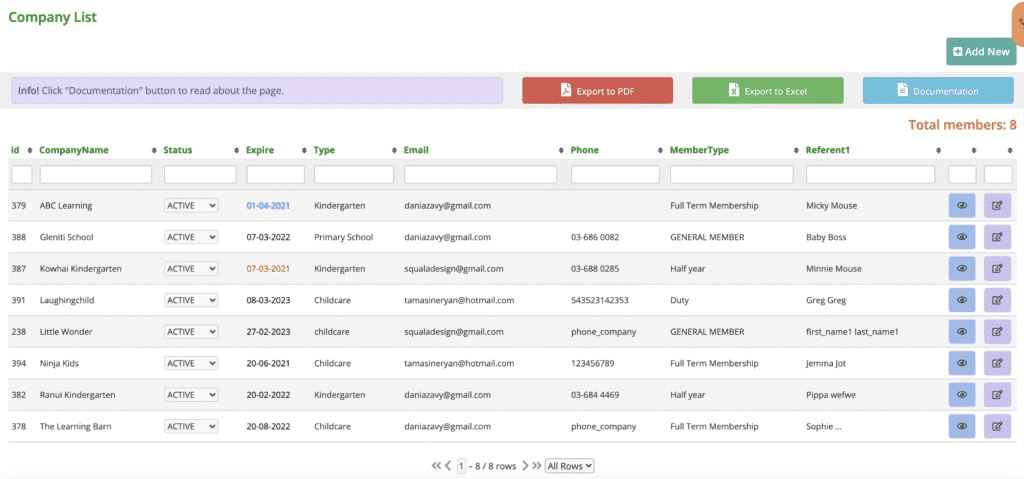
So, looking at the above list, you can see the following information for each company:
- id: the company’s id number.
- CompanyName: the company’s full name
- Status: all these companys’ statuses will be Active however if you need to change a member’s status to locked or resigned you can select either option from the dropdown menu.
- Expire: the date the membership expires. If the date is blue, it means the membership will expire in a month or less, if it’s red the membership has expired.
- Type: the type of establishment of the company
- Email address
- Phone number
- MemberType: membership type
- Referent1: this is the name of the first referent for the company
To view the company’s full list of details, click on the blue View button.
To edit or update the member’s details, click on the purple Edit button.
The post Company List – separate from Member List appeared first on MiBase New Zealand.
]]>The post Add a New Company appeared first on MiBase New Zealand.
]]>Go to Member -> Company and click Add New
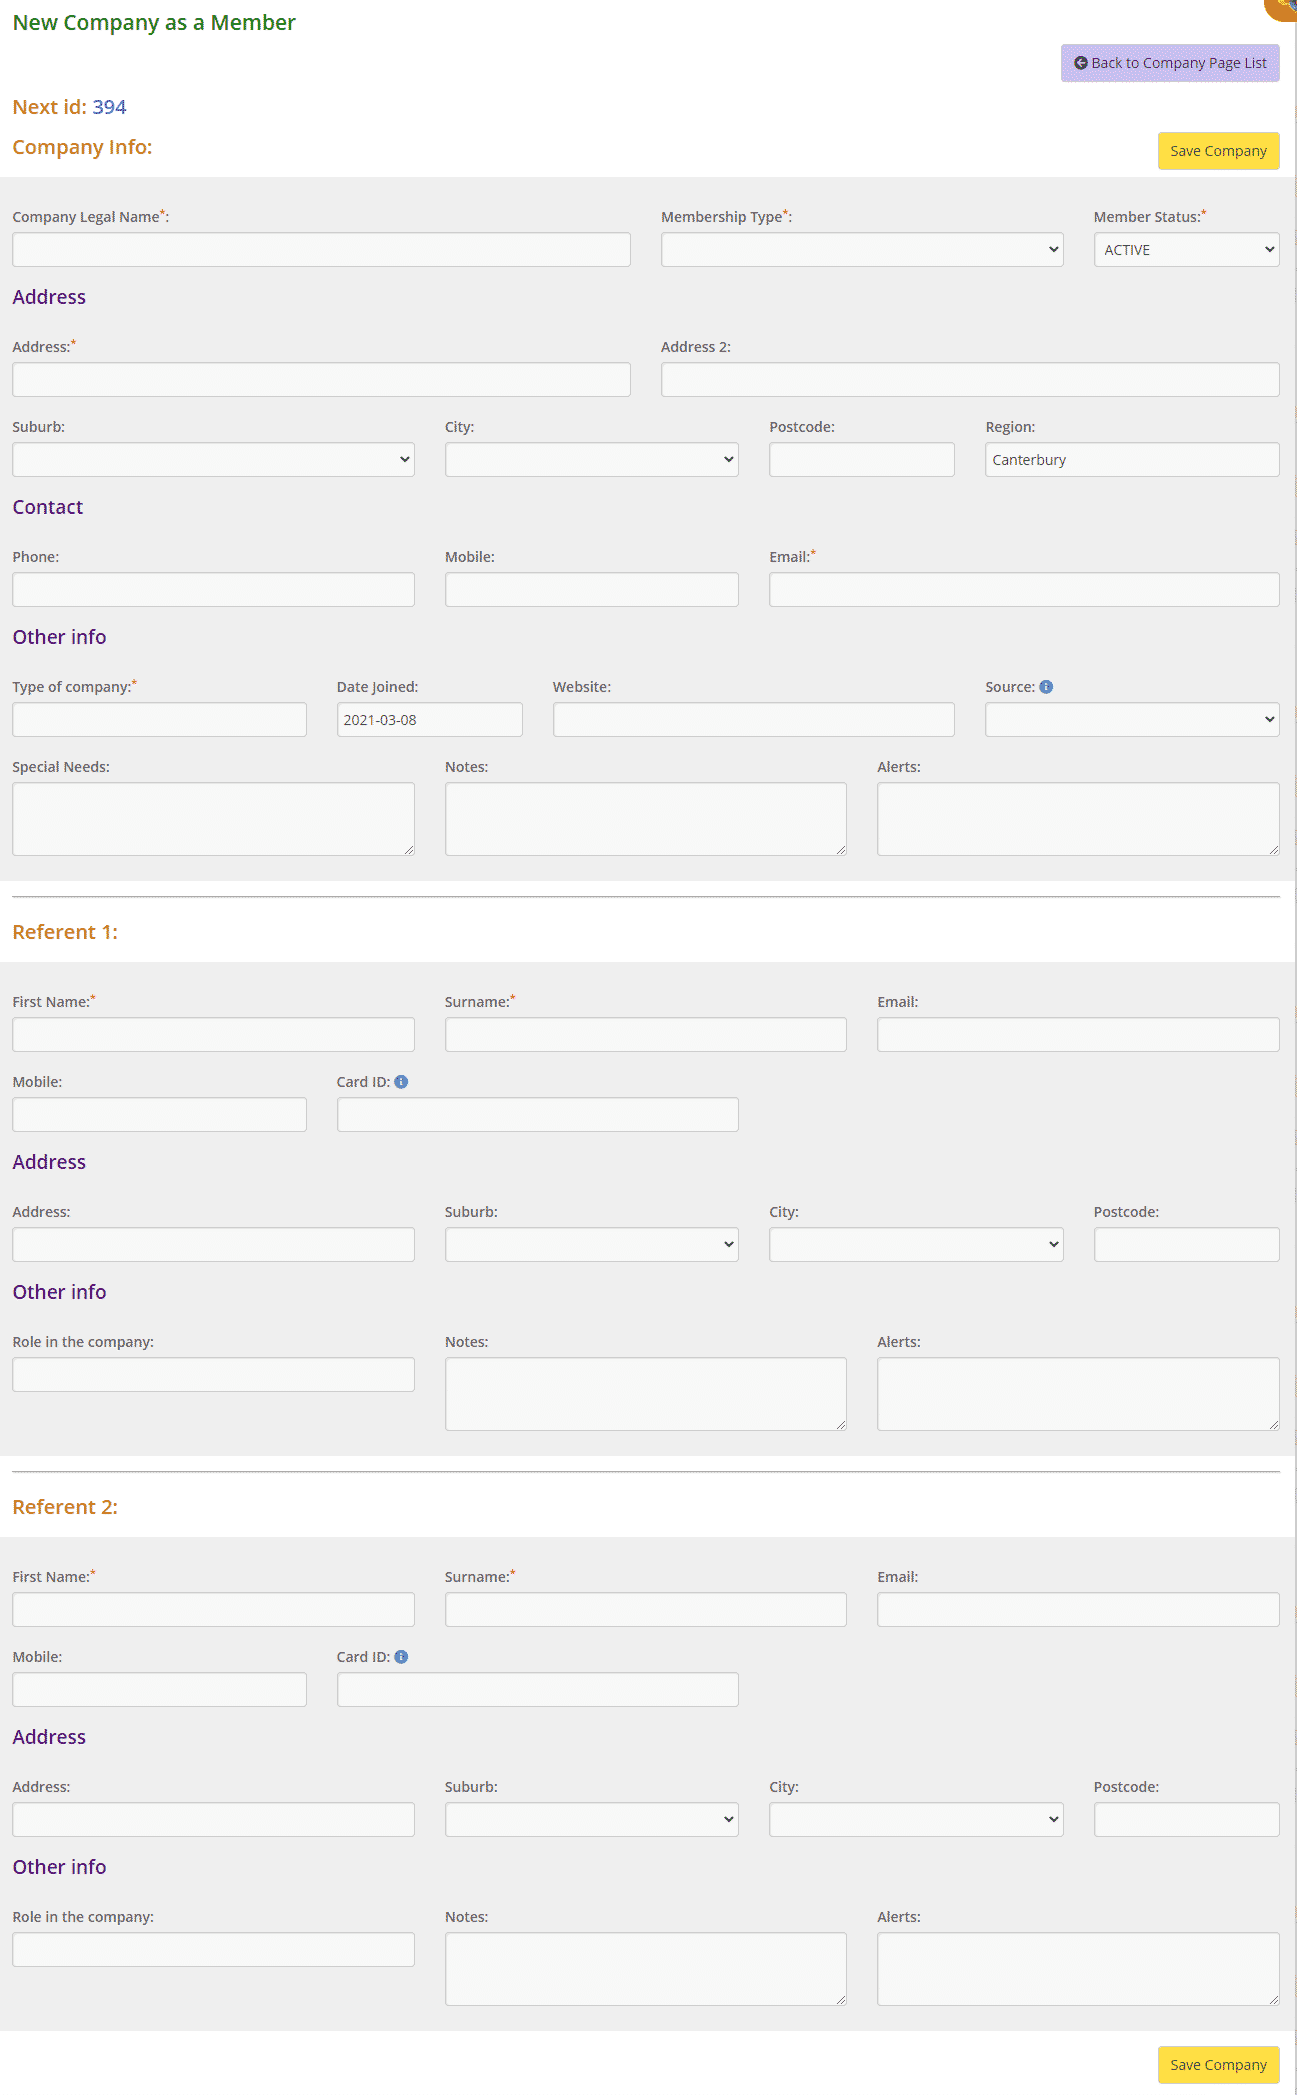
This page has a lot of areas to complete. Some are mandatory (*) and others depend on what your toy library would like to use/fill in.
Points to be aware of:
Company info:
- Company Legal Name – this is mandatory
- Membership Type – this is mandatory. Select from the dropdown box the membership the company would like. If you would like to create a new one, go to this link Create a new Membership to do so
- Membership Status – this is mandatory. This will always default to Active
Address:
- Address – this is mandatory
- Suburb – choose a suburb from the dropdown box. If you need to add another, follow this link Suburbs – create, delete or edit to do so
- City – choose a city from the dropdown box. If you need to add another, follow the link Cities – add or delete to do so
- Region – this is completed already based on the default region you have chosen in the admin setting. If you have not set this up yet, follow this link How to set up a Default Region to do so
Contact:
- Email – this is mandatory
Other info:
- Type of company – this is mandatory, some examples are Childcare, Kindergarten, Primary School, Play Centre, Hospital, etc…
- Date Joined – this automatically fills in the current day’s date
- Source – choose a source from the dropdown box. If you need to add another, follow this link Sources – add or delete to do so
Referent 1/2:
- First Name and Surname – these are mandatory. These are the two people who will hire and return the toys for the company
Once you filled in all the data, click the Save Company button.
Note: if you have not completed the mandatory fields, when you click Save Company, a pop-up box will appear to remind you to complete what you have missed.

Once saved you will then see information relevant to the company you have added and that they have been successfully saved. The Membership fee added can be seen on the company’s Payments page.

If you click Send Welcome Email, you will be taken to the Welcome Email template. At the bottom of this page, click the button Send Welcome Email.
If you click OK, you will be taken back to the Company Detail page.
The post Add a New Company appeared first on MiBase New Zealand.
]]>The post Company Detail page appeared first on MiBase New Zealand.
]]>Just like the Member Detail page, there are a number of ways to access a company’s detail page:
- With a new company, this is created once the details have been saved, a success message appears with a box saying OK, and once this is clicked it will take you to the page.
Follow this link for more information on Adding a New Company - Once a new company is added, in the second menu next to Members List, the company’s ID number will appear, clicking that will take you to their detail page
 Note: a company’s ID number is purple, a member’s ID number is pink
 - With a company already in the system, go to Member -> Company, find the company you are wanting to view and click the blue View button alongside it

- Throughout the various pages related to companies in MiBaseNZ, you will come across company ID buttons, when clicked will take you to their detail page, for example in a toy’s detail page, when a toy is on loan to someone
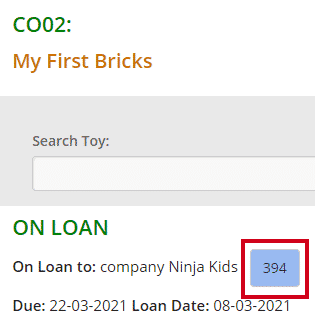
Once you view a company’s detail page, their ID number will appear in the second menu bar next to Members List, as mentioned above. If you decide to go to the Loan page or Payments page their details will automatically appear.
Once you are on the Company Detail page, you will see there is a bit of information. We will break it down into sections and explain it in more detail below.
Company Contact
This is a list of all the information that has been saved for this company either when adding new or when updating/amending in the Edit Company as a member page.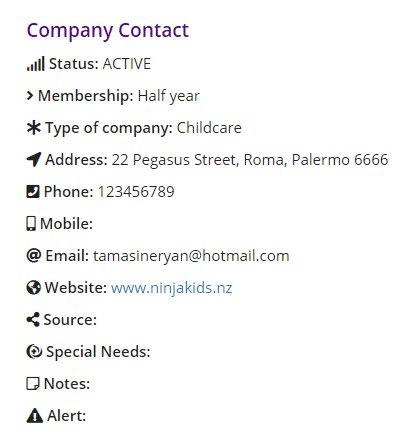
Referent 1 & 2
The same as above, these are the details of the two referents for the company which has been saved either when adding new or when updating/amending in the Edit Company as a member page.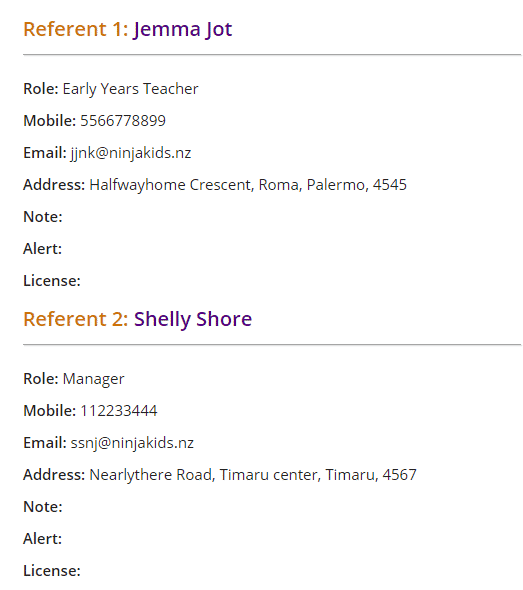
Member Information
The pink Edit button, when clicked, will take you to the Edit Company as a member page where you can change their details.
Next to that is the Send Welcome Email button. Clicking this will take you to the email page where you can view the email before scrolling down and clicking send.
Underneath that is the membership information as well as the login details for the Member Website.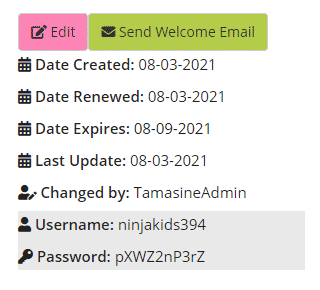
Section with lists
Toy on loan
Here you will see the list of toys the company is currently hiring. By hovering your mouse over the blue button, the image of the toy will appear. Clicking the button will take you to the toy’s detail page.

Reservation Active
This is a list of current reservations for the company. These can be made by admin or the company’s referents can do it for themselves in the Member Website.
The reservation can be deleted by clicking the pink Delete button. It can also be deleted in the Reservation List page or the company’s referents can do it for themselves in the Member Website under the My Library page.

Important! This section will be visible only if the Reservation system is active in MiBaseNZ.
Missing Pieces
A list of pieces the company has lost when hiring a toy. The company can also see this list on the Member Website.

Toy loan’s history
A list of all the toys the company has hired out since starting with the toy library.

- #: number allocated for each loan made to this company
- id: the number allocated to identify/record the loan
- Date: day the toy was loaned
- Toy#: self-apparent. Hovering your mouse over the green button, the image of the toy will appear. If the button is white, it means the toy has no image. Clicking the button will take you to the toy’s detail page.
- ToyName: self-apparent
- Due: day the toy was due back
- Returned: the day the toy was returned
- Overdue: the number of days the toy is on loan. If the number is black, that is the number of days left till it is due back. If the number is red, that was the number of days the toy was overdue
- Delete button: clicking this button will permanently remove the toy from the list
The post Company Detail page appeared first on MiBase New Zealand.
]]>The post Editing a Company’s Detail page appeared first on MiBase New Zealand.
]]>There are two ways to access the Editing Company page:
- When a new company has been added, in the second menu next to the Members List button, the company’s id number will appear, clicking that will take you to their details page
 On the company’s detail page there is a pink Edit button. Clicking this will take you to the Editing Company page

- With a company already in the system, go to Member -> Company, find the company you are wanting to edit in the Company List and click the purple Edit button alongside it

You will see all the areas that have been filled out. The only information that is mandatory for this page is the fields with the red asterisk (*) next to it. The rest is up to the company to disclose if they wish.
Your toy library will probably require much more information than that so it is up to you to ask for this information from your companies when they sign up.
This page lists exactly the same fields as the Add a New Company page. Follow the link for more detailed information for each field.
The only difference between the pages, however, is the Renew Member button and the five fields under Other info outlined below.


- Renew Member button: clicking this button will renew the company’s membership. Follow this link, Renewing a Company’s Membership, for further information
- Date Renewed: the most recent date the membership has been renewed. This date will be the same as the date joined if it is a new company
- Date Expired: the date the membership expires
- Last Update: the last date and time the company’s details had been edited
- Username/Password: the company’s login details for the Member Website. It is best to not change either the username as it is quite specific to the member or the password for privacy reasons.
The post Editing a Company’s Detail page appeared first on MiBase New Zealand.
]]>The post Renewing a Company’s Membership appeared first on MiBase New Zealand.
]]>- Companies can do it themselves on the Member Website
(only if your toy library is using the Member Website and has changed the setting to make this possible) - Admin can do it on the admin website
Admin Website
Go to Member -> Company and find the company you wish to renew in the Company List and click the purple Edit button alongside it.

You will be taken to the Editing Company page. To the right of the page, you will see an orange Renew Member button, click that and the membership automatically renews based on the current information listed for that member.

A Success message will appear with the membership fee amount, new expiry date and the button Send Renew Membership Email if this option has been set up in your system.
Follow this link Membership Renewal email if you would like to see how.

Clicking OK will take you back to the company’s detail page.
Clicking Send Renew Membership Email will take you to the send email page. Scroll down to the bottom you will see the button Send Renew Email, click that to send the email.
The membership fee amount added will be seen on the company’s payment page. To see this click the Payment button in the top menu. You will see the fee added and the account balance will adjust accordingly.

If you go back to the Editing Company page, you will see under Other info, the new expiry date field will have updated.
The company wants to change its membership type
If a company wants to change its membership type, this will need to be updated first and saved before renewing the membership. The reason being is when the renewal membership fee is added, it will add the old membership type and not the new. If this does happen, however, it can be manually changed on the Payments page by clicking the green Edit button next to the payment.
To change the membership type simply go to the Editing Company page, the second field is the Membership Type, select from the dropdown menu.
Click Save Company.

A green Success message will appear. Clicking OK will take you to the Company Detail page.
Click the pink Edit button and then the Renew Member button.
Member Website
If your toy library is using the Members Website, you can also set up the option of allowing your members to renew their own membership when it expires.
To do this go to Setup -> Members and type in online_renew in the Name search box. Change the setting to Yes if you would like members to be able to renew their own membership by clicking the Edit button and making the change.
Once this is done, when the membership is due to expire in a month or has expired, the company will see on their Home page, once they have logged in, a red Renew Now button under their details.
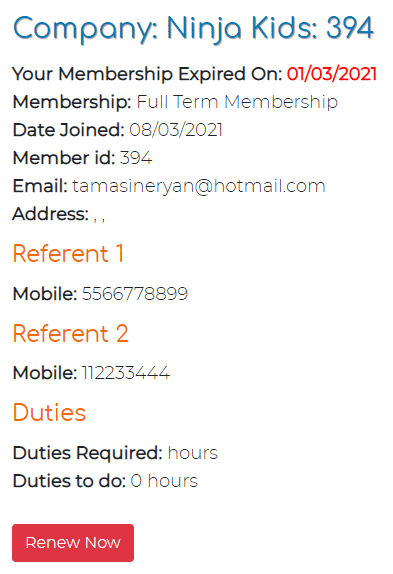
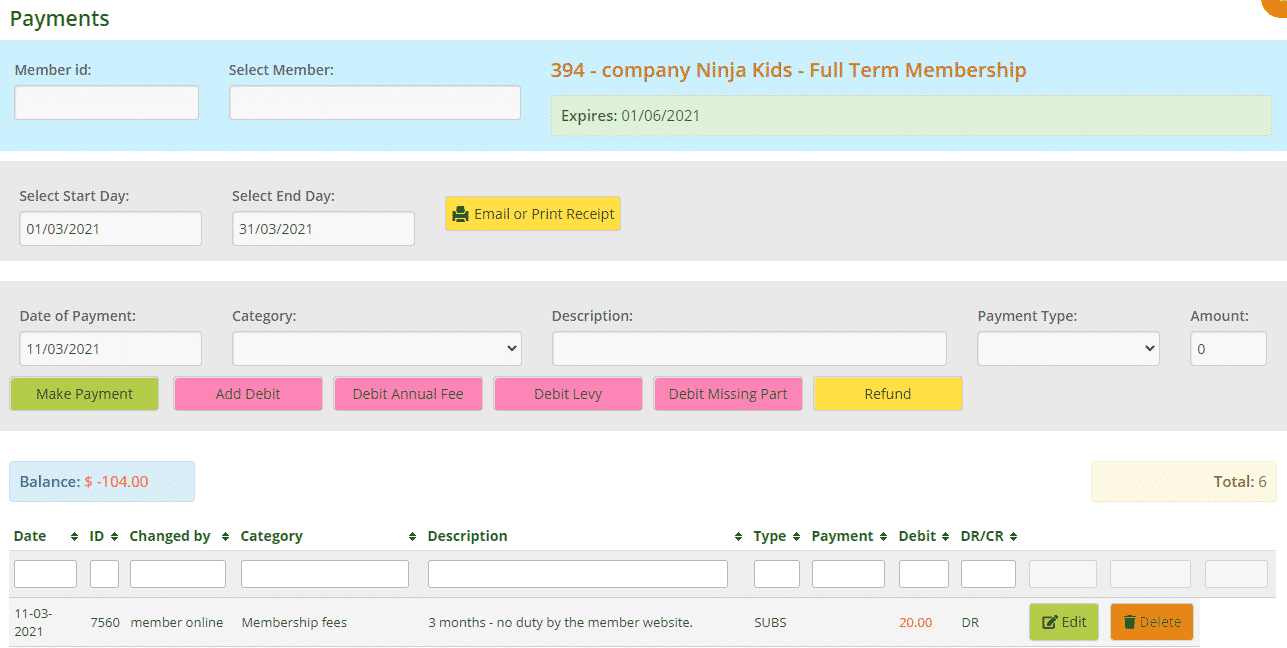
Clicking this button automatically renews their membership and displays the membership fee added to their account and the new expiry date. Clicking OK will take them back to their Home page.

If they click on the Transactions tab, they will see the fee added to their account.

The fee will also appear on their Payments page on the admin website.
Note: a company cannot change its membership type. If they would like to do that they will need to contact you, the admin.
The post Renewing a Company’s Membership appeared first on MiBase New Zealand.
]]>The post Resigned or Locked Company appeared first on MiBase New Zealand.
]]>Resigned or locked companies (a company whose membership has been expired for quite some time), can be seen on the Not Active page.
To see the list of resigned/locked companies go to Member -> Not Active
To read more about the Not Active Lists please read the following article: Not Active Members page.
So you can distinguish between a company and a member, a company will literally have the word ‘company’ as the first name.

If a company has been resigned and they are looking to rejoin again it is quite easy to do and is exactly the same process as a resigned member rejoining again.
Read the following article to learn how to renew a resigned company looking to rejoin.
The post Resigned or Locked Company appeared first on MiBase New Zealand.
]]>