The post Setting up your Member Website appeared first on MiBase New Zealand.
]]>The Member Website is a fabulous tool to have as it allows your members to log in any time to see their membership, account and personal details, toy loans, and due dates, they can manage their own toy reservations, toy renewals, booking duties as well as view your library’s details and information.
It does not need to be activated as it is already available. All you will need to do is send the link to your members as well as their log-in details with the password.
Just like the Public Website, you can choose what functions/pages/modules you would like to use and see on your Member Website.
To do this you will need to check and change each setting on the Member Website Settings page.
There are two places you can access this page:
1. The most direct way is to go to Setup -> Members

2. Or indirectly, if you happen to be in the Public or Admin settings, you can select Member Website Settings at the top of the page

Using either option will take you into the settings page where you will see a list of all the settings you will need to check and change according to how you want your Member Website set up.
The list can be filtered by the modules/pages MiBaseNZ offers to make it easier to understand and to see the different functions you can choose (see outlined in the below image).
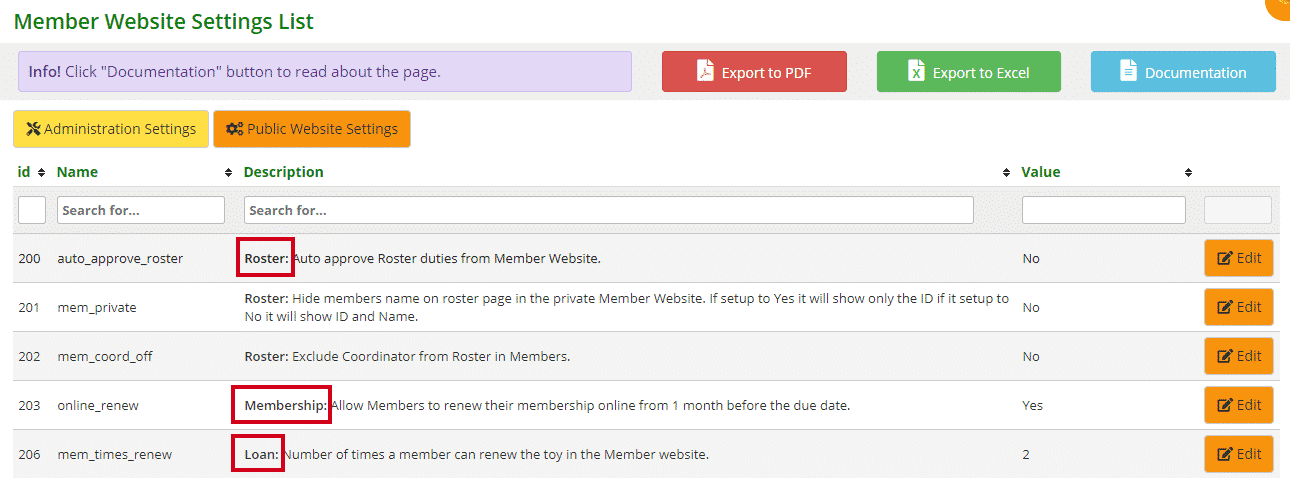
There are 5 modules/pages you can filter the list by. They are:
- Top Menu: these settings are for activating the modules/pages in the navigation bar that can be seen across the top of each page in the Member Website
- Roster: if you have decided to activate the Roster page, these settings are related to specific functions and what information can be seen
- Loan: these settings are related to toy renewals and whether your members can renew toys they have loaned and how often
- Home Page: these settings are related to information that can appear on the Home page
- Reservation: these settings are related to when, how often and how far out a member can make a toy reservation
There are three settings that do not come under one of the above options. These are:


- #203 – online_renew: this setting allows members to renew their membership online. If you choose to activate this setting, one month before a member’s membership expires a red Renew Now button will appear on the Home page with a ‘Your membership is due to expire’ message. To activate this setting, select Yes
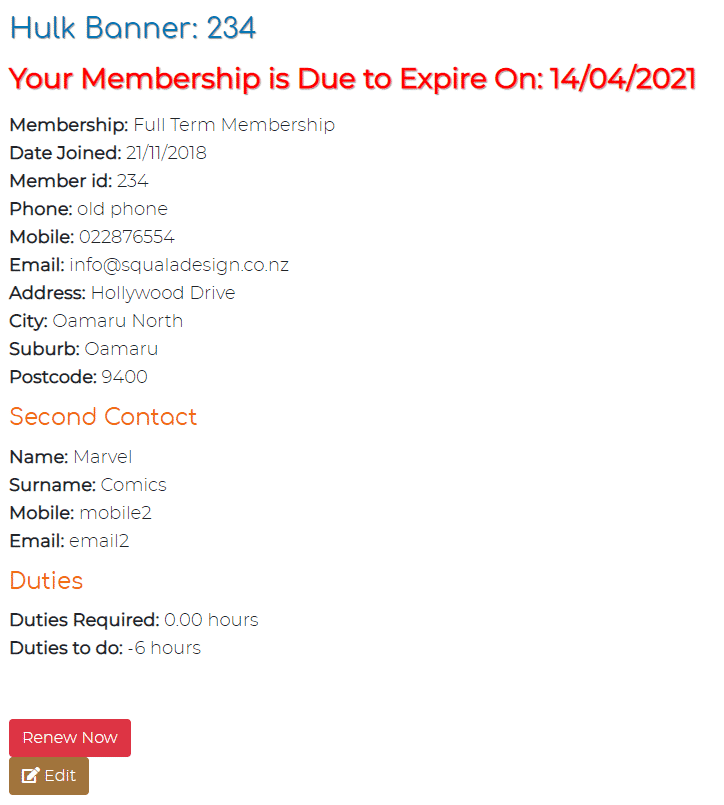
- #207 – mem_edit: this setting allows members to edit their personal details. As you can see above, a brown Edit button will appear if this function is activated. The risk however of having this function available is members can falsify their details without you knowing. If you do want this option, select Yes
- #215 – mem_transaction_intro: This setting is only relevant if you have chosen to activate the Transaction page (setting #214). If you have, this is where you can write an introduction to appear at the top of the page. Click Edit, type in your message in the text box, and click Save
Please note, if you change these settings, you must log out and then log back in again for the settings to take effect.
To view, check and change each of the above groups of settings, follow the links below.
Settings for the Top Menu items
Settings for the Reservation page
The post Setting up your Member Website appeared first on MiBase New Zealand.
]]>The post Settings for Top Menu items appeared first on MiBase New Zealand.
]]>![]()
Some of these modules/pages are automatic, one is a paid module, and two are linked with the public website settings. The remaining others will need to be activated on the Member Website Settings page if you choose to use them. See below for further information.
The automatic modules/pages are:
- Home – for more information on this page read the article Member Website Home page schema
- My Library – for more information on this page read the article My Library page
- My Wishlist – for more information on this page read the article My Wishlist page
- The Toys Menu is automatic however some settings are activated via the public website settings, Settings for the Toy Menu. The sub-heading Reservable Toys also needs to be activated in the public website settings if your library would like to use this function – follow this link to see how – Reservable Toys.
The FAQ page is linked with the public website settings, so if it has been activated there, it will appear on the Member Website. Read this article for further information – FAQ page.
The Click & Collect page is a paid module so your library will need to have purchased this for it to appear. For further information follow this link, Click & Collect module. To read the documentation for this module follow this link, Click & Collect Setup.
So, the remaining two pages are Transactions and Roster and to activate these you will need to go to Setup -> Members
Type the words “top menu” in the Description box. The list will be filtered to show the settings related to the Top Menu. Each setting can be easily changed by clicking the Edit button alongside it, making the change if necessary and clicking Save.
Once the settings are changed you must log out and then log back in again for the settings to take effect.

- #213 – public_members_roster: select Yes to activate the Roster page in the navigation bar.
Follow this link for further settings on specific functions for the Roster page
Follow this link to learn how to add or delete roster preferences to this page - #214 – mem_transaction: Select Yes if you would like the Transactions page in the navigation bar. To add an introduction to the page, add it under setting #215
Follow this link for further information on the Transactions page.
The post Settings for Top Menu items appeared first on MiBase New Zealand.
]]>The post Settings for the Home Page appeared first on MiBase New Zealand.
]]>These settings include the option of using the member alert function (which is a red box that appears when a specific message, reminder or alert has been written by admin to this member) and showing members their list of children.
For more information and an overview of the Member Website home page, read the article Member Website home page schema.
With regards to the above two settings, go to Setup -> Members
Type the word “home page” in the Description box. The list will be filtered to show these two settings. Each setting can be easily changed by clicking the Edit button alongside it, making the change if necessary and clicking Save.
Once the settings are changed you must log out and then log back in again for the settings to take effect.

- #217: select Yes if you would like members to see any written alerts, No if not
- #218: select Yes if you would like members to see their list of children, No if not
You can view the activated settings in the link above to the Member Website Home Page schema.
The post Settings for the Home Page appeared first on MiBase New Zealand.
]]>The post Settings for the Roster page appeared first on MiBase New Zealand.
]]>To see the options, go to Setup -> Members.
Type the word “roster:” in the Description box. The list will be filtered to show all settings related to the Roster page. Each setting can be easily changed by clicking the Edit button alongside it, making the change if necessary and clicking Save.
Once the settings are changed you must log out and then log back in again for the settings to take effect.
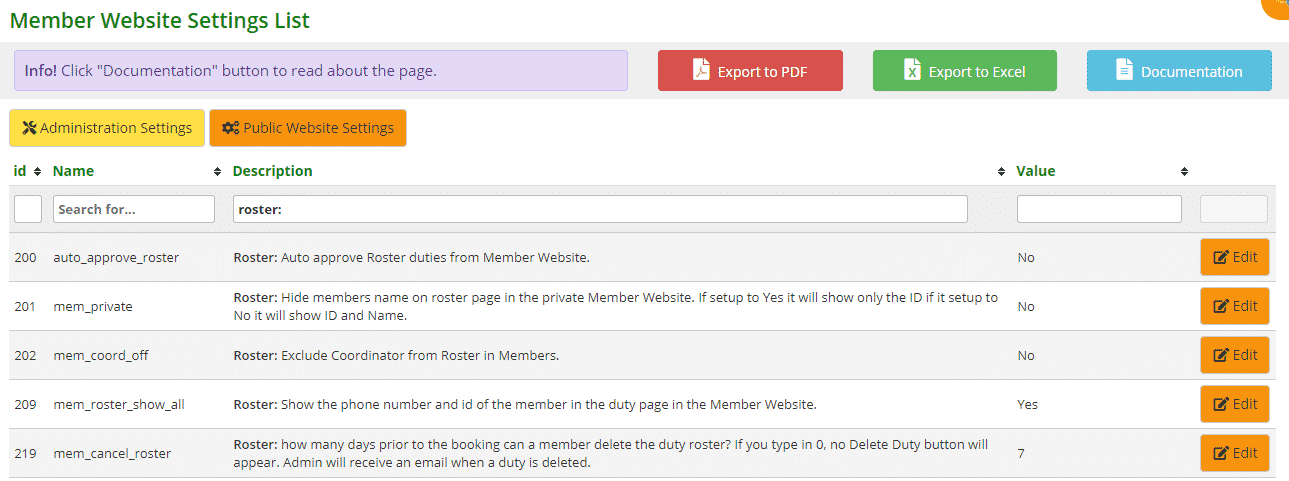
- #200 – auto_approve_roster: When a member selects a duty session on the calendar, this setting will allow it to be automatically approved rather than waiting for the admin to approve it. Select No if you do not want this to automatically happen
- #201 – mem_private: When a member logs on to the Member Website and views the roster calendar, you can decide if they can see the details of other members who have selected a duty, or not. Yes will show ID number, No will show ID number and member’s name
- #202 – mem_coord_off: this setting will exclude coordinators (committee members) from roster duties, select Yes to exclude, No to include
- #209 – mem_roster_show_all: if you have selected No for setting #201, you can also add the member’s phone number as well by selecting Yes for this option.
Toy Libraries show other members details to allow them to call each other if they need to swap their duties. Remember to ask for your members’ permission to show their details. - #219 – mem_cancel_roster: you can decide up to how many days prior to the duty a member is able to delete it. When a member deletes the duty, the admin will receive an email notification. If you do not want any member to be able to delete a duty, type in 0. The Delete My Duty button will not appear on the Member Website

If you are using the Roster System in the Member Website, you should then activate this below setting for the Admin Website.
Go to Setup -> Administration
 Type in ‘roster’ and change the setting to Yes.

What this will do is activate the two tables below on the admin Home page.

- Members on Duty Today: will list what members will be completing their duty today
- Member signed up for duty online: will list the members that have signed up for duty in the Member Website.
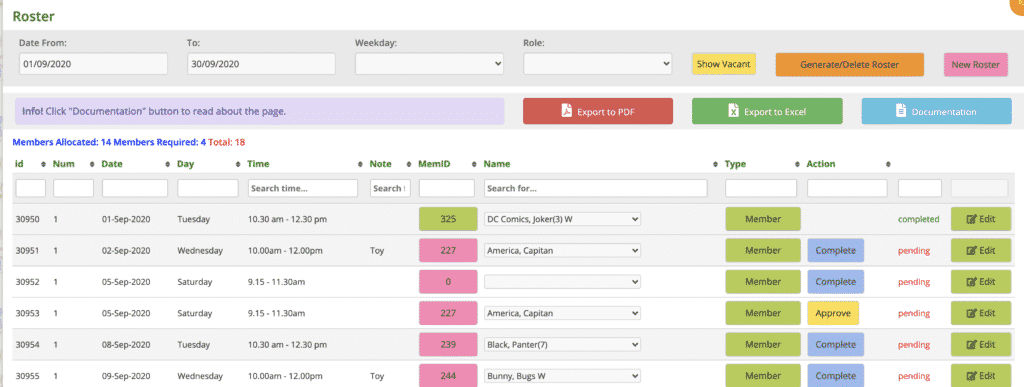
If you have selected Yes for setting #200 above, this duty will automatically be approved. If you have selected No, an admin will need to approve it by clicking the pink Go to Duty Page button which takes you to the Duty Roster page where you can click the yellow Approve button (see below).
The post Settings for the Roster page appeared first on MiBase New Zealand.
]]>The post Settings for Toy Loans appeared first on MiBase New Zealand.
]]>The following settings are related to how often a member can renew a toy and whether they can renew a toy that is overdue.
Go to Setup -> Members
Type the word “loan” in the Description box. The list will be filtered to show the settings related to toy renewals. Each setting can be easily changed by clicking the Edit button alongside it, making the change if necessary and clicking Save.
Once the settings are changed you must log out and then log back in again for the settings to take effect.

- #206 – mem_times_renew: how many times would you like a member to renew a toy, type in the number. If you do not want this option available to your members, leave the field blank or add a 0. On the Member Website, instead of a Renew button, it will say “Renews not activated”
Follow the link to see how to Renew a toy on the Member Website - #211 – overdue_toy_member_renew: if a toy is overdue, would you like the member to still be able to renew it? Select Yes if so, No if not. They will either have to return the toy or contact your librarian to renew it
- #220 – mem_block_loan: if a membership has expired and the member still has a toy on loan, this setting will block the member from renewing the toy. Select No if you do not want the toy to be renewed.
The post Settings for Toy Loans appeared first on MiBase New Zealand.
]]>The post Settings for the Reservation page appeared first on MiBase New Zealand.
]]>The following settings are related to when, how often and how far out a member can make a reservation.
Go to Setup -> Members
Type the word “reservation” in the Description box. The list will be filtered to show the settings related to reservations. Each setting can be easily changed by clicking the Edit button alongside it, making the change if necessary and clicking Save.
Once the settings are changed you must log out and then log back in again for the settings to take effect.

- #208: this setting allows members to make their own toy reservations. If this setting is activated, when viewing a toy, at the bottom of the page there will be a brown Reserve Toy button which will take members to the Reservation page. To activate, select Yes
- #221: this setting prevents members from making back-to-back reservations, particularly for popular toys allowing other members the opportunity to reserve them. Type in the number of days after a reservation a member can make another one for the same toy. The reservation calendar will be highlighted for these number of days blocking the member from reserving
- #222: this setting prevents members from making a reservation on the day the library is opened or as many days prior to the session of your choosing. Again the reservation calendar will be highlighted blocking the member from reserving
- #223: this setting prevents members from booking toys too far into the future. You can set the limit. The reservation calendar won’t be highlighted but the days will be blocked
The post Settings for the Reservation page appeared first on MiBase New Zealand.
]]>The post For members – how to use the Members Website! appeared first on MiBase New Zealand.
]]>
Logging in
There are two ways you can access our Members Login page.
- If you have received our Login email, please click the link provided which will take you there. Type in your user name and password and click Login.
- Visit our Public Website. To the top right of the screen, you will see the word Login. From the dropdown menu select Member Log In. This will take you to the login page. Type in your user name and password and click Login.

Forgot, lost or didn’t receive your login details?
Never fear they are easy to retrieve. When you go to the Members Login page, you will see down the bottom Forgot password? Click this button and it will take you to the Forgot Password page. Remember: This a generic documentation, each Toy Library will have a different logo and colours. Type in your email address and click Email my password. You will receive an email with both your username and password details. 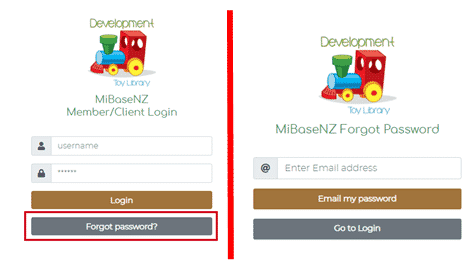
Home Page
Once you have logged in, you will be taken to the Home page. You will see a small introduction to our library and what we offer. Scrolling down you will see your personal details and membership information. You may have the option of editing these details or you may not. If you do, click the Edit button and make the changes, remember to save once done. If not, please email us with the changes and we can update it for you. Continue scrolling down and you will see a list of your children and their birth dates. You can edit their details by clicking the Edit button and if there is a new member to the family you can add their details by clicking the Add New button. Remember to save once done. To the right of the page, you will see all our details and opening hours.
Navigation Bar / Menu
At the top of the Home page, you will see a navigation bar listing all the different pages in our Member Website. This can be seen and accessed from each page. Note: this guide has been created for all toy libraries to use so some of the pages may not apply to our toy library. To the far right, you will see the word Actions. From the dropdown menu, you can choose to log out of our Members Website or visit our Public Website. 
My Library
In this page, you can view all your toy loans, reservations, bookings, roster duties and missing pieces, if any. Any information we would like to share with you such as our Newsletters can also be seen under the heading Files and can be accessed by clicking the Open button. You have the options of renewing your toys here or deleting any reservations, duties or bookings.
Toys
You can choose what toys you would like to view by selecting from the dropdown menu:
- All Toys – our entire toy range
- Popular Toys – our most popular toys in the library
- New Toys – our most recent purchases
- Reservable Toys – only these toys can be reserved online (if this option is not here it means all toys can be reserved and not just a select few).
To reserve a toy or add a toy to your wishlist, click the View Toy button under the toy. You will be taken to the toy’s details page. Under the image, you will see a grey button, click to Add to my Wishlist. This toy will now appear in the My Wishlist page. Scroll further down and you will see a Reserve Toy button. Click this and you will be taken to the Reservation page.
Reserving a toy
Once you are on the Reservation page, you can see the availability of the toy on the calendar by using the coloured availability chart underneath as a guide. Click on the calendar the start date you would like the toy from. The calendar will automatically highlight the hire period for the toy. Click the Reserve button to the right of the calendar. The reservation will then appear under the heading Reserved Toys in the My Library page. We will also be notified of your reservation.
My Wishlist
As mentioned above, once you have added a toy to your wishlist from the toy’s details page, it will automatically be listed here on this page. You can see the status of the toy if it is in the library, if it’s on loan, or when it has been reserved. You can delete the toy from the wishlist by clicking the Delete button. You can reserve the toy by clicking the Reserve Toy button. This will take you to the Reservation page. Follow the steps mentioned above, Reserving a Toy, to see how.
Transactions
This page lists all your transactions; toy hires, payments, fees and fines. Your account balance is shown at the bottom of the page.
Roster
If you have a duty membership or you would just like to help out at our library, this is where you can book your duties. Choose the day you can come in and click the Add My Duty button. We only have a select amount of slots for each session so if this button is not there it means there are none available for that day. Your roster will then appear under the heading Roster Duties in the My Library page. We will also be notified of your duty booking.
If you can no longer make your duty, you have the option of deleting the duty in the Roster page or under the heading Roster Duties in the My Library page. We will also be notified when you delete your booking.
Click & Collect
Just like the shops, you can select a day and time when you want to collect and/or drop off your toys. There are two options with this page.
- Book a time to pick up any toys you have reserved as well as select a time to drop them off. You must reserve toys first before you can use this option You just simply select from the dropdown menus provided
- For no toy reservations, you just want to drop off the toys you already have on loan, then again simply select a date and time from the dropdown menus to do this
Remember to click Save for either option. Once you have made a booking, a Success message will appear and it will also appear under the heading Booking in the My Library page. We will also be notified of your booking.
FAQ
If you have any questions about our library, please check our Frequently Asked Questions page first for answers. If you cannot find what you are looking for please contact us with what you would like to know and we will reply as soon as possible.
The post For members – how to use the Members Website! appeared first on MiBase New Zealand.
]]>The post MiBaseNZ Member Website home page schema appeared first on MiBase New Zealand.
]]>The Member Website is part of MiBaseNZ with NO additional cost. You can choose some pages/modules you would like to appear simply by activating or deactivating them.
The Home Page schema is described in the image below.
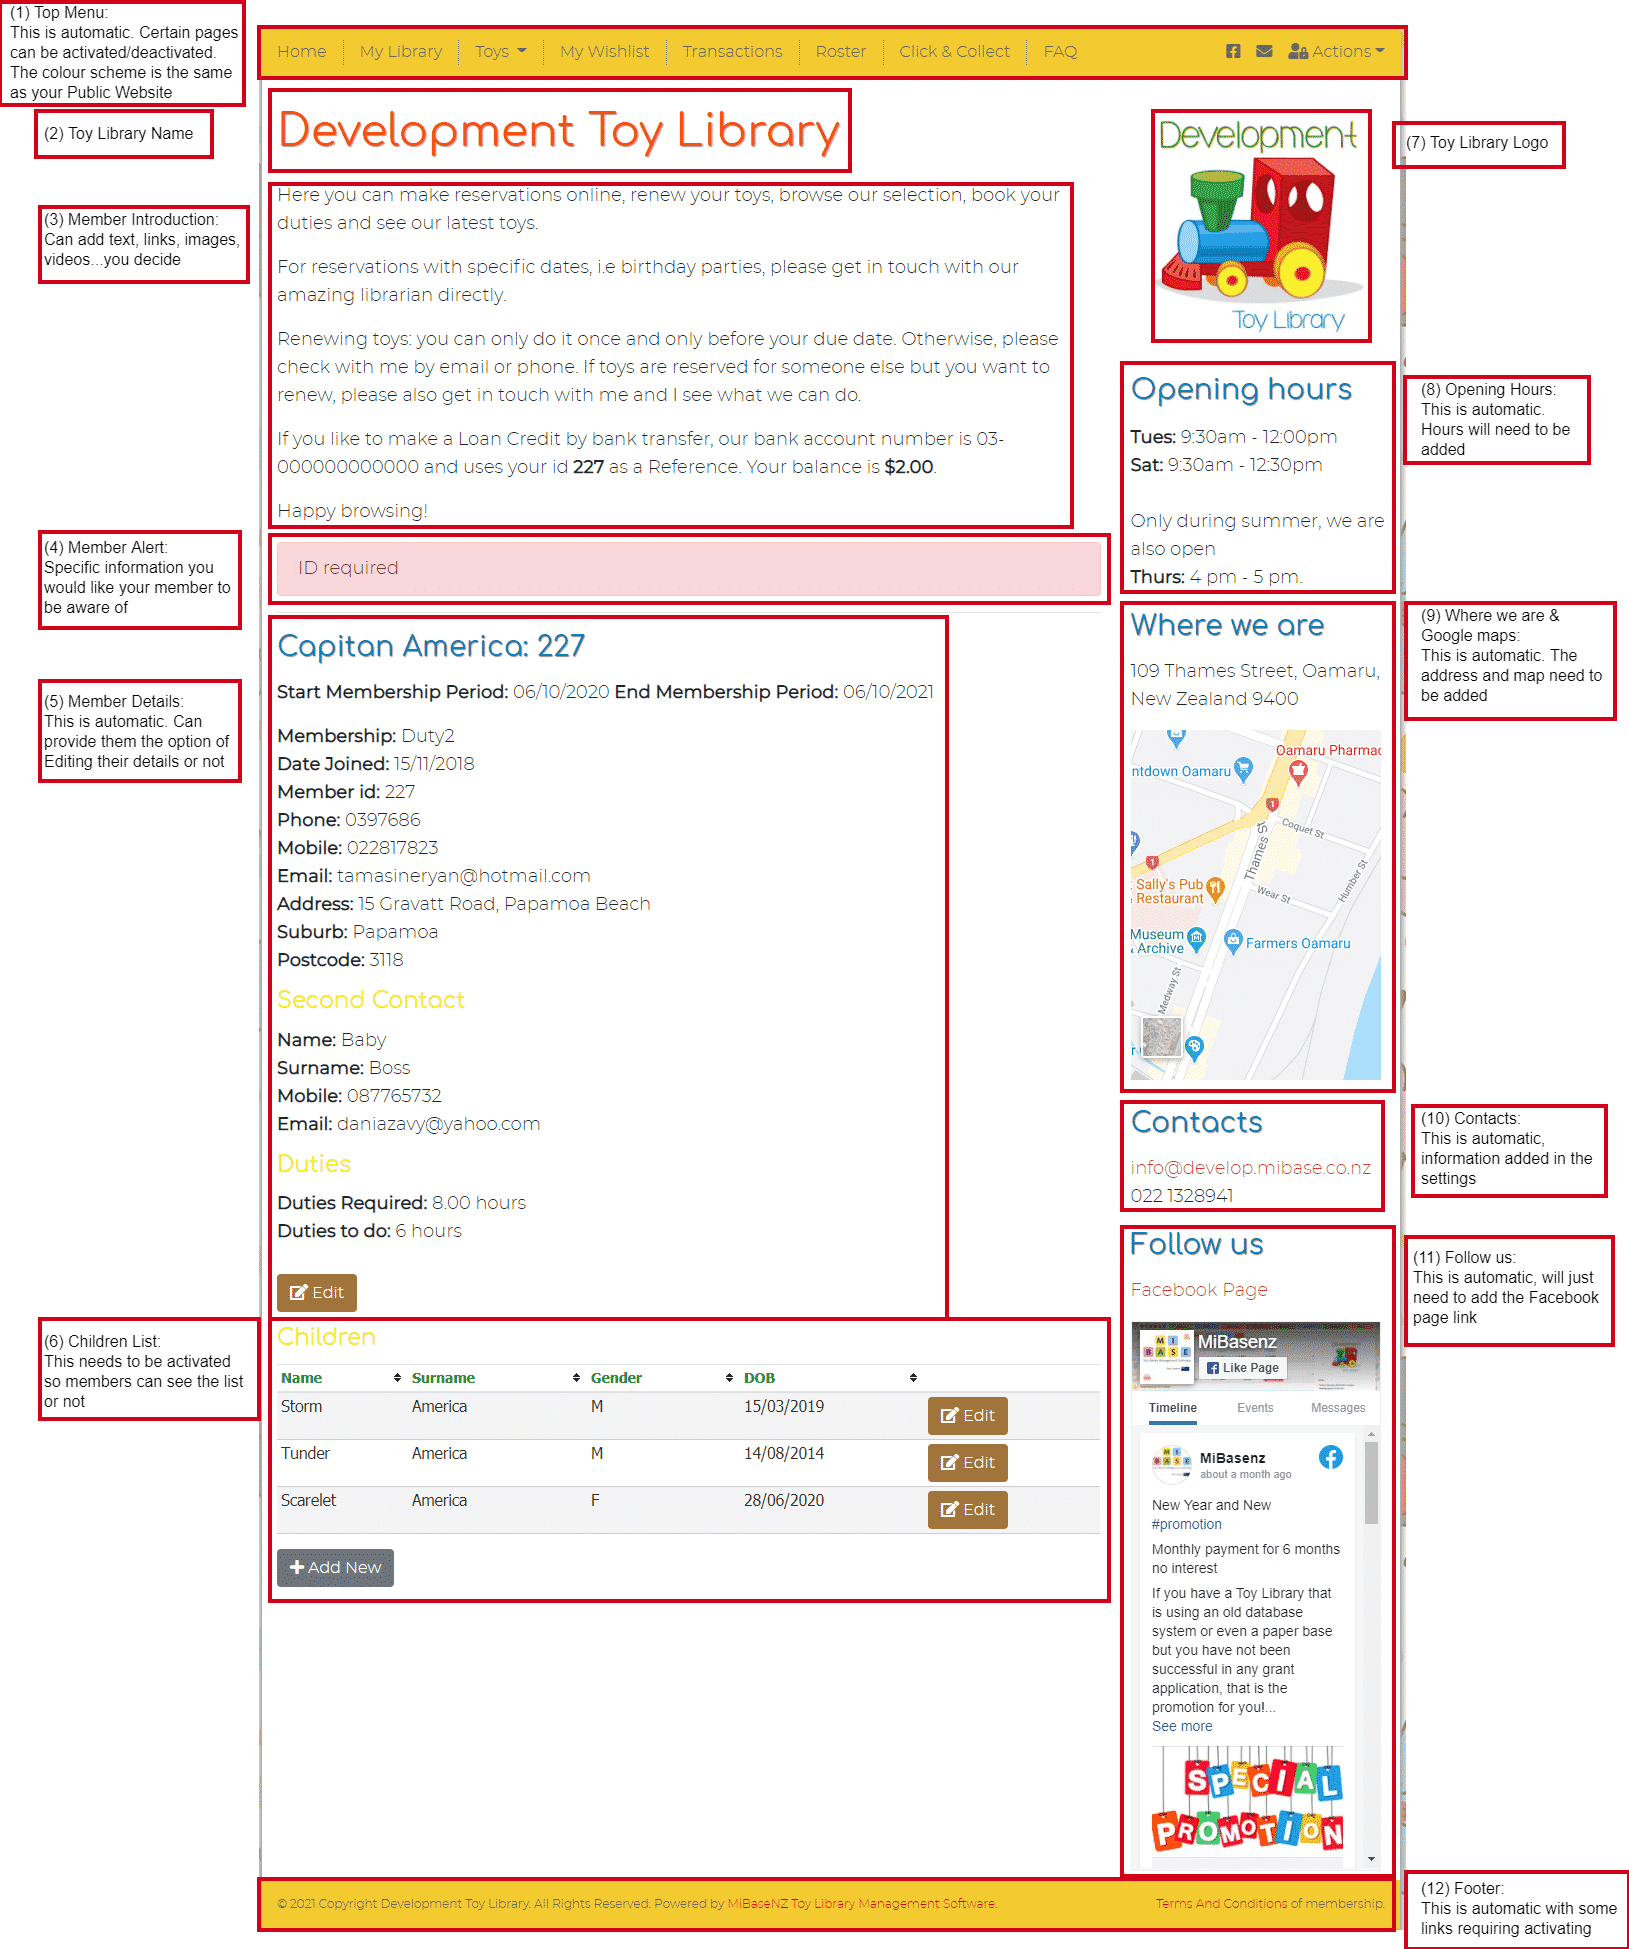
(1) Top Menu
Located at the top of every page of the Member Website, this bar-shaped menu lists the modules/pages that can be accessed by your members. Some of these pages are automatic whereas others will need to be activated.
To activate these pages read the article Settings for Top Menu Items.
The font and background colour of the top menu will be the same as your Public Website. If you would like to make any changes, read the article Design your Public & Member Website.
(2) Toy Library Name:
To add your toy library name go to Setup -> Administration, search for the setting libraryname, click Edit and type in your name. Click Save.

(3) Member introduction:
In this section, you can add whatever content you think is relevant for your members to know about your toy library such as what they can and cannot do. You could also mention certain functions they can use on the website. Remember this is the very first page members will see when they log in.
To add this content, go to Setup -> Edit website and add under the Members Home Page section.
Read the article Edit your Public Website for further information.

(4) Member Alert:
For this alert box to appear on the home page of a members website, it will need to be activated. To do this go to Setup -> Members, search for the setting mem_alert, click Edit and change the setting to Yes. Click Save.

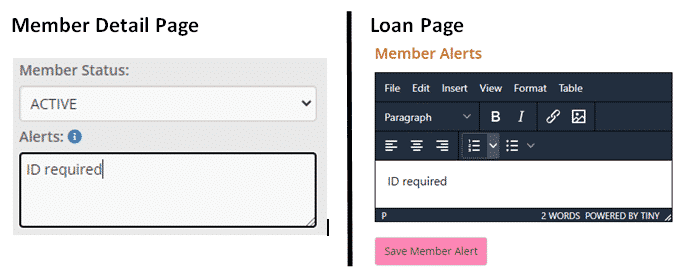
The alert can be added on the admin website under the Member Detail page in the Edit mode or on the Loan page in the Member Alerts box.
(5) Member Details:
Once the information has been inserted in the Member Detail page, it automatically appears here. You have the option of providing members with an Edit button to allow them to update their details if need be. To add this button go to Setup -> Members, search for the setting mem_edit, click Edit and change the setting to Yes. Click Save.
The information under Duties is only relevant to Duty members and will list the number of hours they are required to do according to the membership and how many hours they are to complete. This automatically updates if the duties have been recorded when the member does them.
For all non-duty members, it will be recorded as 0 hours.
(6) Children List:
For this list to appear on the home page of a members website, it will need to be activated. To do this go to Setup -> Members, search for the setting mem_children_show, click Edit and change the setting to Yes. Click Save.

Once the information has been inserted in the Member Detail page, it automatically appears here. Members will have the option of editing their child/rens details or adding another child.
(7) Toy Library Logo:
This is part of the initial setup, and cannot be changed by the toy library. If you would like to change it, however, please send an email to daniela@mibase.co.nz.
(8) Opening hours:
To add the opening hours, go to Setup -> Administration, search for the setting open hours, click Edit and type in the hours. Click Save.

(9) Where we are:
To add your toy library’s address, go to Setup -> Edit website and add under the Right column section.
Read the article Edit your Public Website for further information.
It is highly recommended you add a Google map here as well as the written address.
To add a map into this section, read the article, How to add a Google map on your website.

(10) Contacts:
To add your toy library’s contact details you will need to go to two different settings.
To add the email address, go to Setup -> Administration, search for the setting email_from, click Edit and type in the address. Click Save.

To add the number, go to Setup -> Members, search for the setting phone, click Edit and type in the number. Click Save.

(11) Follow us:
To activate this section, go to Setup -> Public Settings, search for the setting facebook, click Edit and insert the complete Facebook Page URL. Click Save.
An icon will also appear in the Top Menu.

(12) Footer:
The footer content is automatic. The font and background colour of the top menu will be the same as your Public Website. If you would like to make any changes, read the article Design your Public & Member Website.
The post MiBaseNZ Member Website home page schema appeared first on MiBase New Zealand.
]]>The post Transactions page appeared first on MiBase New Zealand.
]]>The Transactions page needs to be activated if you would like your members to see it. It will then appear in the top menu of the Member Website. Members will need to log in to their accounts to see it.

To activate this page go to Setup -> Members, and type in ‘transaction’ as shown below. Click the orange Edit button for setting 214 and change it to Yes. Click Save.

To add an introduction to the top of the page, click the orange Edit button for setting 215, type in your message in the text box, and click Save.
It will look like this.

The post Transactions page appeared first on MiBase New Zealand.
]]>The post Design your Public & Member Website appeared first on MiBase New Zealand.
]]>Go to Setup -> Design your website

Important notes before starting
Your choices will be applied to both websites. Your Public Website can not be different from your Member Website.
Each time you make a selection, click Save. To view the change in the website, you will need to refresh the page.
![]()
At the bottom of the page, you will find the Save button as well as two other buttons.
Import from settings – this button is no longer required. Before this page was created, you would change the backgrounds and colours in the settings. This button allowed you to import your design from your settings instead of starting from the beginning.
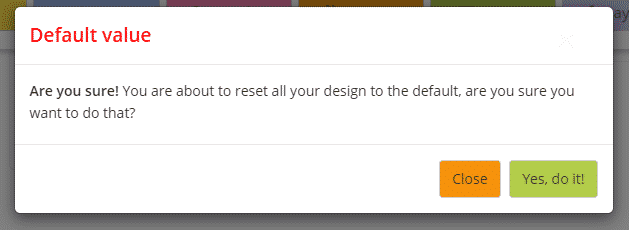
Default value – clicking this button will reset your website back to the original backgrounds, fonts and colour schemes when you first signed up with MiBaseNZ. If you click this button, an Are you sure! pop-up screen will appear.
Background – Body, Header and Footer
The first step in designing your websites is to decide on the backgrounds for the main body of the websites as well as the header and footer which will be seen on every page.
Body background – image or colour
You can either choose an image or a colour, but not both.
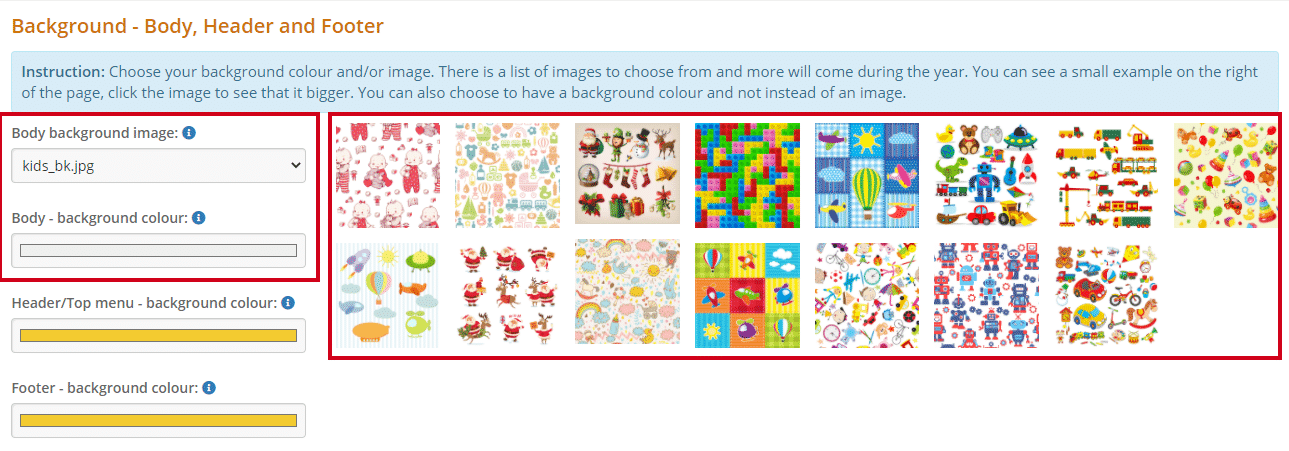
To the right, you will see a selection of images. Click on each one to enlarge it. The name of the image can be seen at the top. Once you have chosen an image you like, to the left you will see the heading Body background image. Find the image name in the dropdown menu and select it.
Scroll down to the bottom of the page and click Save.
Refresh your website to see the changes.
If you would like a different image that is not listed or you would like to see some other options, please send an email to daniela@mibase.co.nz.
If your toy library would prefer to have no image and would rather just a colour background, make sure the Body background image dropdown menu is selected at ‘none’ then choose a colour by clicking the colour bar under the heading Body – background colour.
 You can choose from the rainbow or if you would like to use a colour from your toy library logo, type in the code for the colour. If you don’t know the code for your logo, please send an email to daniela@mibase.co.nz.
Scroll down to the bottom of the page and click Save.
Refresh your website to see the changes.
Examples of image and colour backgrounds


Header and footer – background colour
The header (or top menu) and the footer are the bars at the top and bottom of each page of your website. It is important when choosing these colours to try and match them to the background. Also, when making your choice, be aware of the font colour you would like to use for the words in the header and footer.

Same as above, click the colour bar and choose a colour from the rainbow or type in a colour code.
Scroll down and click Save.
Refresh your website to see the changes.


Fonts – Style and colour
The font is the style of writing. You will be able to decide the font style for the headings and titles and for the main text (body font). You will also be able to choose the font colour for some of this text but not for all. For the main text, the colour can not be changed and is automatically set. You can change however the colour for the titles and headings, the header/top menu, the footer and any links you create within these.
Titles/Headings and Body – font styles
The body font is everything but the title or headings. This should be different from the title or headings as the title is big and short whereas the body needs to be easy to read as there is a lot more writing involved.

To the right, you will see a selection of fonts. Click on each one to enlarge it. Once you have chosen a style you like, to the left you will see the headings Titles/Heading font and Body font. Find the font names in the dropdown menus and select them.
Scroll down to the bottom of the page and click Save.
Refresh your website to see the changes.
If you would like a different font than the ones listed, in the blue box above the font styles, there is a link to a number of other options. Once you see one you like, send an email to daniela@mibase.co.nz and it will be added to the list.
Title/Heading colours
Each of the headings or titles on your website can be a different colour, or not, you decide. Again, think about your colour choices and whether they will work with the background and the header and footer.
Click the colour bar and choose a colour from the rainbow or type in a colour code.
Click Save. Refresh your website to see the changes.
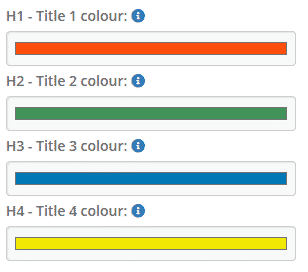
- H1 – Title 1 is the toy library name and the title or heading for each page of the website
- H2 – Title 2 is for sections in the page such as the header under the toy library name
- H3 – Title 3 is for subtitles, in this case, the right-hand column headings; Opening hours, Where we are, Contacts, Follow us
- H4 – Title 4 is also for subtitles, in this case, the Our Team names as well as the membership headings
Font colour – top menu/header, footer and links
When deciding on your colour choices for these fonts, it is important to choose a contrasting colour otherwise it won’t be clear and easy to read.
For example, dark background/light font or light background/dark font. See the examples below.
The Body – font link is the link to another page added within your website pages, for example, an email.
The Footer – font link is the links added in the footer.
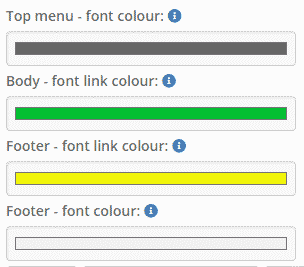
Click the colour bar and choose a colour from the rainbow or type in a colour code.
Click Save. Refresh your website to see the changes.
As you can see, choosing a dark grey colour for the top menu words makes it stand out against the yellow background. The footer, however, the words and link colours are lost against the yellow background.

![]()
The post Design your Public & Member Website appeared first on MiBase New Zealand.
]]>