The post Setting up your Public Website appeared first on MiBase New Zealand.
]]>To do this you will need to check and change each setting in the Public Website Settings page.
There are two places you can access this page:
1. Go to Setup -> Administration

….and click on Public Website Settings

2. Go to Setup -> Public Settings

Using either option will take you into the settings page where you will see a long list of all the settings you will need to check and change according to how you want your Public Website set up.
The list can be filtered by the modules/pages MiBaseNZ offers to make it easier to understand and to see the different functions you can choose (see outlined in the below image).
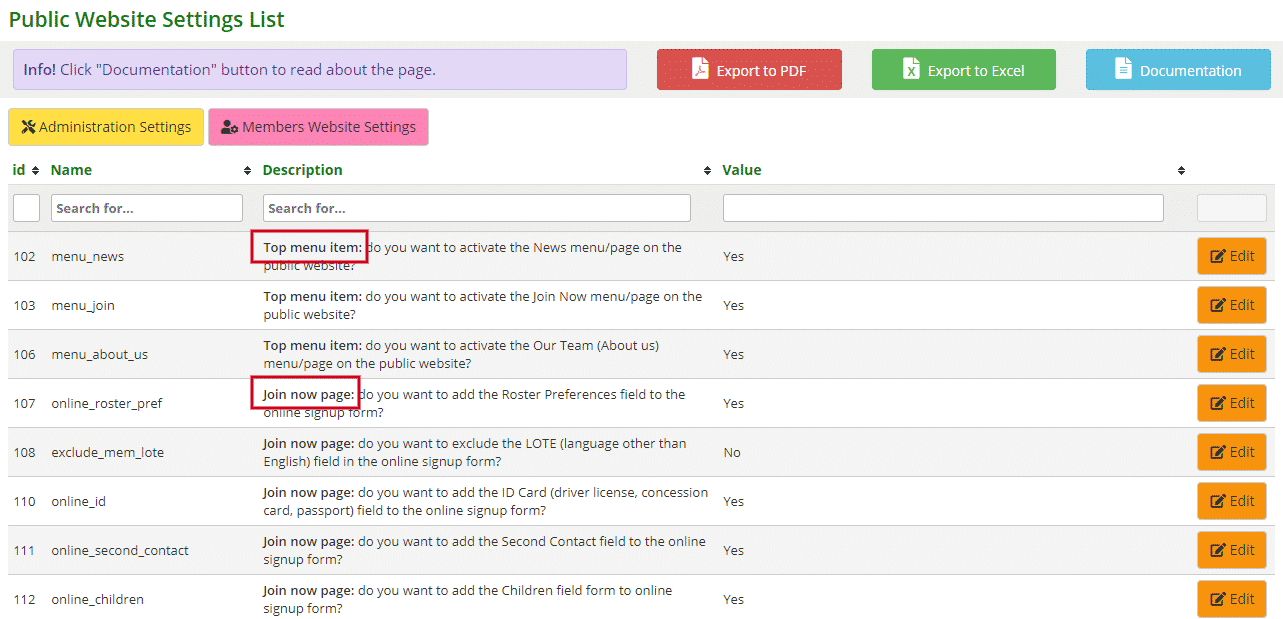
There a 6 modules/pages we can filter the list by. They are:
- Top menu item: these settings are for activating the modules/pages in the navigation bar that can be seen across the top of each page in the Public Website
- Join now page: these settings are related to the online signup form
- Home page: these settings are for the slideshows in the Home page
- Toy menu: these settings are related to the Toys dropdown menu in the navigation bar
- Toy list page: these settings are related to your library’s toys and what information is shown for each toy
- Toy Detail page: these setting are related to a toy’s cost and if you want it seen in Public Website
There are four settings that do not come under one of the above options. These are:


- #113: this setting relates to the Roster page in the Public Website. If you choose to activate the Roster page, this setting allows you to choose whether the members’ names can be seen by everyone or not.
Yes, you will see the member’s ID number and name. No, you will only see the members ID number. - #125: Google Tag Manager is a tool that allows you to manage and deploy marketing tags which are snippets of code or simple pieces of data — usually no more than one to three words — that describe information on a web page. Tags provide details about an item and make it easy to locate related items that have the same tag. You can ask us to create a Google Tag Manager or you can go directly in the link here: https://tagmanager.google.com/ and create your own one.
- #134: This is an important one. To activate your Public Website page you need to select Yes by clicking on the “Edit” button, making the change, and clicking “Save”. Leaving this setting at No, anyone who tries to view it will see a “Coming Soon” page.
- #151: this setting relates to the Toy Menu in the Public and Member Websites. It gives you the option of having a list of toys that can be reserved. This is only relevant for libraries who do not want all their toys to be available for reservation, they just want to provide a selection.
If you want this option then select Yes.
Please note, if you change these settings, you must log out and then log back in again for the settings to take effect.
To view, check and change each of the above groups of settings, follow the links below.
Settings for the Join Now page
Settings for the Toy List page
Settings for the Toy Detail page
The post Setting up your Public Website appeared first on MiBase New Zealand.
]]>The post Settings for Top Menu items appeared first on MiBase New Zealand.
]]>
Each of these modules/pages needs to be activated in the Public Settings page which means you can choose which module/page you would like to use, or not use.
Go to Setup -> Public Settings
Type the words “top menu” in the Description box. The list will be filtered to show all settings related to the Top Menu. Each setting can be easily changed by clicking the Edit button alongside it, making the change if necessary and clicking Save.
Once the settings are changed you must log out and then log back in again for the settings to take effect.
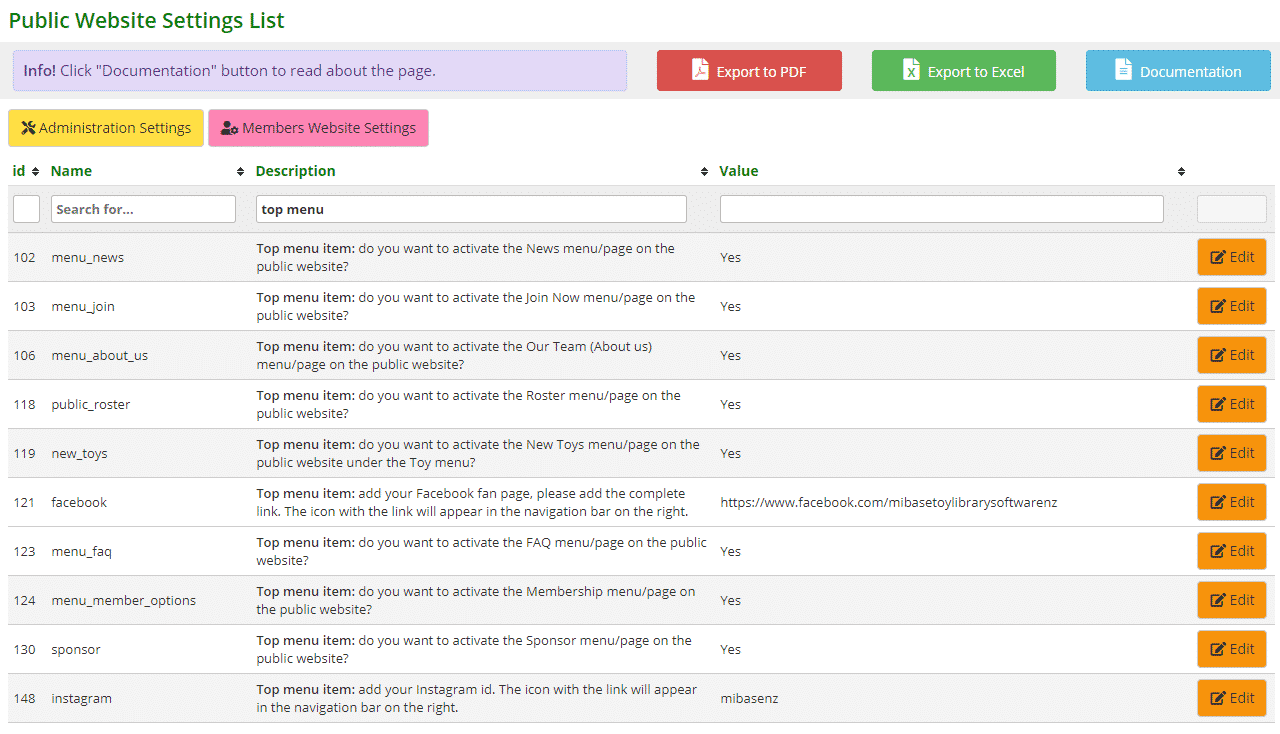
- #102: select Yes to activate the News page in the navigation bar. Follow the link to learn how to add a news article to this page
- #103: select Yes to activate the Join Now page in the navigation bar, selecting No the page will not appear. Follow the link to learn how to setup the Join now page
- #106: select Yes to activate the Our Team page in the navigation bar. Follow the link to learn how to edit the Our Team page
- #118: select Yes to activate the Roster page in the navigation bar. Follow the link to learn how to add or delete roster preferences to this page
- #119: select Yes to activate the New Toys page under the Toys menu in the navigation bar, selecting No the option/page will not appear
- #121: by adding the link to your Facebook page (if you have one), the Facebook icon will appear in the navigation bar on the right (see above) as well as under the Follow us section in the right column of the Public Website.
- #123: select Yes to activate the FAQ page in the navigation bar. Follow the link to learn how to add FAQ’s to this page
- #124: select Yes to activate the Membership page in the navigation bar. To add all your membership options to this page, you will need to go to Setup -> Edit Website. Scroll down to the heading Member Options on Website and type in the details there
- #130: select Yes to activate the Sponsors page in the navigation bar. Here you can add the logos of all your sponsors. Follow the link to learn how to upload files/logos to this page
- #148: by adding the link to your Instagram account (if you have one), the Instagram icon will appear in the navigation bar on the right (see above). You need to add your library name without the ‘@’ icon.
The post Settings for Top Menu items appeared first on MiBase New Zealand.
]]>The post Settings for the Join Now page appeared first on MiBase New Zealand.
]]>You will also need to review and change, if necessary, the Membership Application Received email template as the system automatically sends this email when someone signs up online.
To review the settings, go to Setup -> Public Settings.
Type the words “join now page” in the Description box. The list will be filtered to show all settings related to the Join Now page. Each setting can be easily changed by clicking the Edit button alongside it, making the change if necessary and clicking Save.
Once the settings are changed you must log out and then log back in again for the settings to take effect.
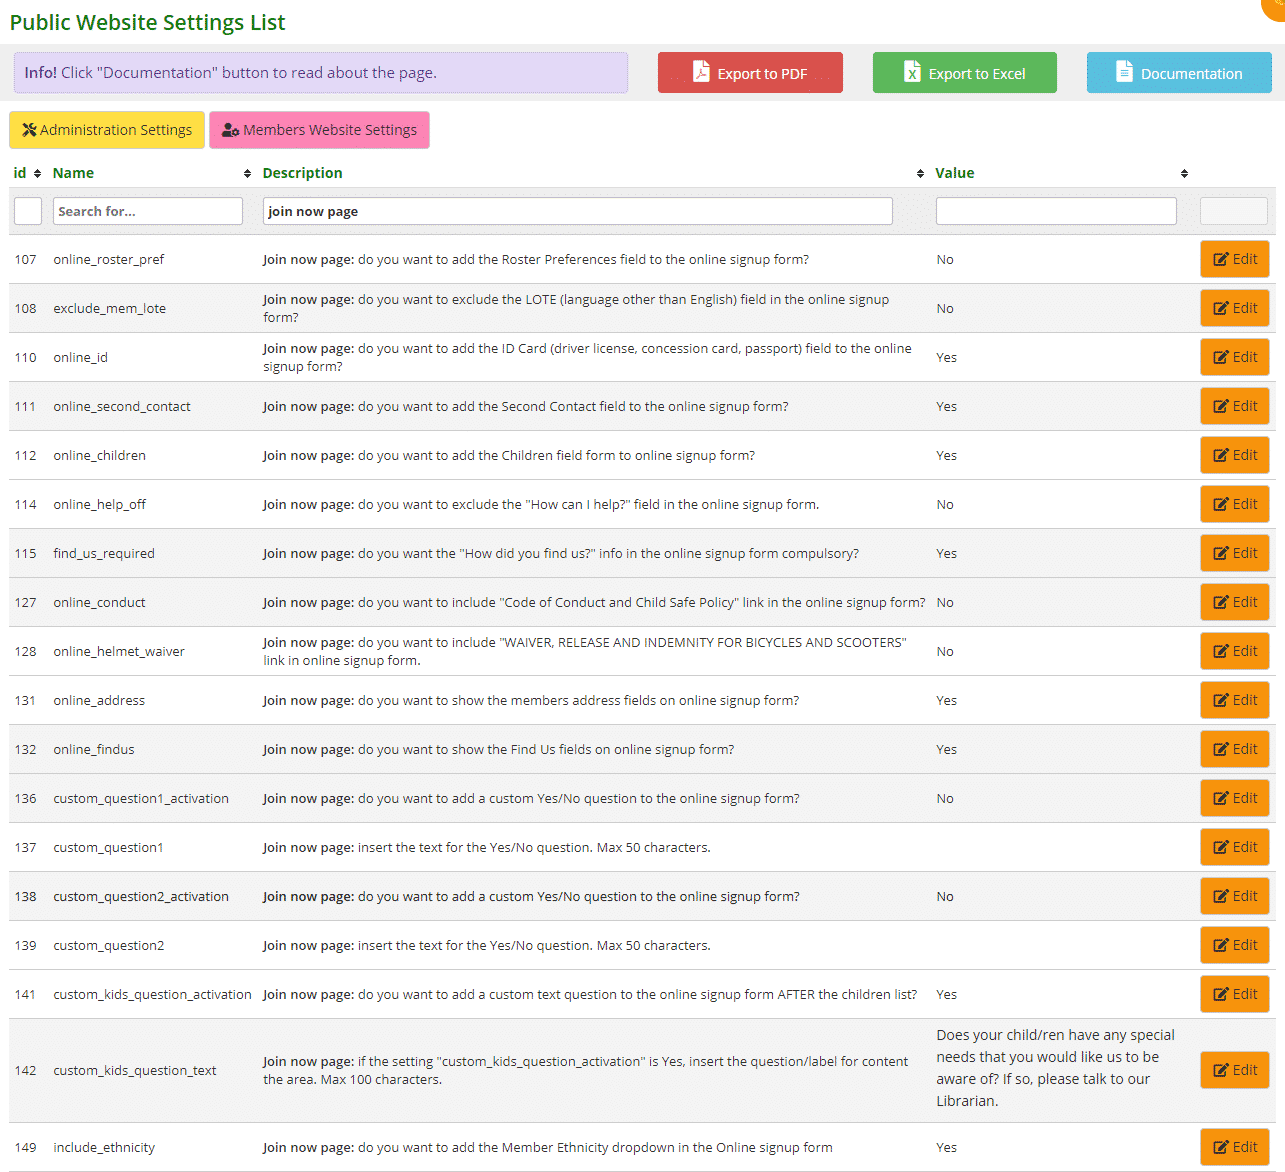
- #107: select Yes to add the Roster Preferences field. Follow the link to learn How to setup up roster preferences
- #108: select Yes to exclude the LOTE field, No to include. Follow the link to learn How to add or delete languages to the dropdown menu in the signup form
- #110: select Yes to add the ID Card field, selecting No the field will not appear
- #111: select Yes to add the Second Contact field, selecting No the field will not appear
- #112: select Yes to add the Children field form, selecting No the field will not appear
- #114: select Yes to exclude the “How can I help?” field, No to include
- #115: select Yes to make answering the question “How did you find us?” compulsory.
- #127: select Yes to include the Code of Conduct link. When this is clicked, a pop-up screen will appear with your terms and conditions. To add these to this screen, you will need to go to Setup -> Edit Website and add the information to the Conditions of Membership box
- #128: select Yes to include the Helmet Waiver link. When this is clicked, a pop-up screen will appear with your policy’s details. To add these to this screen, you will need to go to Setup -> Edit Website and add the information to the Helmet Waiver box
- 131: select Yes to add the Members Address fields, selecting No the fields will not appear. One of the fields is a dropdown menu for Suburbs. Follow the link to learn how to add or delete suburbs to this menu
- #132: this refers to the “How did you find us?” question. Select Yes to include, No to exclude. Follow the link to learn how to add answers to this question in the dropdown menu of the signup form
- #136/138: select Yes to add a Yes/No custom question, No the field will not appear
- #137/139: if you have selected yes to #136 and #138, type in the custom question here
- #141: select Yes to add a custom question under the Children’s list, No the field will not appear
- #142: if you have selected yes to #142, type in the custom question here
- #149: select Yes to include the Ethnicity field, No to exclude. Follow the link to learn how to add or delete ethnicities to the dropdown menu in the signup form
The post Settings for the Join Now page appeared first on MiBase New Zealand.
]]>The post Setting up the Membership Application Received email template appeared first on MiBase New Zealand.
]]>To create/modify this email template, go to Setup -> Email Template, type in ‘approve’ as shown below, and click the yellow edit button.

Then change the content in the email.
You can also add any generic shortcode you like to the email. Follow this link to view our full list of shortcodes.
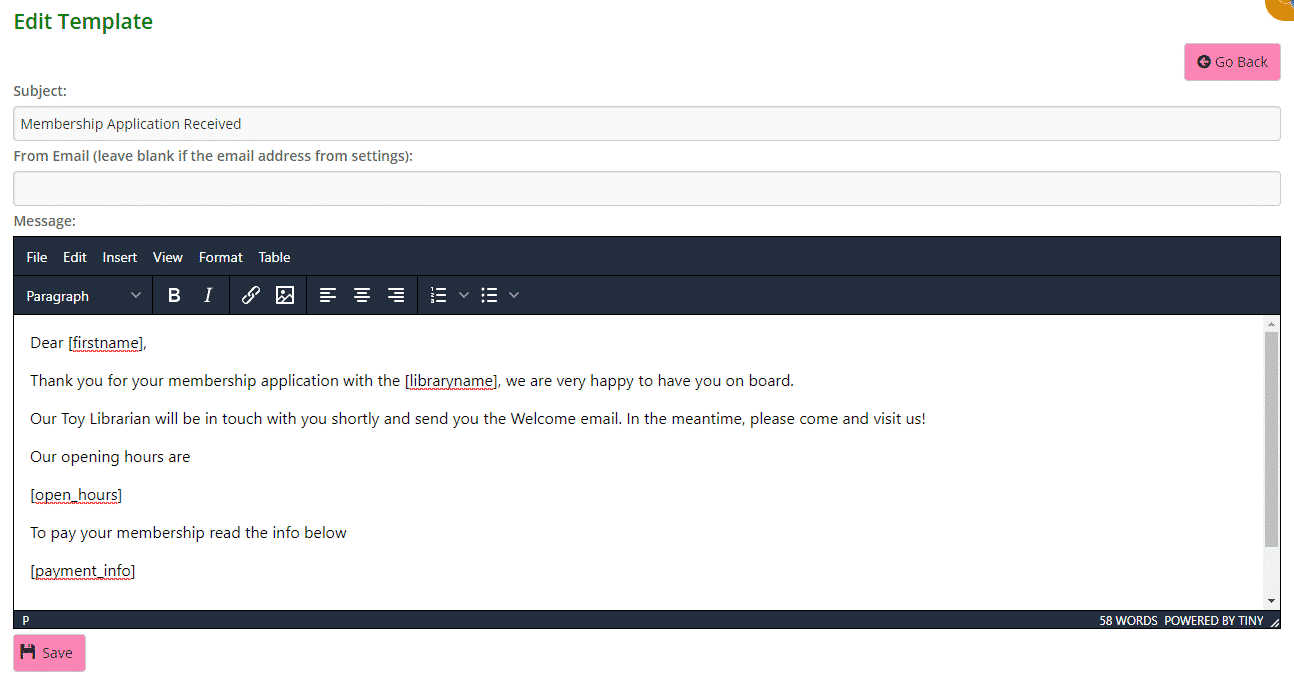
Click Save.
A Success message will appear. Clicking Go Back will take you back to the Email Templates page.

The post Setting up the Membership Application Received email template appeared first on MiBase New Zealand.
]]>The post Settings for the Home page appeared first on MiBase New Zealand.
]]>The second is the sponsor slider where your sponsors’ logos can be viewed.
The third is the toy slider where the last 6 most recent toy purchases can be viewed.
To activate these slideshows, go to Setup -> Public Settings.
Type the word “home” in the Description box. The list will be filtered to show the settings related to the Home page slideshows. Each setting can be easily changed by clicking the Edit button alongside it, making the change if necessary, and clicking Save.
Once the settings are changed you must log out and then log back in again for the settings to take effect.

Select Yes to activate the slideshow/sliders on the home page.
Selecting No, the slideshow/sliders will not appear.
Setting #155 allows you to select the number of toys you would like to see in the latest additions slider. Three toys will appear per each rotation so you will need to select a multiple of 3 for this to work.
Follow this link to add images to the slideshow at the top of the home page.
Follow this link to add images to the sponsor slider on the home page.
The post Settings for the Home page appeared first on MiBase New Zealand.
]]>The post Settings for the Toy Menu appeared first on MiBase New Zealand.
]]>
In this menu, you can choose to view Toys (your library’s full toy list), Popular Toys and New Toys. A fourth optional heading can be added, Reservable Toys, which will be explained further down below.
In the settings, you can decide which order you would like your toy list to appear to the public and how many toys shown in the popular, new toy and reservable list.
Go to Setup -> Public Settings
Type the words “toy menu:” in the Description box. The list will be filtered to show the settings related to the Toy Menu. Each setting can be easily changed by clicking the Edit button alongside it, making the change if necessary and clicking Save.
Once the settings are changed you must log out and then log back in again for the settings to take effect.
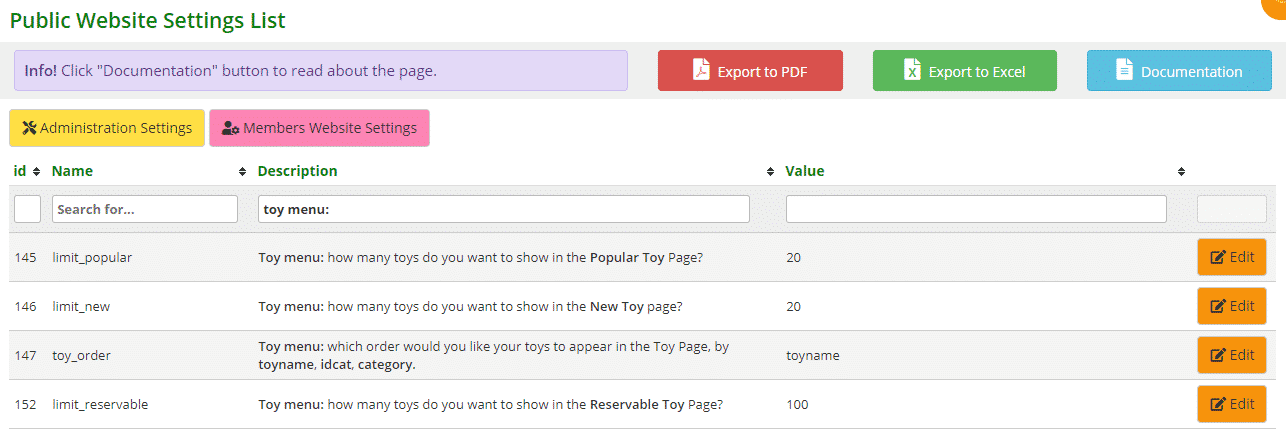
- #145: type in the number of the top most popular toys in your library you would like to see appear in this list
- #146: type in how many of your latest toy purchases you would like to see appear in this list
- #147: choose the order you would like to see your toys appear in the toy page. The order will be either alphabetically or numerically
- #152: this setting depends on whether you have activated setting #151. If you have, type in how many reservable toys you would like to see appear in this list
The post Settings for the Toy Menu appeared first on MiBase New Zealand.
]]>The post Settings for the Toy List page appeared first on MiBase New Zealand.
]]>Some libraries choose not to have a rent or toy hire fee for their toys as it is part of their memberships so this setting would be irrelevant. Some libraries may choose out of personal preference to not have either option appear for each toy.
Whatever option you decide, you can choose and change it by going to Setup -> Public Settings.
Type the words “toy list” in the Description box. The list will be filtered to show the settings related to the Toy List. Each setting can be easily changed by clicking the Edit button alongside it, making the change if necessary and clicking Save.
Once the settings are changed you must log out and then log back in again for the settings to take effect.

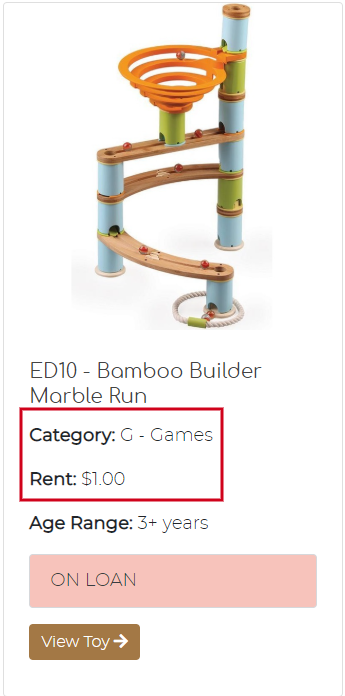
Select Yes to show the rent cost and the toy category in the Toy List page.
Selecting No, the rent cost and the toy category will not appear.
The post Settings for the Toy List page appeared first on MiBase New Zealand.
]]>The post Settings for the Toy Detail page appeared first on MiBase New Zealand.
]]>So, when you see a toy in the Toy List you like and you click View Toy, you will then be taken to the Toy Detail page.
As mentioned in the article Settings for the Toy List page, some libraries choose not to have a rent or toy hire fee for their toys as it is part of their memberships so that setting would be irrelevant. Some libraries choose to not have the replacement cost appear as they feel it deters members from hiring the toy knowing how much, if the toy is damaged by them, it will cost to replace. Some libraries choose to have both so members are given all information regarding the toy.
Whatever option you decide, you can choose and change it by going to Setup -> Public Settings.
Type the words “toy detail” in the Description box. The list will be filtered to show the settings related to Toy Detail. Each setting can be easily changed by clicking the Edit button alongside it, making the change if necessary and clicking Save.
Once the settings are changed you must log out and then log back in again for the settings to take effect.

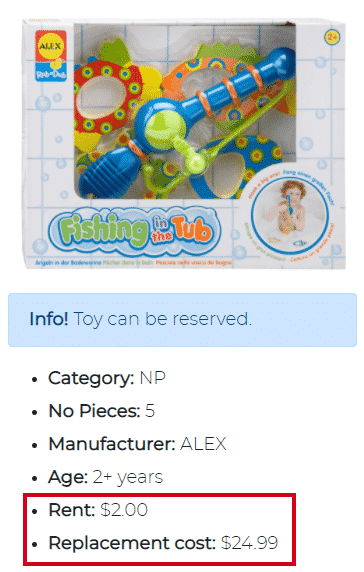
Select Yes to show the rent cost and the replacement cost in the Toy Detail page.
Selecting No, the rent cost and the replacement cost will not appear.
The post Settings for the Toy Detail page appeared first on MiBase New Zealand.
]]>