How Can We Help?
MiBaseNZ‘s Join Now page is the online membership application form for your toy library which can be viewed on your Public Website. If you have decided to activate the Join Now page in the Public Settings, you will need to decide what functions and information you would like to use and obtain from this application form.
You will also need to review and change, if necessary, the Membership Application Received email template as the system automatically sends this email when someone signs up online.
To review the settings, go to Setup -> Public Settings.
Type the words “join now page” in the Description box. The list will be filtered to show all settings related to the Join Now page. Each setting can be easily changed by clicking the Edit button alongside it, making the change if necessary and clicking Save.
Once the settings are changed you must log out and then log back in again for the settings to take effect.
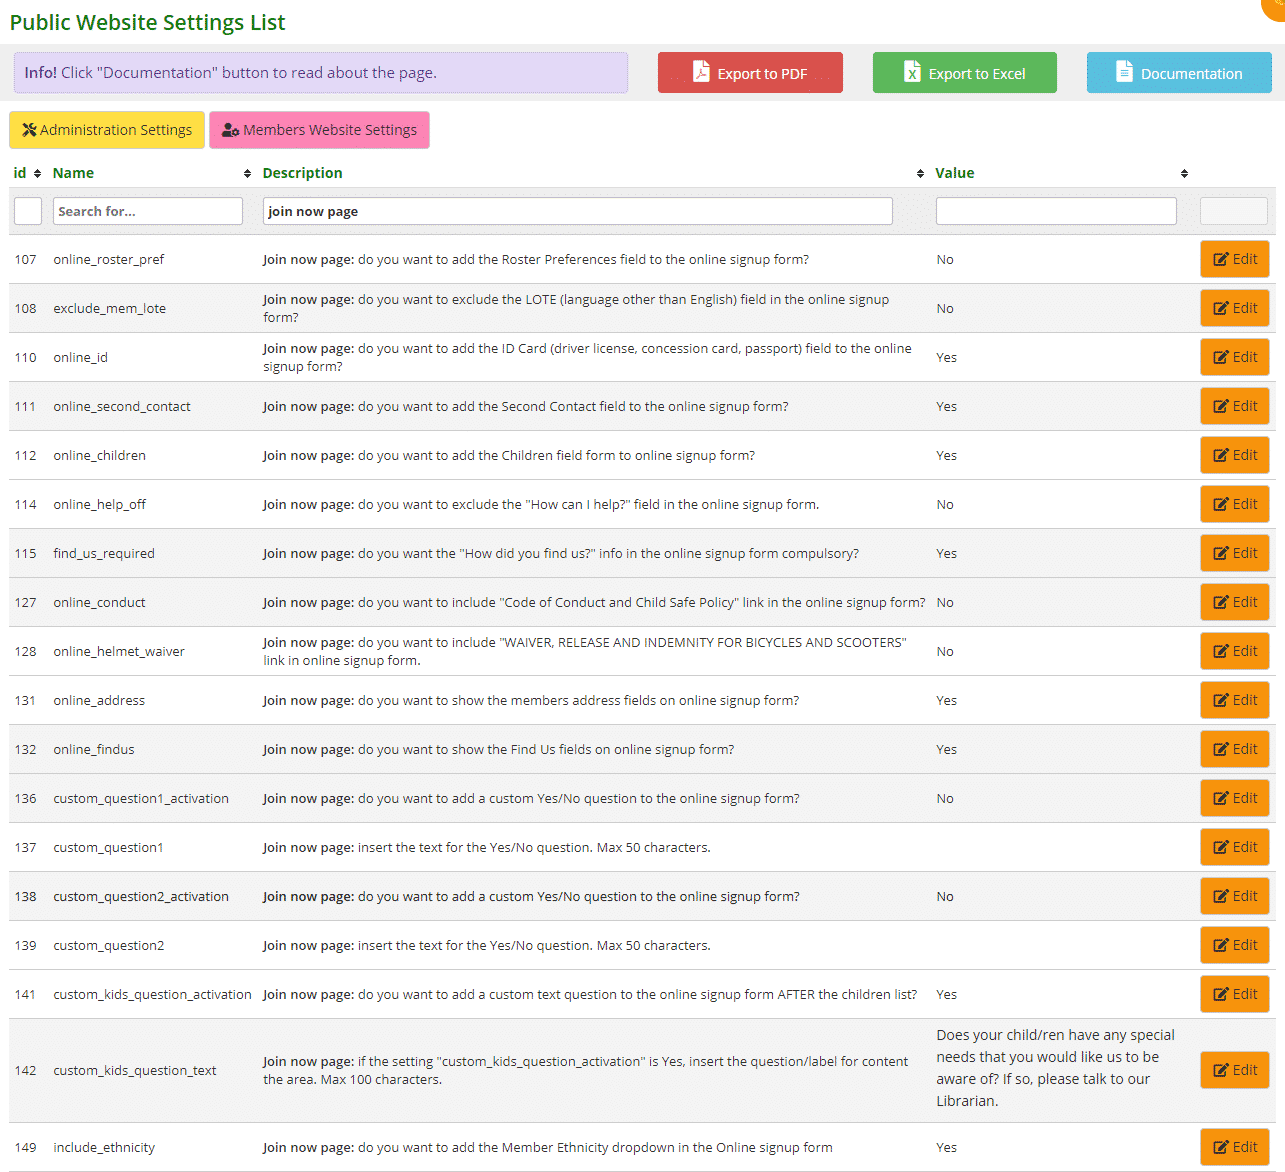
- #107: select Yes to add the Roster Preferences field. Follow the link to learn How to setup up roster preferences
- #108: select Yes to exclude the LOTE field, No to include. Follow the link to learn How to add or delete languages to the dropdown menu in the signup form
- #110: select Yes to add the ID Card field, selecting No the field will not appear
- #111: select Yes to add the Second Contact field, selecting No the field will not appear
- #112: select Yes to add the Children field form, selecting No the field will not appear
- #114: select Yes to exclude the “How can I help?” field, No to include
- #115: select Yes to make answering the question “How did you find us?” compulsory.
- #127: select Yes to include the Code of Conduct link. When this is clicked, a pop-up screen will appear with your terms and conditions. To add these to this screen, you will need to go to Setup -> Edit Website and add the information to the Conditions of Membership box
- #128: select Yes to include the Helmet Waiver link. When this is clicked, a pop-up screen will appear with your policy’s details. To add these to this screen, you will need to go to Setup -> Edit Website and add the information to the Helmet Waiver box
- 131: select Yes to add the Members Address fields, selecting No the fields will not appear. One of the fields is a dropdown menu for Suburbs. Follow the link to learn how to add or delete suburbs to this menu
- #132: this refers to the “How did you find us?” question. Select Yes to include, No to exclude. Follow the link to learn how to add answers to this question in the dropdown menu of the signup form
- #136/138: select Yes to add a Yes/No custom question, No the field will not appear
- #137/139: if you have selected yes to #136 and #138, type in the custom question here
- #141: select Yes to add a custom question under the Children’s list, No the field will not appear
- #142: if you have selected yes to #142, type in the custom question here
- #149: select Yes to include the Ethnicity field, No to exclude. Follow the link to learn how to add or delete ethnicities to the dropdown menu in the signup form
