The post Waiting Members page appeared first on MiBase New Zealand.
]]>To view the waiting list go to Member -> Waiting Members.
The list is not much different from the Members List. The one main difference is that the waiting list has the Joined column which is the date the member joined the library. This is handy for finding out which member is next in line to be activated or to see how long a member has been waiting.

Adding a member to the waiting list
To add members to the waiting list is very simple.
Simply add a new member as per normal and save their details.
Go to their Member Detail page and click Edit.

Under Member Status in the Important Data box, select Waiting from the dropdown menu. Click Save.
The member will automatically be moved to the waiting list.

Activating a member from the waiting list
When a member has left the library and a space becomes available for another member, simply go to the waiting list to select the member who is next in line to join the library.
The list on the Waiting Members page is organised from the most recent member who has signed up to the library down to the earliest member which is at the bottom of the list. You want to select the earliest member.
Under the Status column next to this member select Active from the dropdown menu and refresh the page.
The member will no longer be on the list but will have been added to the Members List.

Note: something to be aware of, when you activate a member the Joined date does not change. You will need to change this date and the expiry date to reflect when they became an active member. To edit these dates you will need to go to their Member Detail page, click Edit, and make the changes.
The post Waiting Members page appeared first on MiBase New Zealand.
]]>The post How to resign or lock a member appeared first on MiBase New Zealand.
]]>A locked member is someone who has potentially stolen toys from your library or who has not paid their fees. By locking a member it is letting all admin know to be aware of this member if they return.
All resigned or locked members can be viewed on the Not Active page and will also not receive any automatic or bulk emails.
There are two ways to resign or lock a member.
The first once set up is automatic, ongoing, and only applies to already expired members.
The second option is instantaneous requiring admin to manually make the change. This can be done for both current and expired members.
- allow MiBaseNZ to automatically move them to the Not Active list by activating the cron job for the automatic email Resigned Members. Once this is set up you can choose how long after the membership has expired that they will be moved. An email will be sent to the member and their details will be automatically moved from the Expired Members list to the Not Active list.
To set this up go to Resigned Members – Automatic Email. - Manually change the status of the member on their Member Detail page which will automatically move them from the list they are currently on to the Not Active list. The steps to achieve this differs slightly for current members and expired members.
Current Members
Find the member you would like to resign or lock either through the Active Members link on the home page or the Members List on the second menu bar.
Once you have found the member change their status to RESIGNED or LOCKED by selecting from the dropdown menu. Refresh the page.

This member will now be listed on the Not Active list.
Expired Members
Find the member you would like to resign or lock either through the Expired Members link on the home page or the Expired Members list by going to Member -> Mem. Expired.
Once you have found your member click the pink Edit button alongside their name.

On the right-hand side in the Important Data box, scroll down to the Member Status and select RESIGNED or LOCKED from the dropdown menu.
Click Save Member.
This member will now be listed on the Not Active list.
The post How to resign or lock a member appeared first on MiBase New Zealand.
]]>The post For members – how to use the Members Website! appeared first on MiBase New Zealand.
]]>
Logging in
There are two ways you can access our Members Login page.
- If you have received our Login email, please click the link provided which will take you there. Type in your user name and password and click Login.
- Visit our Public Website. To the top right of the screen, you will see the word Login. From the dropdown menu select Member Log In. This will take you to the login page. Type in your user name and password and click Login.

Forgot, lost or didn’t receive your login details?
Never fear they are easy to retrieve. When you go to the Members Login page, you will see down the bottom Forgot password? Click this button and it will take you to the Forgot Password page. Remember: This a generic documentation, each Toy Library will have a different logo and colours. Type in your email address and click Email my password. You will receive an email with both your username and password details. 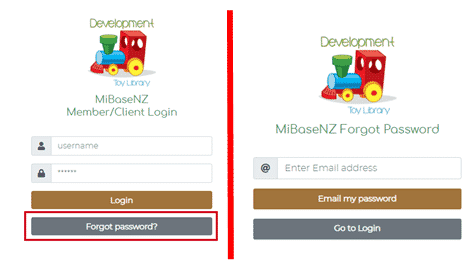
Home Page
Once you have logged in, you will be taken to the Home page. You will see a small introduction to our library and what we offer. Scrolling down you will see your personal details and membership information. You may have the option of editing these details or you may not. If you do, click the Edit button and make the changes, remember to save once done. If not, please email us with the changes and we can update it for you. Continue scrolling down and you will see a list of your children and their birth dates. You can edit their details by clicking the Edit button and if there is a new member to the family you can add their details by clicking the Add New button. Remember to save once done. To the right of the page, you will see all our details and opening hours.
Navigation Bar / Menu
At the top of the Home page, you will see a navigation bar listing all the different pages in our Member Website. This can be seen and accessed from each page. Note: this guide has been created for all toy libraries to use so some of the pages may not apply to our toy library. To the far right, you will see the word Actions. From the dropdown menu, you can choose to log out of our Members Website or visit our Public Website. 
My Library
In this page, you can view all your toy loans, reservations, bookings, roster duties and missing pieces, if any. Any information we would like to share with you such as our Newsletters can also be seen under the heading Files and can be accessed by clicking the Open button. You have the options of renewing your toys here or deleting any reservations, duties or bookings.
Toys
You can choose what toys you would like to view by selecting from the dropdown menu:
- All Toys – our entire toy range
- Popular Toys – our most popular toys in the library
- New Toys – our most recent purchases
- Reservable Toys – only these toys can be reserved online (if this option is not here it means all toys can be reserved and not just a select few).
To reserve a toy or add a toy to your wishlist, click the View Toy button under the toy. You will be taken to the toy’s details page. Under the image, you will see a grey button, click to Add to my Wishlist. This toy will now appear in the My Wishlist page. Scroll further down and you will see a Reserve Toy button. Click this and you will be taken to the Reservation page.
Reserving a toy
Once you are on the Reservation page, you can see the availability of the toy on the calendar by using the coloured availability chart underneath as a guide. Click on the calendar the start date you would like the toy from. The calendar will automatically highlight the hire period for the toy. Click the Reserve button to the right of the calendar. The reservation will then appear under the heading Reserved Toys in the My Library page. We will also be notified of your reservation.
My Wishlist
As mentioned above, once you have added a toy to your wishlist from the toy’s details page, it will automatically be listed here on this page. You can see the status of the toy if it is in the library, if it’s on loan, or when it has been reserved. You can delete the toy from the wishlist by clicking the Delete button. You can reserve the toy by clicking the Reserve Toy button. This will take you to the Reservation page. Follow the steps mentioned above, Reserving a Toy, to see how.
Transactions
This page lists all your transactions; toy hires, payments, fees and fines. Your account balance is shown at the bottom of the page.
Roster
If you have a duty membership or you would just like to help out at our library, this is where you can book your duties. Choose the day you can come in and click the Add My Duty button. We only have a select amount of slots for each session so if this button is not there it means there are none available for that day. Your roster will then appear under the heading Roster Duties in the My Library page. We will also be notified of your duty booking.
If you can no longer make your duty, you have the option of deleting the duty in the Roster page or under the heading Roster Duties in the My Library page. We will also be notified when you delete your booking.
Click & Collect
Just like the shops, you can select a day and time when you want to collect and/or drop off your toys. There are two options with this page.
- Book a time to pick up any toys you have reserved as well as select a time to drop them off. You must reserve toys first before you can use this option You just simply select from the dropdown menus provided
- For no toy reservations, you just want to drop off the toys you already have on loan, then again simply select a date and time from the dropdown menus to do this
Remember to click Save for either option. Once you have made a booking, a Success message will appear and it will also appear under the heading Booking in the My Library page. We will also be notified of your booking.
FAQ
If you have any questions about our library, please check our Frequently Asked Questions page first for answers. If you cannot find what you are looking for please contact us with what you would like to know and we will reply as soon as possible.
The post For members – how to use the Members Website! appeared first on MiBase New Zealand.
]]>The post Member Detail page appeared first on MiBase New Zealand.
]]>There are a number of ways to access a member’s detail page:
- With a new member, this is created once the details have been saved, a success message appears with a box saying OK, and once this is clicked it will take you to the page.
Follow this link for more information on Adding a New Member. - Once a new member is added, in the second menu next to Members List, the member’s id number will appear, clicking that will take you to their detail page

- With a member already in the system, click Members List, find the member you are wanting to view and click the blue View button alongside it

- Throughout the various pages related to members in MiBaseNZ, you will come across member id buttons, when clicked will take you to their detail page, for example in a toy’s detail page, when a toy is on loan to someone
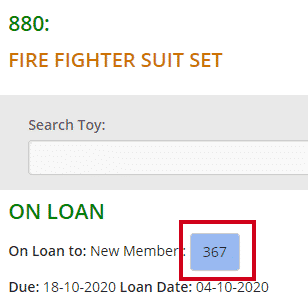
Once you view a member’s detail page, their ID number will appear in the second menu bar next to Members List, as mentioned above. If you decide to go to the Loan page or Payments page their details will automatically appear.
Once you are in the Member Detail page, you will see there is a lot of information. We will break it down into sections and explain it in more detail below.
Member Name

If this isn’t the member you were wanting to view, you can type in their id number in the Member id field if you know it or type in their name in the Select Member field and select from the dropdown menus.
Underneath this is the member’s id number and their name.
Below that is the pink Edit button. Clicking this will take you to the Edit Member page where you can change their details.
Next to that is the Send Welcome Email button. Clicking this will take you to the email page where you can view the email before scrolling down and clicking send.
If you have not set up this email yet or would like to make some changes, follow this link to see how.
Member Information
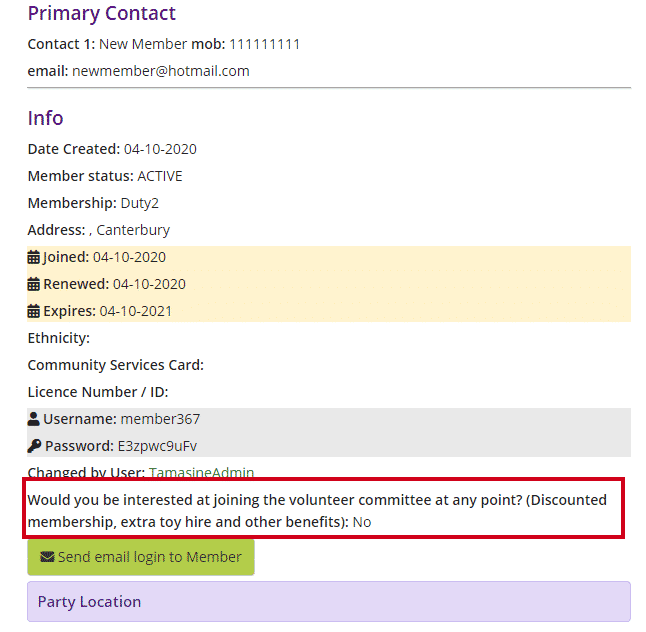
This is a list of all the information that has been saved for this member either when adding new or when updating/amending in the Edit Member page.
The section outlined in red you will not see in the New Member or Edit Member page. This question is listed in the online signup form in the Public Website if you are using it.
The green Send email login to Member button under this, allows you to send the member their login details to the Member Website (if your library is using it). Clicking this will take you to the email page where you can view the email before scrolling down and clicking send.
If you have not set up this email yet or would like to make some changes, follow this link to see how.
Party Location heading is only relevant if you are using the Party Pack module and a member has listed a different location to their address.
Roster
Whether the membership warrants the member to complete duties or not, the information will be recorded here.
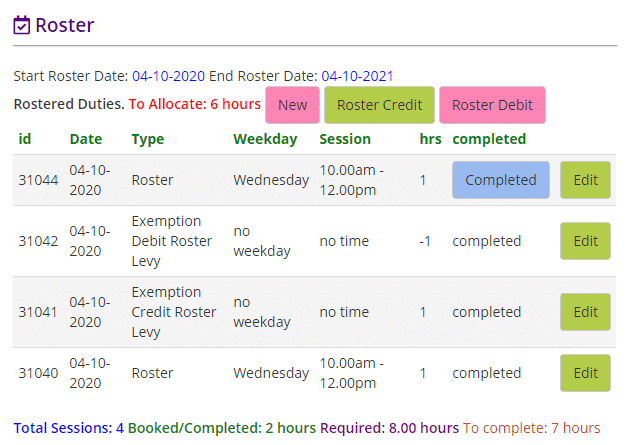
- Start/End Roster Date: the length of the membership
- Rostered Duties. To Allocate: total number of duty hours the member still needs to complete
- New button: clicking this will take you to the Add New Roster page. This will actually generate a whole new roster. To add the member to an already existing roster, go to Member-> Duty Roster. Read this article for further information Adding a member to a duty roster.
For information regarding rosters, read this article about the Roster System - Roster Credit button: clicking this will add a completed roster to the list. Handy if a member volunteers at an Opening Day for example and not during a library session. Clicking the green Edit button allows you to change the details.
- Roster Debit button: does the opposite and will remove a roster as you can see in the second line under the hour’s column, it is a -1. Again clicking the green Edit button allows you to change the details.
- Complete button: when a member has completed a duty, this button needs to be clicked for it to be recorded as done in the system. This can also be done in the Duty Roster page
- Total Sessions: this is the number of duties this member needs to complete
- Booked/Completed: records the total number of duties already completed and the duties booked to be done
- Required: total number of duty hours this member needs to complete
- To complete: number of duty hours the member still needs to do
Member Card
This is where you can select from the dropdown menu a member card to print and give to your members. Select which one you would like from the menu then click Open membercard on pdf.


If you do not like these options and would like a different layout or other information on your member card, Open a ticket with details of your request.
Children
This is where the member’s children are listed. New children can be added here and their details can also be edited.
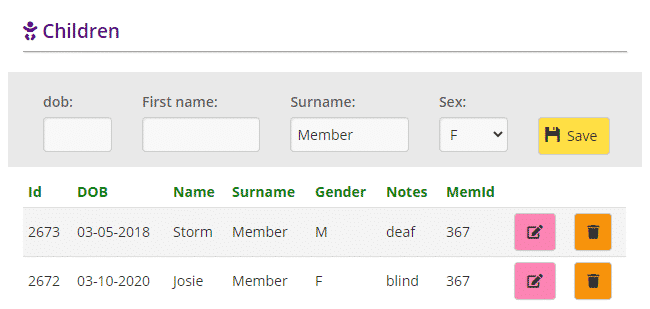
For further information on this, read the article How to add, edit or delete a child’s details.
Toy on Loan

This is a list of all the toys the member is currently hiring. By hovering your mouse over the blue button, the image of the toy will appear. Clicking the button will take you to the toy’s detail page. The member can also see this list in the Member Website.
Missing Pieces
A list of pieces the member has lost when hiring a toy. The member can also see this list in the Member Website.

Reservation Active
A list of current reservations for this member. These can be made by admin or the member can do it for themselves in the Member Website.

The reservation can be deleted by clicking the pink Delete button. It can also be deleted in the Reservation List page or the member can do it for themselves in the Member Website under the My Library page.
Toy loan’s history
A list of all the toys this member has hired out since starting with the toy library.

- #: number allocated for each loan made to this member
- id: the number allocated to identify/record the loan
- Date: day the toy was loaned
- Toy#: self-apparent. Hovering your mouse over the green button, the image of the toy will appear. If the button is white, it means the toy has no image. Clicking the button will take you to the toy’s detail page.
- ToyName: self-apparent
- Due: day the toy was due back
- Returned: the day the toy was returned
- Overdue: the number of days the toy is on loan. If the number is black, that is the number of days left till it is due back. If the number is red, that is the number of days the toy is overdue
- Delete button: clicking this button will permanently remove the toy from the list
The post Member Detail page appeared first on MiBase New Zealand.
]]>The post Editing Member’s Detail page appeared first on MiBase New Zealand.
]]>There are two ways to access the Editing Member page:
- When a new member has been added, in the second menu next to the Members List button, the member’s id number will appear, clicking that will take you to their details page

In the member’s detail page there is a pink Edit button. Clicking this will take you to the Editing Member page

- With a member already in the system, click Members List, find the member you are wanting to edit and click the pink Edit button alongside it

You will see all the areas that have been filled out by the member or admin. The only information that is mandatory for this page is the fields with the red asterisk (*) next to it; membership type and the first and last name. The rest is up to the member to disclose if they wish.
Your toy library will probably require much more information than that so it is up to you to ask for this information from your members when they sign up.
This page lists exactly the same fields as the Add New Member page. Follow the link for more detailed information for each field.
The difference between the pages, however, is the column to the right of the Editing Member page which we will explain in further detail below.
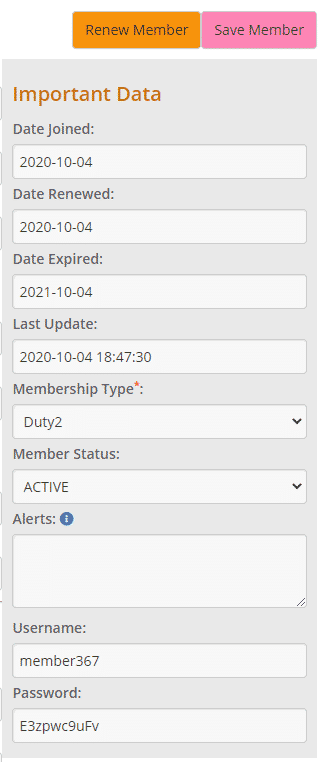
- Renew Member button: clicking this button will renew the member’s membership. Follow this link, Renewing a Membership, for further information
- Save Member button: click this button to save any updated member’s details
- Date Joined: date the member first joined the library
- Date Renewed: most recent date the membership has been renewed. This date will be the same as the date joined if it is a new member
- Date Expired: date the membership expires
- Last Update: the last date and time the member’s details had been edited
- Membership Type: if a member would like to change their membership type, select a new option from the dropdown menu. If a member is renewing their membership at the same time, the new membership type will need to be saved first before clicking the Renew Member button otherwise the new membership fee will not be added correctly to their payment page
- Member Status: a member’s status can be changed from active to locked or resigned by selecting from the dropdown menu. This is usually done if there have been issues with this member or you know this member has moved out of town and will no longer be returning.
- Alerts: this is specific for the member and will appear in their Member Website. It is good to use if you need to let the member know something specific for them
- Username/Password: the member’s login details for the Member Website. It is best to not change either the username as it is quite specific to the member or the password for privacy reasons.
The post Editing Member’s Detail page appeared first on MiBase New Zealand.
]]>The post Members List – Second Menu appeared first on MiBase New Zealand.
]]>This list does not include the expired members, even though they are also deemed active. To see this list go to Members Expired page. If you would like to see a list of all your Not Active Members, follow this link.
MiBaseNZ’s Members List page is easily located in the second menu bar allowing you quick access to the list.
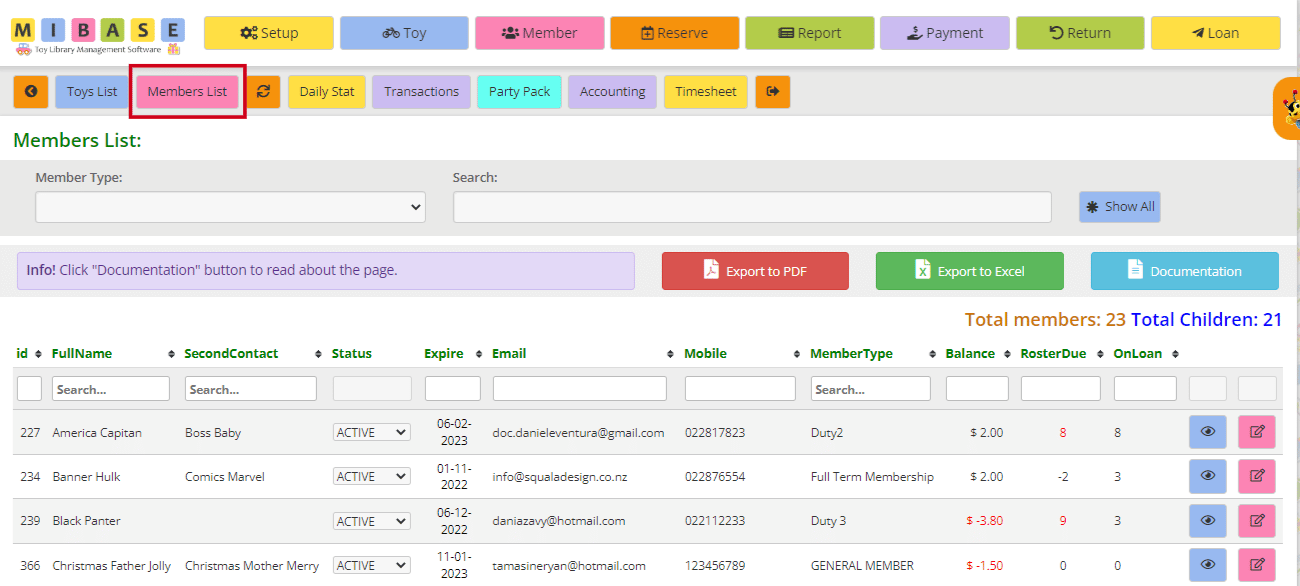
The total number of members and the total number of children are displayed in the top right corner above the table.
At the top of the page, you can see two search boxes. The first is a dropdown menu where you can filter the list by membership type. The second box, you can use to type in a name for example for a more specific search. Click the blue Show All button for the full list to appear again.
You can also sort or filter the list by clicking the arrows next to the heading you want to sort or filter the list by or just type in the search boxes underneath the headings.
So, looking at the above list, you can see the following information for each member:
- id: the member’s id number.
- FullName: the member’s full name
- SecondContact: the full name of the second contact
- Status: all these members’ statuses will be Active however if you need to change a member’s status to locked or resigned you can select either option from the dropdown menu.
- Expire: the date the membership expires. If the date is blue, it means the membership will expire in a month or less
- Email address
- Mobile/Phone numbers
- MemberType: membership type
- Balance: this is the member’s account balance. If it is red, it means the member is owing money
- RosterDue: this lists the number of duties the member is owing. If the number is red, the member owes duties. If the number is negative, the member has completed more duties than expected
- OnLoan: this is the number of toys the member is currently hiring out
To view the member’s full list of details, click on the blue ![]() “View” button.
“View” button.
To edit or update the member’s details, click on the pink ![]() “Edit” button.
“Edit” button.
To download the list to PDF and/or Excel, either click the Export to PDF or Export to Excel buttons. This will export the full list, not a filtered list. If you want to download a filtered list, export it to excel and sort or filter through there.

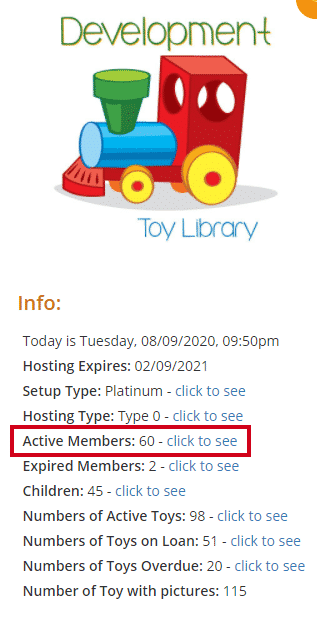
You can also access the Members List via the homepage.
The post Members List – Second Menu appeared first on MiBase New Zealand.
]]>The post Using the 1-Click function appeared first on MiBase New Zealand.
]]>Go to Setup -> 1 click function 
As you can see from the image below, there are two columns of functions. 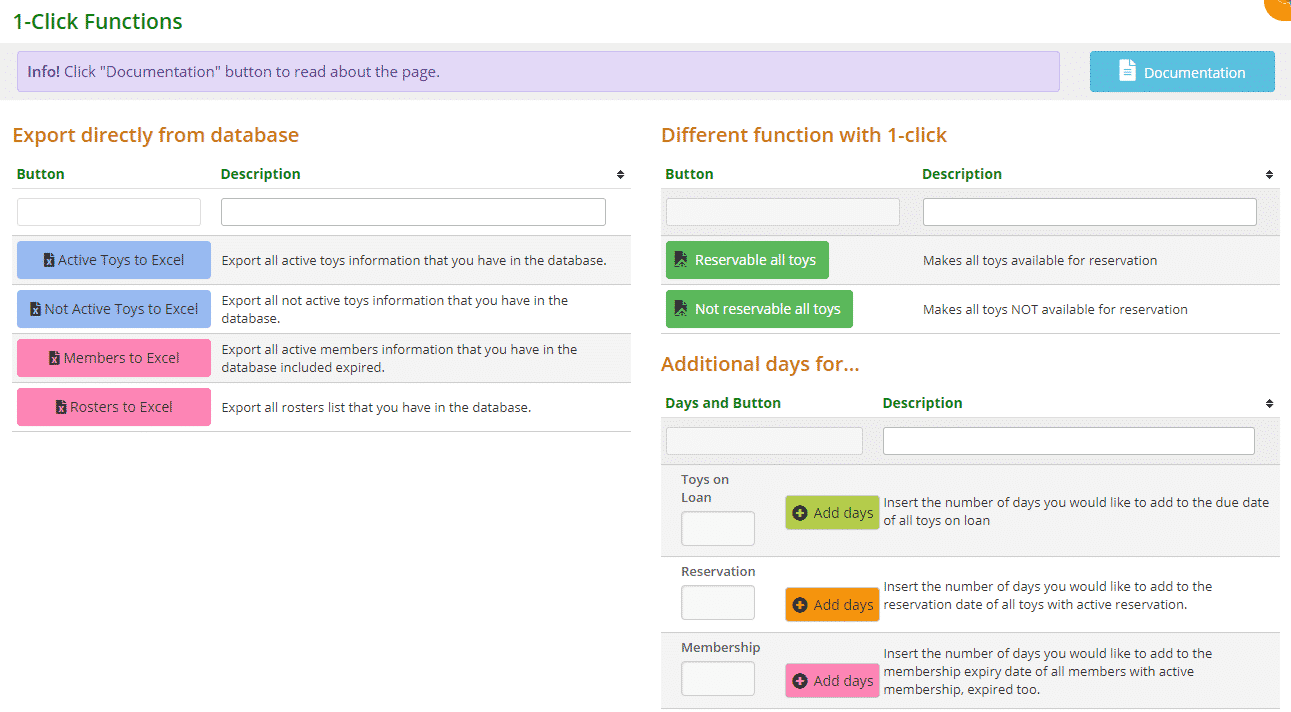
Export Directly from Database
Simply choose the data you would like to export from the database. Each button exports different data which is explained in the description.
- Active Toys to Excel
- Not Active Toys to Excel
- Members to Excel: active members also includes expired members
- Rosters to Excel
Different Function with 1 Click
These functions are applied directly to the database.
- Reservable all toys
- Not reservable all toys
As the description says, with these buttons you can either make all toys available to be reserved or not.
Note: this applies to both admin and members. So if you have selected toys not available to be reserved as you don’t want members to reserve them, admin cannot reserve them either.
If there are only some toys you would like to be able to reserve or some toys you don’t want available for reservation, you will need to go to the individual toy’s edit page and select or deselect the box ‘This Toy can be reserved’. 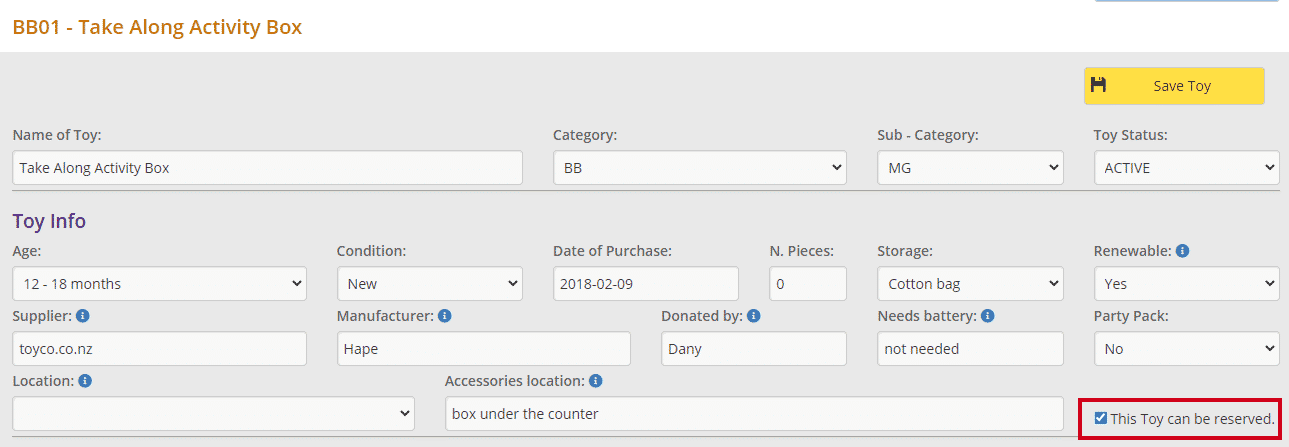
Additional Days For…
This function is great if you would like to extend the due date of all the toys currently on loan, active reservation dates, and membership expiry dates for both active and expired members for a certain number of days without having to manually change the dates for each individual toy/member.
The following article How to add additional days explains this further.
The post Using the 1-Click function appeared first on MiBase New Zealand.
]]>The post Bulk Emails – how to use them appeared first on MiBase New Zealand.
]]>MiBaseNZ has a selection of Bulk Emails you can choose from and change to your library’s liking or you can create your very own.
To see the list of emails and find out how to send them, go to Member -> Bulk Emails.

Before sending an email, there are steps you need to follow which are clearly shown on the page.
Step 1
Choose the email template from the dropdown menu.

The template will be automatically added to the subject and message box shown below.
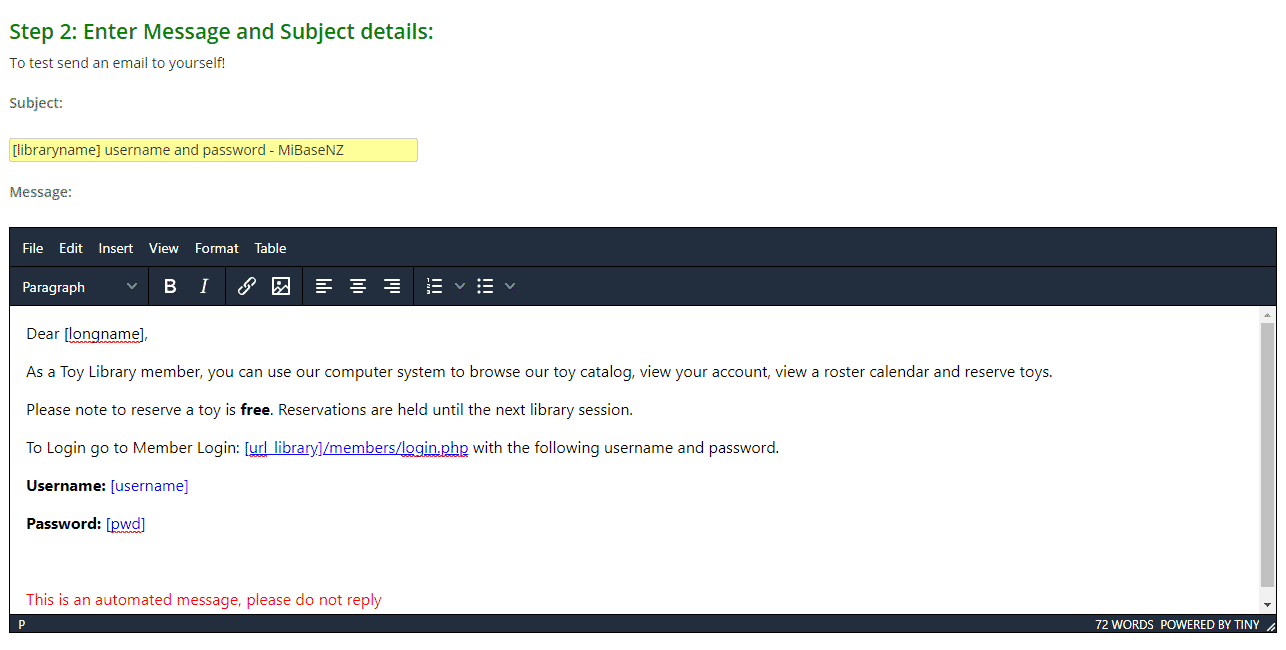
In the example below, the Login email was selected. Check what is written, you can make changes here as well if you need to.
Note: These changes won’t save once the email is sent. To make the changes permanent you will need to go back into the email template under Setup and save them there.
Step 2
Select the members you wish to send the email to by filtering/selecting from the dropdown menus. As you select from the dropdown menus, the list of members underneath will automatically adjust each time to show the filtered list.
If you do not want to filter your members by one of the options, just leave it blank.

- Membership: this dropdown menu contains a list of your library’s memberships as well as the option of filtering your members by who has toys on loan, who has missing parts today or all members with missing parts
- Member Status: you can choose all members (expired and non), expired members or just non-expired members
- Date: will always show the current day’s date
- Search String: you can type in a search if you know what you are looking for, for example, a member’s name
- Template: this is where you choose the type of bulk email you would like to send in Step 1.
By clicking the links below, you will go to that specific Bulk Email to see how to set it up correctly
Bulk Email – generic template you can change to your liking
Login – member’s login details
Member_Update – email asking for members to update their details
Missing – email for members who were missing pieces from their toy returns that day
New_Member – Welcome email for new members
Renew_Membership – like the welcome email but for members renewing their membership
Newsletter – template you can use specifically for your library’s newsletters
You have the option of Creating your own email template. If you do, it will be listed here as well. - Show All / Select All: once you have finished filtering your list of members, if you would like to send the email to all these members, click the Select All button.
If you only want to send to some of these members you will need to check the box next to each members’ name in the list.
If you want to see the full unfiltered list of all your members, click the Show All button.
Step 3
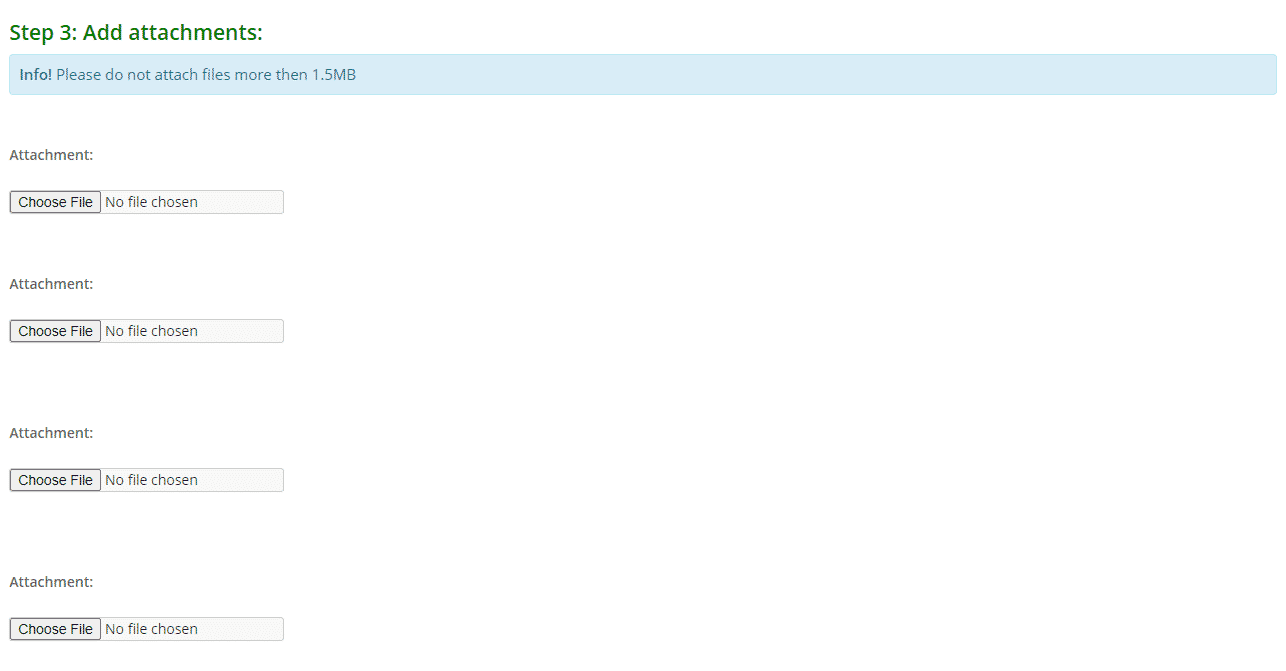
This is where you can add attachments to your email if you would like to.
Click the Choose File button to find and add your attachment. As you can see you can add up to four attachments.
Step 4
Check all the steps above. If you are happy with the email and selected members then click Send Email.

Email Result
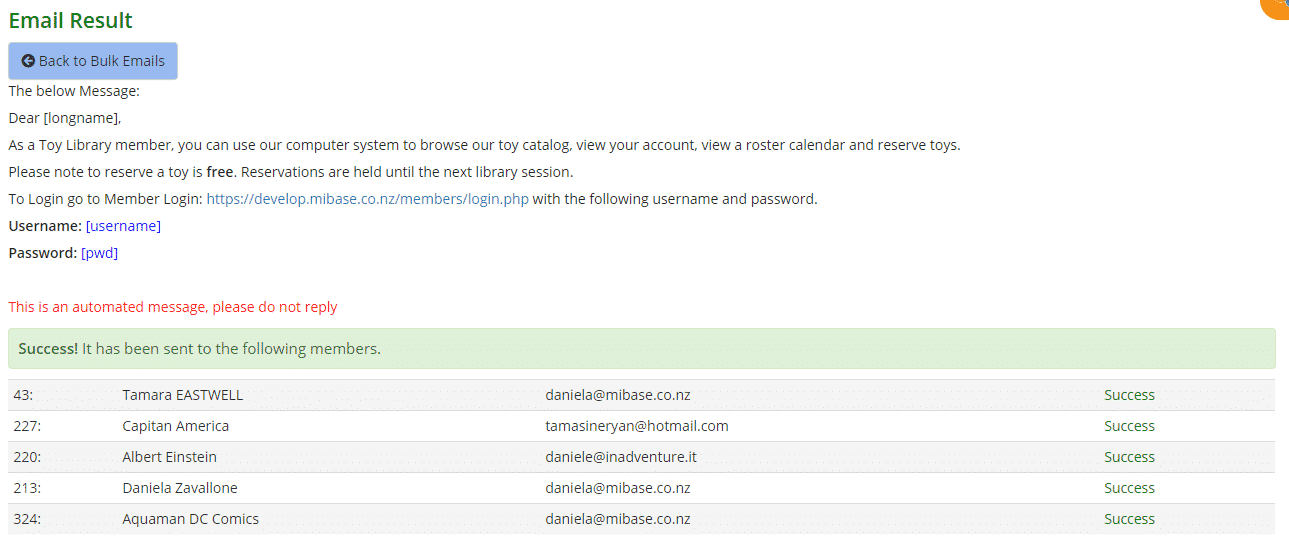
An ‘Email Result’ page will appear with the email template sent and a Success message confirming the list of members the email had been sent to. See the example below,
The post Bulk Emails – how to use them appeared first on MiBase New Zealand.
]]>The post Members Login – Bulk email appeared first on MiBase New Zealand.
]]>
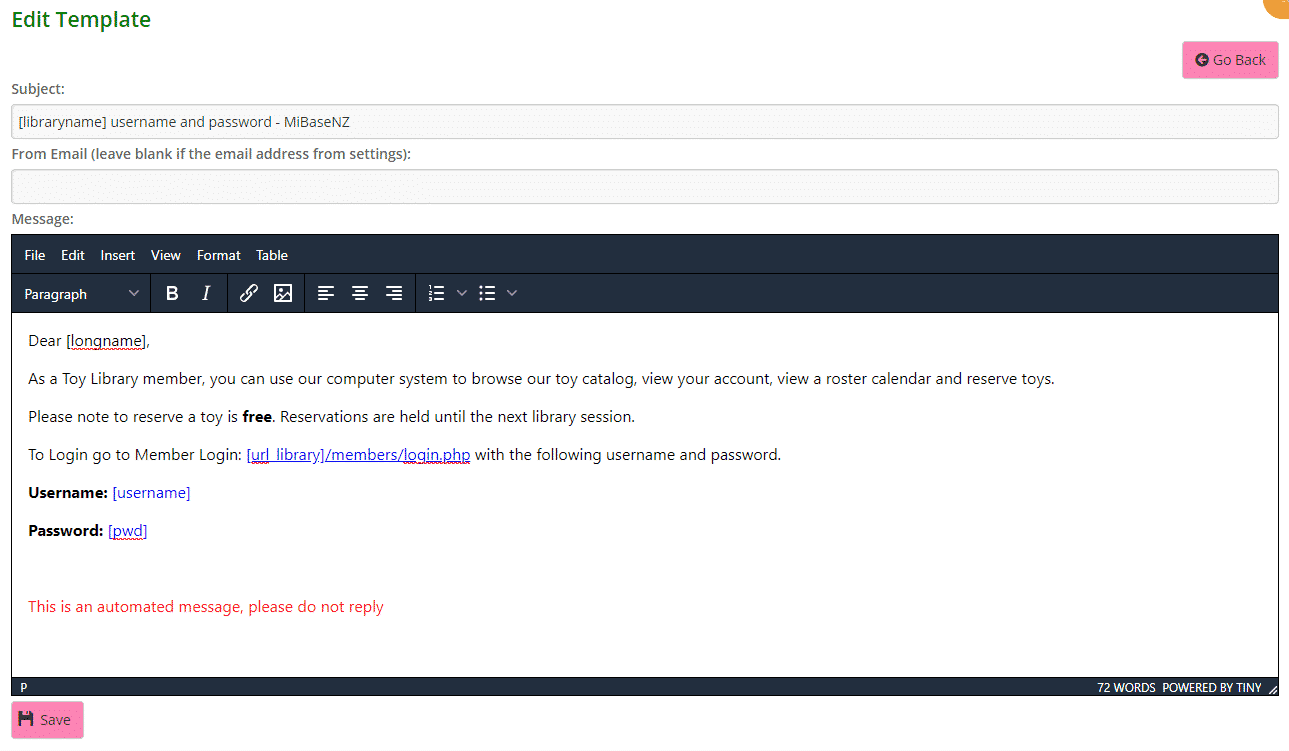
The first important step is to create/modify this email template. Go to Setup -> Email Template, type in ‘login’ as shown below and click the yellow edit button.

Then change the content in the email. As you can see, a few shortcodes have been used. The two key ‘must-have’ shortcodes for this email are [username] and [pwd]. Otherwise, you can add any generic shortcode you like. Follow this link to view our full list of shortcodes.
To add the correct Member Login URL, follow the instruction:
- Select the text that will become an URL
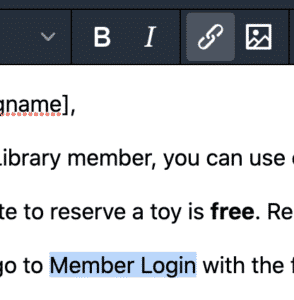
- Click the insert link icon (the chain)
- In the pop up don’t add anything, just choose “Member website” from the last dropdown
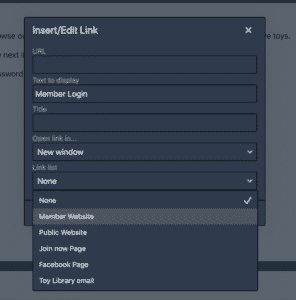
- You will now see the correct dynamic URL, click SAVE
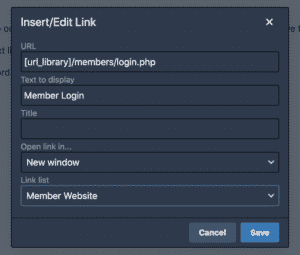
Then click Save on the Email template. A Success message will appear. Clicking Go Back will take you back to the Email Templates page. 
Result
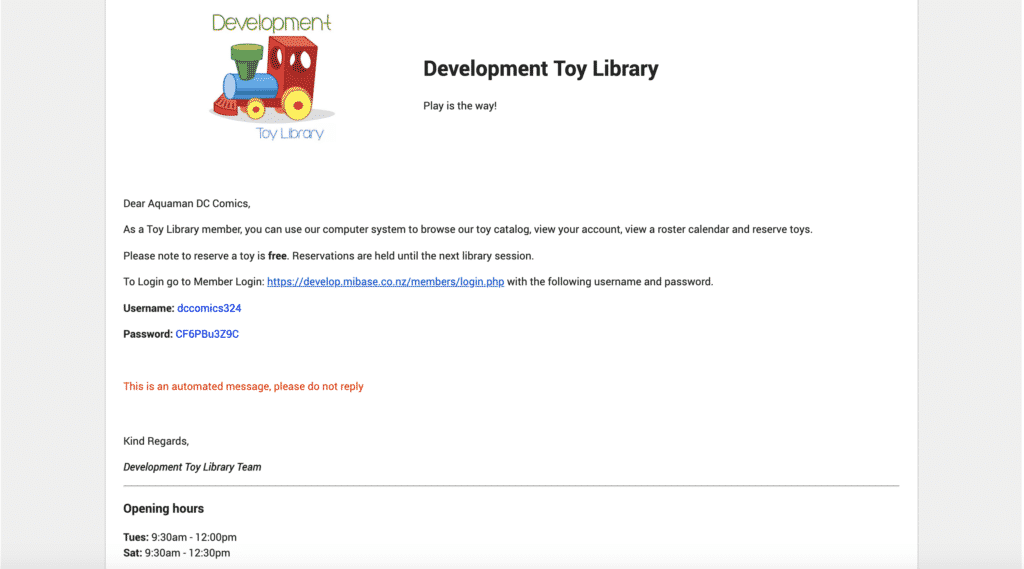
The post Members Login – Bulk email appeared first on MiBase New Zealand.
]]>The post Membership Renewal – Bulk email appeared first on MiBase New Zealand.
]]>To set up this setting go to Setup -> Administration, type in ‘auto_renew_email’ as shown below and click the yellow edit button.

If you would like the email to be sent automatically when the membership is renewed, change the setting to Yes otherwise leaving it as No, you will see the yellow email button Send Renew Membership Email after you renew the membership.

Once you have done this the next important step is to create/modify this email template.
Go to Setup -> Email Template, type in ‘renew’ as shown below and click the yellow edit button.

Then change the content in the email.
You can also add any generic shortcode you like to the email. Follow this link to view our full list of shortcodes.
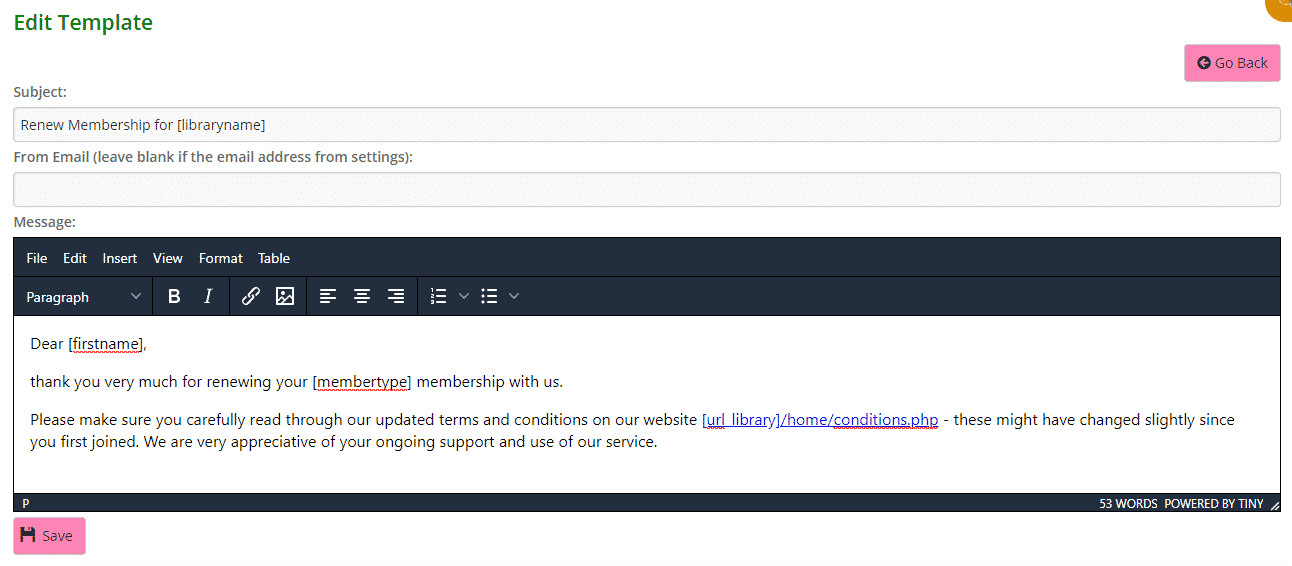
Click Save.
A Success message will appear. Clicking Go Back will take you back to the Email Templates page.

The post Membership Renewal – Bulk email appeared first on MiBase New Zealand.
]]>