The post How to insert a link or add an image appeared first on MiBase New Zealand.
]]>Two features of this text editor are the Insert/edit link and the Insert/edit image buttons.

Inserting a link
Text-based links are styled so that they stand out from other items on the page, they change colour as the mouse is moved over it, and the cursor will also change to a pointing hand.
To insert a link into text, whether it is just one word or a phrase, you need to follow these steps.
- First, load the page or website to which you want to link to. If it is a document you will need to upload it to MiBaseNZ’s Upload Files page.
- In the text, highlight the word or phrase you would like to link.
- Click the Insert/edit link button. A pop-up window will appear.
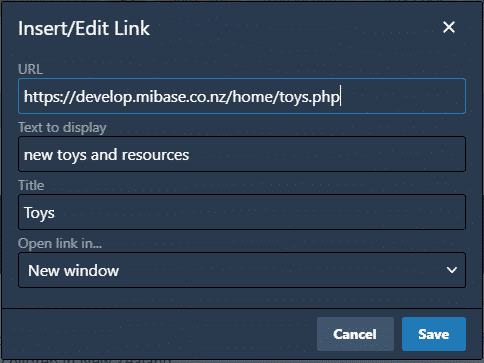
- Copy and paste the URL of the page or website into the URL field or the File Path from the Upload Files page.
The Text to display field should already have the word or phrase you highlighted. If you forgot to highlight, you can just type the words in here.
Add a Title.
The Open link in field should be New window so the page or website can be opened in a new window ensuring your website isn’t lost. - Click Save.
The word or phrase in the text will now be a different colour. Clicking the link (as you can see in the below image), a box will appear above it with the URL.
The last two buttons allow you to remove the link or open the link.

Inserting an image
To insert an image into text you need to follow these steps.
- First, know where you want to insert the image from as it determines where you upload the image.
- In the text, place the focus where you want the image to appear.
- Click the Insert/edit image button. A pop-up window will appear.
– If the image is already on MiBaseNZ’s Upload Files page, you can copy the File Path…

…and paste it in the Source field under General.

– If the image is on your computer click the Upload word and click Browse for an image. Find the image you would like to upload and either double click it or select Open.
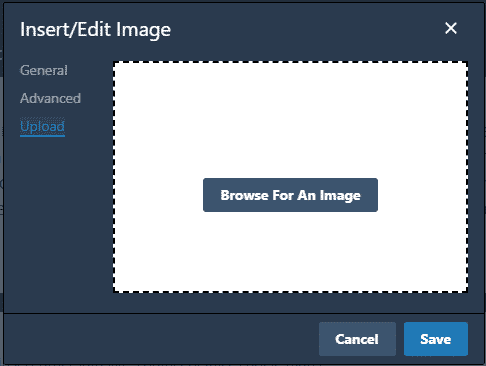
Once it loads, the pop-up window will switch back to the General pop-up window as mentioned above.
The Source field will automatically be filled with the URL for the image you have uploaded. - Add an Image title
- To ensure the size of the image is not too big, change the Width to 300. The height will automatically update. If it is already 300 or less, leave it.
- Click Save.
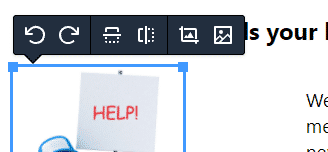
The image will now appear in the text. Clicking the image (as you can see in the below example), a box will appear above it with the following buttons:
- Rotate anti-clockwise
- Rotate clockwise
- Flip vertically
- Flip horizontally
- Edit image – another pop-up window will appear with editing options
- Image options – clicking this last button will open the Insert/edit image pop-up window.
*Note: In the Insert/edit image pop-up window you may have noticed the Advanced option. We advise you not to use this as it messes with the image hence no instructions provided.
The post How to insert a link or add an image appeared first on MiBase New Zealand.
]]>The post Design your Public & Member Website appeared first on MiBase New Zealand.
]]>Go to Setup -> Design your website

Important notes before starting
Your choices will be applied to both websites. Your Public Website can not be different from your Member Website.
Each time you make a selection, click Save. To view the change in the website, you will need to refresh the page.
![]()
At the bottom of the page, you will find the Save button as well as two other buttons.
Import from settings – this button is no longer required. Before this page was created, you would change the backgrounds and colours in the settings. This button allowed you to import your design from your settings instead of starting from the beginning.
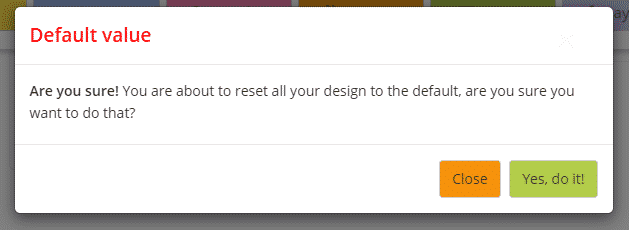
Default value – clicking this button will reset your website back to the original backgrounds, fonts and colour schemes when you first signed up with MiBaseNZ. If you click this button, an Are you sure! pop-up screen will appear.
Background – Body, Header and Footer
The first step in designing your websites is to decide on the backgrounds for the main body of the websites as well as the header and footer which will be seen on every page.
Body background – image or colour
You can either choose an image or a colour, but not both.
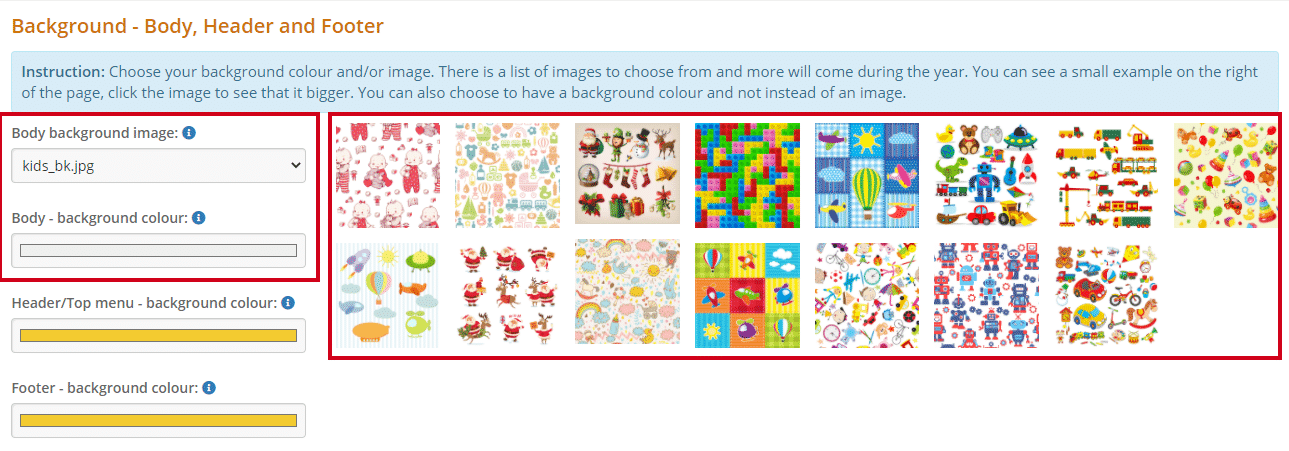
To the right, you will see a selection of images. Click on each one to enlarge it. The name of the image can be seen at the top. Once you have chosen an image you like, to the left you will see the heading Body background image. Find the image name in the dropdown menu and select it.
Scroll down to the bottom of the page and click Save.
Refresh your website to see the changes.
If you would like a different image that is not listed or you would like to see some other options, please send an email to daniela@mibase.co.nz.
If your toy library would prefer to have no image and would rather just a colour background, make sure the Body background image dropdown menu is selected at ‘none’ then choose a colour by clicking the colour bar under the heading Body – background colour.
 You can choose from the rainbow or if you would like to use a colour from your toy library logo, type in the code for the colour. If you don’t know the code for your logo, please send an email to daniela@mibase.co.nz.
Scroll down to the bottom of the page and click Save.
Refresh your website to see the changes.
Examples of image and colour backgrounds


Header and footer – background colour
The header (or top menu) and the footer are the bars at the top and bottom of each page of your website. It is important when choosing these colours to try and match them to the background. Also, when making your choice, be aware of the font colour you would like to use for the words in the header and footer.

Same as above, click the colour bar and choose a colour from the rainbow or type in a colour code.
Scroll down and click Save.
Refresh your website to see the changes.


Fonts – Style and colour
The font is the style of writing. You will be able to decide the font style for the headings and titles and for the main text (body font). You will also be able to choose the font colour for some of this text but not for all. For the main text, the colour can not be changed and is automatically set. You can change however the colour for the titles and headings, the header/top menu, the footer and any links you create within these.
Titles/Headings and Body – font styles
The body font is everything but the title or headings. This should be different from the title or headings as the title is big and short whereas the body needs to be easy to read as there is a lot more writing involved.

To the right, you will see a selection of fonts. Click on each one to enlarge it. Once you have chosen a style you like, to the left you will see the headings Titles/Heading font and Body font. Find the font names in the dropdown menus and select them.
Scroll down to the bottom of the page and click Save.
Refresh your website to see the changes.
If you would like a different font than the ones listed, in the blue box above the font styles, there is a link to a number of other options. Once you see one you like, send an email to daniela@mibase.co.nz and it will be added to the list.
Title/Heading colours
Each of the headings or titles on your website can be a different colour, or not, you decide. Again, think about your colour choices and whether they will work with the background and the header and footer.
Click the colour bar and choose a colour from the rainbow or type in a colour code.
Click Save. Refresh your website to see the changes.
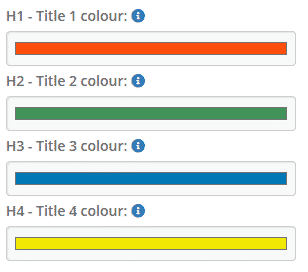
- H1 – Title 1 is the toy library name and the title or heading for each page of the website
- H2 – Title 2 is for sections in the page such as the header under the toy library name
- H3 – Title 3 is for subtitles, in this case, the right-hand column headings; Opening hours, Where we are, Contacts, Follow us
- H4 – Title 4 is also for subtitles, in this case, the Our Team names as well as the membership headings
Font colour – top menu/header, footer and links
When deciding on your colour choices for these fonts, it is important to choose a contrasting colour otherwise it won’t be clear and easy to read.
For example, dark background/light font or light background/dark font. See the examples below.
The Body – font link is the link to another page added within your website pages, for example, an email.
The Footer – font link is the links added in the footer.
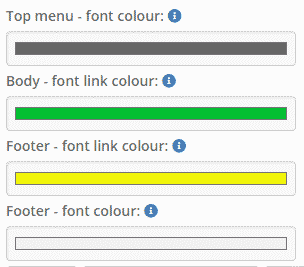
Click the colour bar and choose a colour from the rainbow or type in a colour code.
Click Save. Refresh your website to see the changes.
As you can see, choosing a dark grey colour for the top menu words makes it stand out against the yellow background. The footer, however, the words and link colours are lost against the yellow background.

![]()
The post Design your Public & Member Website appeared first on MiBase New Zealand.
]]>The post Edit your Public & Member Websites appeared first on MiBase New Zealand.
]]>Some sections may be relevant to both or to just the Public Website or the Member Website.
Some sections may not be relevant if your toy library has chosen to not use them in which case you will just need to leave them blank.
Go to Setup -> Edit Website

At the top of the page, you will see a blue Save Web Info button. Once you have added the content for each section, you will need to click this before leaving the page and for the information to be updated in the websites.
If you are making any changes, once you click Save Web Info, you will also need to refresh your website to view these changes. 
Using the toolbar text editor
Each section will have a toolbar text editor along the top to help you to improve the description and general layout of your text as well as provide some formatting.

The best way to understand how to use each setting is to have a play, however, here are some points to help you:
- To create a heading, select the size of the Heading (1-6) from the Paragraph drop down menu. If you have read the Design your website article, you will see whatever heading size you choose will take on the heading colour and font style you have selected here.
- To insert an image or link into the text, read this article How to add an image or link to learn how.
- To create a new paragraph just press ENTER on your keyboard. However, if you just want the next line down without a new paragraph and space between, press SHIFT + ENTER.
- Rather than scrolling through the text box to see what you have written, you can enlarge the text box by dragging the diagonal lines down which are located bottom right of each box.

Home Page
This section is only relevant to the home page of the Public Website.
In this section, you can add whatever content or images about your toy library you like. You can even add links to other pages within your website too. Remember this is the first page people will see when they view your website.
Right Column

This section can be seen in both the Public and Member Websites and appears on almost all pages. Your toy library logo, Opening hours, Contacts and Follow us are all automatically added from the admin settings if you have set them up.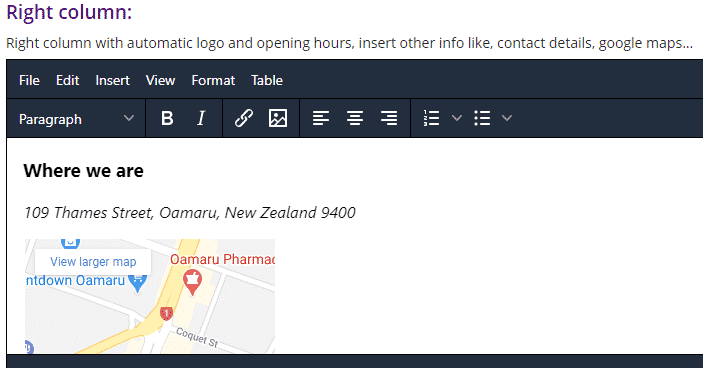
Where we are needs to be manually added here.
It is highly recommended you add a google map here as well as the written address.
To add a map into this section please read this article, How to add a Google map on your website.
FAQ Page
This section can be seen in both the Public and Member Websites IF you have activated the FAQ page. To activate this page, follow this link to see how.
Here is where you add an introduction to the FAQ’s, it is not where you add the questions and answers.
To add the FAQ’s, go to FAQ’s List to see how.
If you choose to not add an introduction, you will just see the list of questions and answers in the FAQs page.
Sponsors Page
This section can only be seen on the Public Website IF you have activated the Sponsors page. To activate this page, follow this link to see how.
The Sponsors page is where you add the logos of all your sponsors. You have two options here:
- Option 1 – is great if you just want to add the logos with no explanation. Like the FAQ page, you can just add an introduction (or not) and the logos are added in Setup -> Upload Files. To learn how to add the logos read this article How to upload files.
- Option 2 – is great if you want to write a little blurb about each sponsor. You can add an introduction (or not) and then add the logos underneath by uploading the images. This is easily done in this section. To learn how, please read this article How to add images.
Our Team page
This section can only be seen on the Public Website IF you have activated the Our Team page. To activate this page, follow this link to see how.
Here is where you add an introduction, it is not where you add your list of committee members/volunteers.
To add your toy library team, go to Our Team page to see how.
If you choose to not add an introduction, you will just see the list of committee members/volunteers on the Our Team page.
News Page
This section can only be seen on the Public Website IF you have activated the News page. To activate this page, follow this link to see how.
Here is where you add an introduction, it is not where you add your news articles. To add these, go to Adding a news article to see how.
If you choose to not add an introduction, you will just see the list of articles.
Member Options
This section can only be seen on the Public Website IF you have activated the Membership page. To activate this page, follow this link to see how.
This is where you add all information on your toy library’s membership options. There is no other page for this. Once the page is activated, this information will be listed there.
Conditions of Membership
This is where you add your toy library’s Terms and Conditions. These can be viewed in two places:
- the footer of both your Public and Member Websites which is seen on every page. The link will take you to the Terms and Conditions page.
- the bottom of the Join Now page (if you have activated it). This link will bring up a pop-up screen showing the Terms and Conditions.

Members Home Page
This section is only relevant to the home page of the Member Website. It is the very first page members will see when they log in.
In this section, you can add whatever content you think is relevant for your members to know about your toy library such as what they can and cannot do, for example, how many times they can renew toys, how long reserved toys are held for if not collected on the day. You could also mention certain functions they can use on the website. You could also add shortcodes such as the member’s ID or their account balance.
To see the list of shortcodes please follow this link Using Shortcodes.
Payment Information: Instructions for members – Joining
This section is linked to the shortcode [payment_info]. You can add your account details and any other message that relates to it as seen below and when you use the above shortcode in an email this information will automatically appear.
Email template example:
Email example: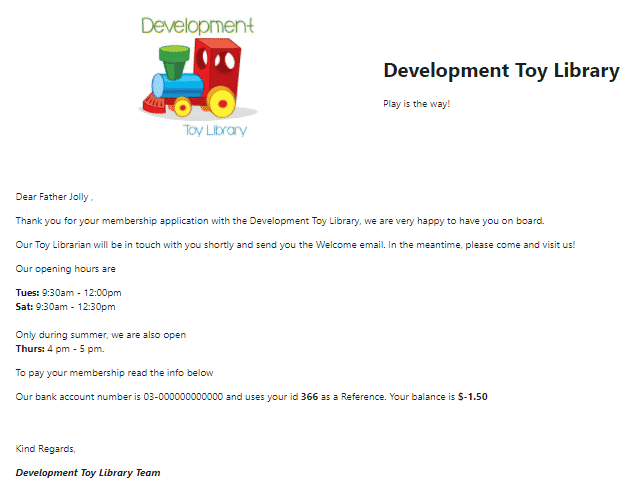
Payment Information: Instructions for members – Renewing
This section is currently being tested. Please do not use it until further notice.
Bouncing Castle Terms and Conditions / Jumping Castle comments for popup
Please do not use these sections as they will be removed in the near future.
Helmet Waiver /Child Safe Policy & Code of Conduct
If your toy library has these policies then they can be added here, if not, leave the sections blank. If you do add these policies, they will appear in the same places as the Terms and Conditions.
With regards to the link in the footer of both your Public and Member Websites, these policies will not have a separate link, they have been added to the end of the Terms and Conditions so when you click the link for the Terms and Conditions, both these policies will be listed there as well.
For the bottom of the Join Now page (if you have activated it), you will see separate links for each policy and clicking on them will bring up a pop-up screen showing the policy.

The post Edit your Public & Member Websites appeared first on MiBase New Zealand.
]]>The post FAQs page – how to add an FAQ appeared first on MiBase New Zealand.
]]>This page is great for adding all the information you want your members and non-members to know and a place that they can view for themselves rather than coming to ask you. The layout is created already, all you need to do is add your question and the answer.
Go to Setup -> FAQs list

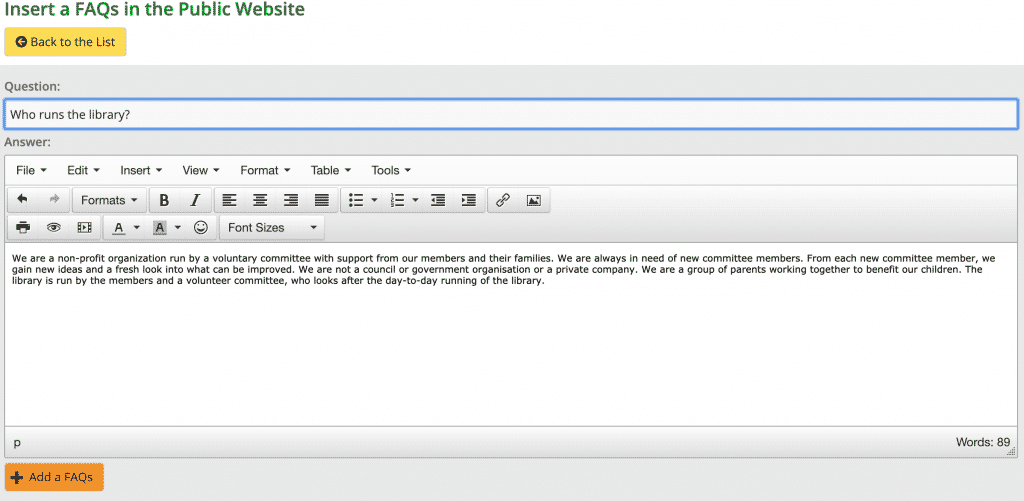
Click the button on the right Add new and enter the information in the below fields.
- Question: enter the question you wish to answer
- Answer: enter the answer to the question
Then click Add a FAQs.
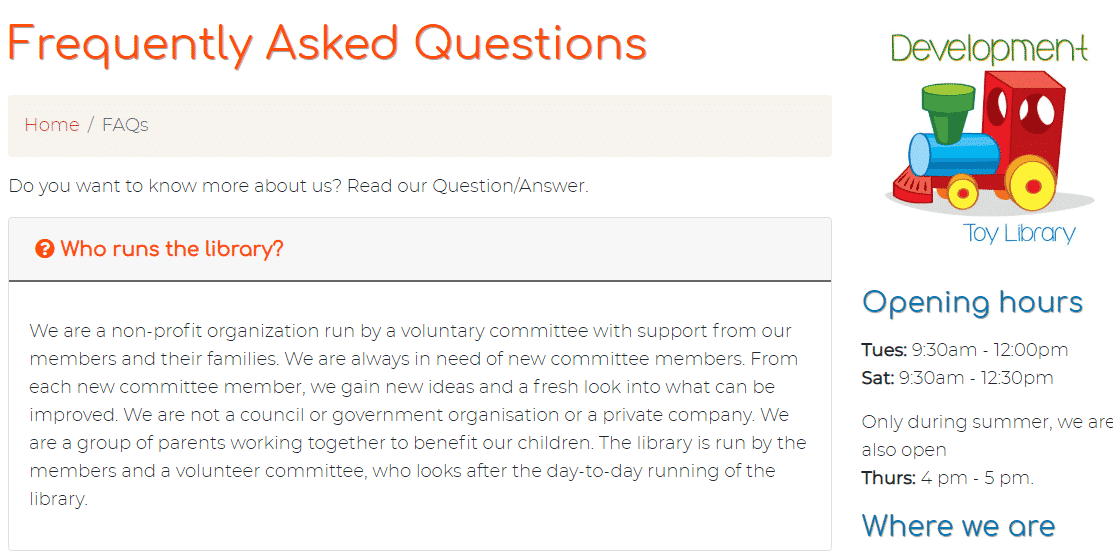
This is what will appear on the website. You can click the question for the answer to appear and click it again for it to retract.
Short Video from our YouTube channel
The post FAQs page – how to add an FAQ appeared first on MiBase New Zealand.
]]>The post News page – how to add an article appeared first on MiBase New Zealand.
]]>It is important to remember to update this page monthly if you want your website to appear at the top of Google searches. The latest news always appears on top and continues down to the oldest news. Each news article is separated by a line.
20 news page items can be seen on the main page, after that, a pagination will appear at the bottom of the page for viewers to click to the previous articles.
To add a news article, go to Setup -> News list

Click on Add New.
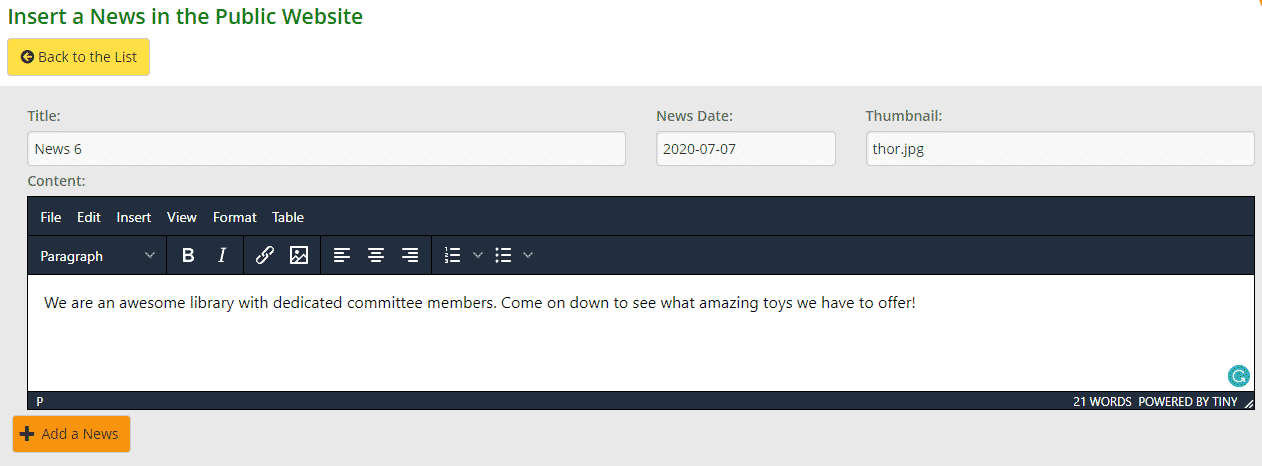
Then insert:
- Title: what you would like the article to be called, not too long
- News Date: this can be the current date or be backdated, default is the current date
- Thumbnail: this is for adding pictures to the article, please refer to How to upload files to learn how to upload media
Once you have uploaded the picture you need to copy the last section of the file path, which is the file name for the image and paste it in the Thumbnail box
In the below image you would copy the ‘thor.jpg’ and insert this into the thumbnail box

- Content: enter the information for the news article
Then click Add a News.
A Success message will appear. Continue to add another article or click OK when done. This will take you back to the News List page.
After adding the article, if you wish to edit select the yellow button or to delete select the orange button.

Example on the public website: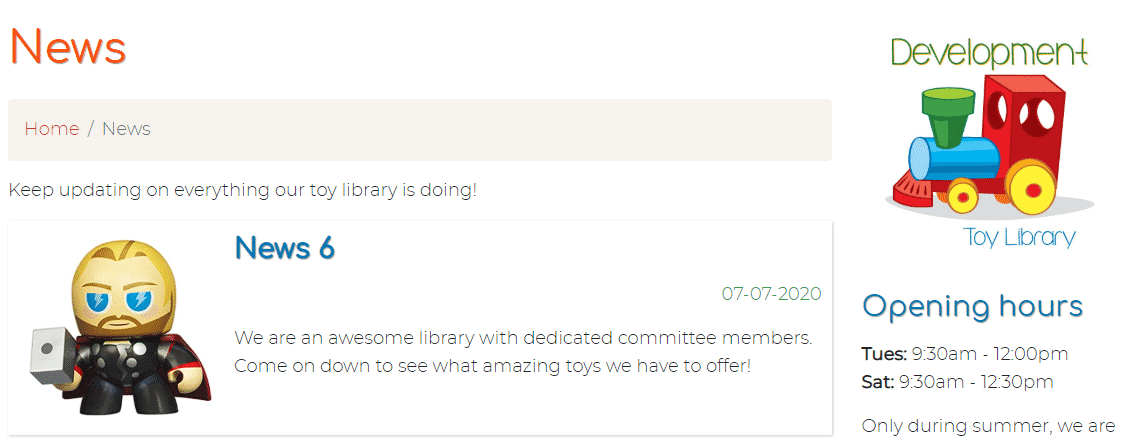
The post News page – how to add an article appeared first on MiBase New Zealand.
]]>The post Activating the Roster System appeared first on MiBase New Zealand.
]]>
Admin Website
The Admin Website is already set up and ready to use. All you will need to do is set up the Roster Preferences and Duty Roster under the Member page.
This must be done before using the system and before it is activated in the Member and Public Websites.
To do this, follow these links:
Creating Roster Preferences
Setting up the Duty Roster
If your toy library would like to use the Roster System in the Member and Public Website, certain settings will need to be activated.
Member Website
By setting up the Roster System in the Member Website, it allows members to log in and choose for themselves when they would like to complete their duties.
To find out how to do this, go to Activating the Roster in the Member Website
Public Website
If you choose to have the roster on your Public Website, members cannot select a duty from there. It is just to show everyone who is doing what roster and when and how many spaces are available.
To find out how to do this, go to Activating the Roster in the Public Website
Automatic Emails for Duties
To let members know about their upcoming duties, you can set up an automatic email to be sent so many days before the duty is to be completed.
Go to Roster Reminder Automatic Email to find out how.
Another reminder email you can use is the Due to Duty email. When a member’s membership is due to expire and they still have some duties to complete, this can be set up to be sent so many months/weeks before the membership expires. There are three Due to Duty templates to use which allows you to stagger the reminders as this email is only sent once.
Go to Due to Duty Automatic Email to find out how.
Where you can view Duty Roster information
There are a number of places members’ duties can be viewed within MiBaseNZ.
- Member Stat page: under the table heading ‘TotDuties’, you can see the total number of duty hours a member has done since they joined. This is a great way to see who helps out a lot.
Go to Member Stat page - Daily Stat page: you can see under the table header ‘Roster’ which member has completed a roster that day.
Go to Daily Stat page - Members List: under the table header ‘RosterDue’ you can see the total number of duty hours the member is owing. If the number is red, the member owes duties. If the number is negative, the member has completed more duties than expected.
Go to Members List page - Reports: although you can export the roster calendar to PDF or Excel, you can also select the ‘Roster with a date range’ report.
Go to Reports - Member Detail Page: you can access this page by clicking the member id number on the Roster page. Scroll down to the heading ‘Roster’. You can see recorded duties if any or what duties still need to be completed.
Watch the Recorded Webinar
The post Activating the Roster System appeared first on MiBase New Zealand.
]]>The post Activating the Roster in the Public Website appeared first on MiBase New Zealand.
]]>Members cannot select a duty from there.
You can decide what information can be shown by changing the settings below.
Go to Setup -> Public Settings

Type in the word ‘roster’ and change the following settings to your liking.

- #118: This is the important one. For the roster calendar to be viewed on the Public Website you need to select Yes
- #113: showing members names – selecting Yes you will see ID number and name, No you will only see the ID number
- #107: when someone joins up to your toy library using the online signup form, you can add the Roster Preferences field to the signup form by selecting Yes
Once the settings are changed you must log out and then log back in again for the settings to take effect.
The post Activating the Roster in the Public Website appeared first on MiBase New Zealand.
]]>The post How to add a Google map on your website appeared first on MiBase New Zealand.
]]>When adding a location, it is highly recommended you add (or embed) a map. There are a few reasons why it is a good idea but mainly it is more convenient and helpful for visitors to locate your library and get directions saving them having to search for it themselves and leaving your website to do so. It is also creating an interface that is visually rich and engaging to your users.
Go to Setup -> Edit Website and scroll down to the section called Right Column. This is where you add the location of your library and the map.


To add a Google map you will need to follow these steps:
- Open Google Maps
- Type in your toy library location in the search bar in the top left of the page. When you have selected the correct address, you will see a Share button appear below. Click this.
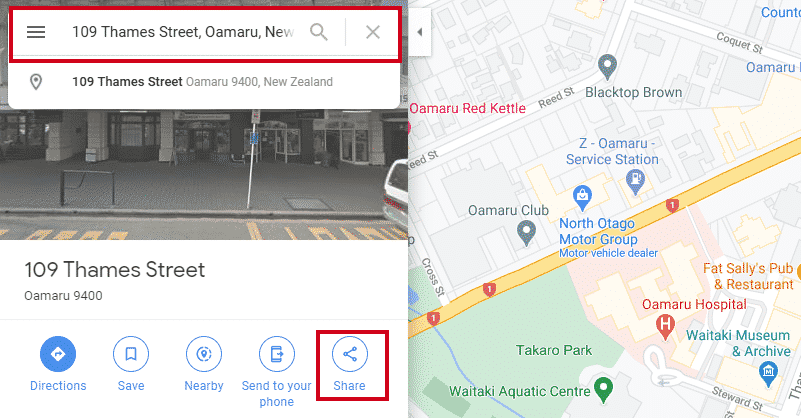
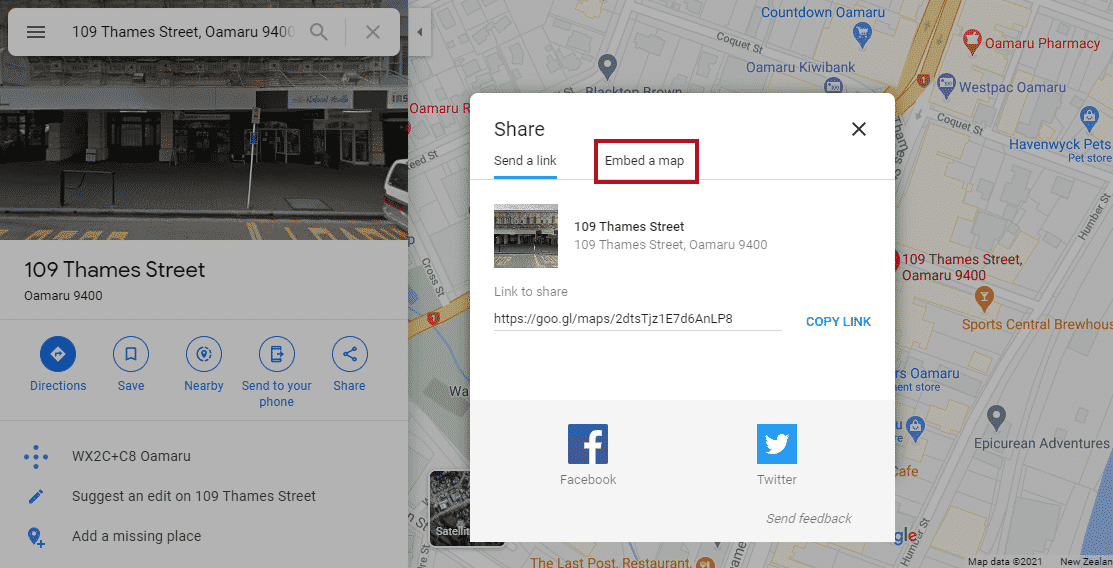
- You will see a new pop-up window appear. Select Embed a Map.
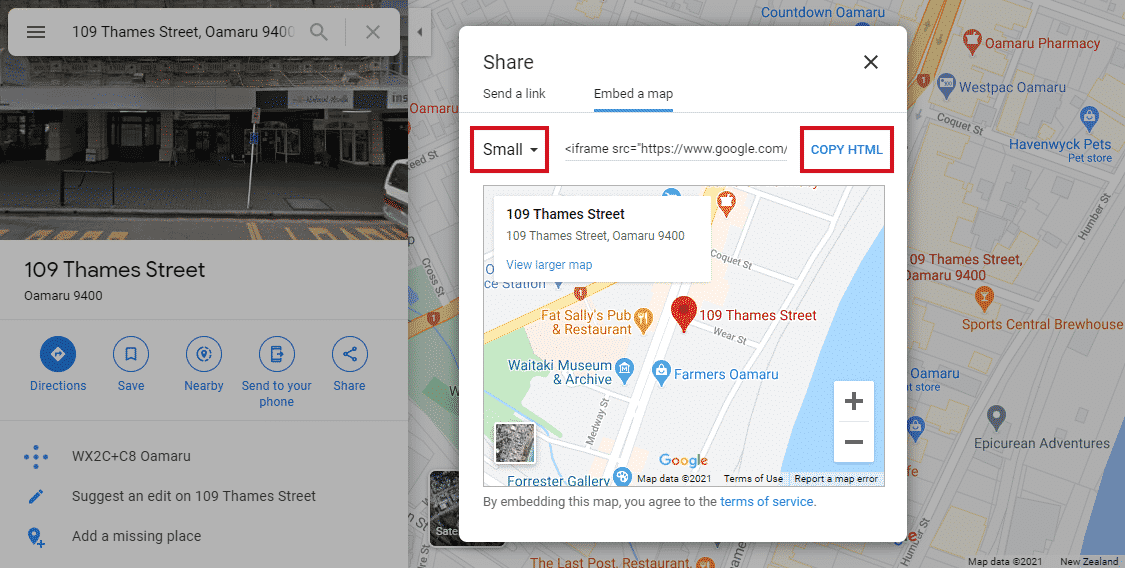
- Decide on the size of the map you would like on your website. Your options are small, medium, large, custom size. For MiBaseNZ’s website, small is the best option.
Copy the HTML code by clicking the words.
- Go back to MiBaseNZ’s admin website, Setup -> Edit Website, Right Column.
Select Insert -> Media.

- A pop-up window will appear. Select Embed and paste the HTML code.

- Select General and you will see the Source and size of the image will have automatically been added.
To ensure the size of the image is not too big, change the Width to 300. The height will automatically update.

- Click Save.
The post How to add a Google map on your website appeared first on MiBase New Zealand.
]]>The post Setting up your Public Website appeared first on MiBase New Zealand.
]]>To do this you will need to check and change each setting in the Public Website Settings page.
There are two places you can access this page:
1. Go to Setup -> Administration

….and click on Public Website Settings

2. Go to Setup -> Public Settings

Using either option will take you into the settings page where you will see a long list of all the settings you will need to check and change according to how you want your Public Website set up.
The list can be filtered by the modules/pages MiBaseNZ offers to make it easier to understand and to see the different functions you can choose (see outlined in the below image).
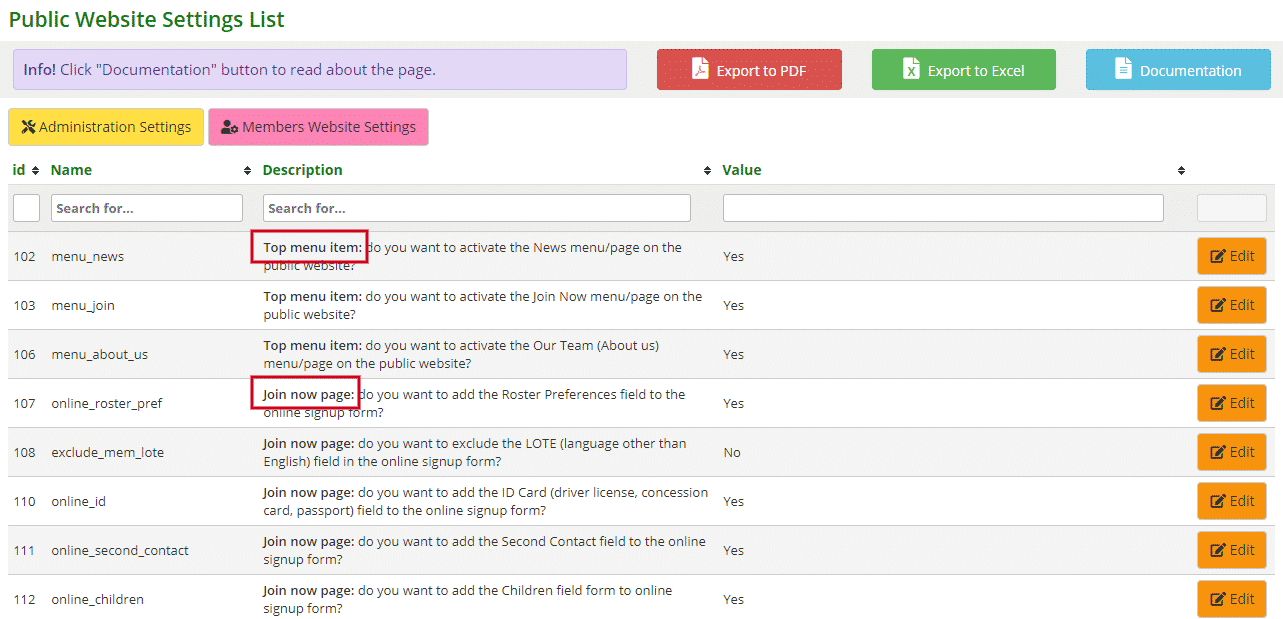
There a 6 modules/pages we can filter the list by. They are:
- Top menu item: these settings are for activating the modules/pages in the navigation bar that can be seen across the top of each page in the Public Website
- Join now page: these settings are related to the online signup form
- Home page: these settings are for the slideshows in the Home page
- Toy menu: these settings are related to the Toys dropdown menu in the navigation bar
- Toy list page: these settings are related to your library’s toys and what information is shown for each toy
- Toy Detail page: these setting are related to a toy’s cost and if you want it seen in Public Website
There are four settings that do not come under one of the above options. These are:


- #113: this setting relates to the Roster page in the Public Website. If you choose to activate the Roster page, this setting allows you to choose whether the members’ names can be seen by everyone or not.
Yes, you will see the member’s ID number and name. No, you will only see the members ID number. - #125: Google Tag Manager is a tool that allows you to manage and deploy marketing tags which are snippets of code or simple pieces of data — usually no more than one to three words — that describe information on a web page. Tags provide details about an item and make it easy to locate related items that have the same tag. You can ask us to create a Google Tag Manager or you can go directly in the link here: https://tagmanager.google.com/ and create your own one.
- #134: This is an important one. To activate your Public Website page you need to select Yes by clicking on the “Edit” button, making the change, and clicking “Save”. Leaving this setting at No, anyone who tries to view it will see a “Coming Soon” page.
- #151: this setting relates to the Toy Menu in the Public and Member Websites. It gives you the option of having a list of toys that can be reserved. This is only relevant for libraries who do not want all their toys to be available for reservation, they just want to provide a selection.
If you want this option then select Yes.
Please note, if you change these settings, you must log out and then log back in again for the settings to take effect.
To view, check and change each of the above groups of settings, follow the links below.
Settings for the Join Now page
Settings for the Toy List page
Settings for the Toy Detail page
The post Setting up your Public Website appeared first on MiBase New Zealand.
]]>The post Settings for Top Menu items appeared first on MiBase New Zealand.
]]>
Each of these modules/pages needs to be activated in the Public Settings page which means you can choose which module/page you would like to use, or not use.
Go to Setup -> Public Settings
Type the words “top menu” in the Description box. The list will be filtered to show all settings related to the Top Menu. Each setting can be easily changed by clicking the Edit button alongside it, making the change if necessary and clicking Save.
Once the settings are changed you must log out and then log back in again for the settings to take effect.
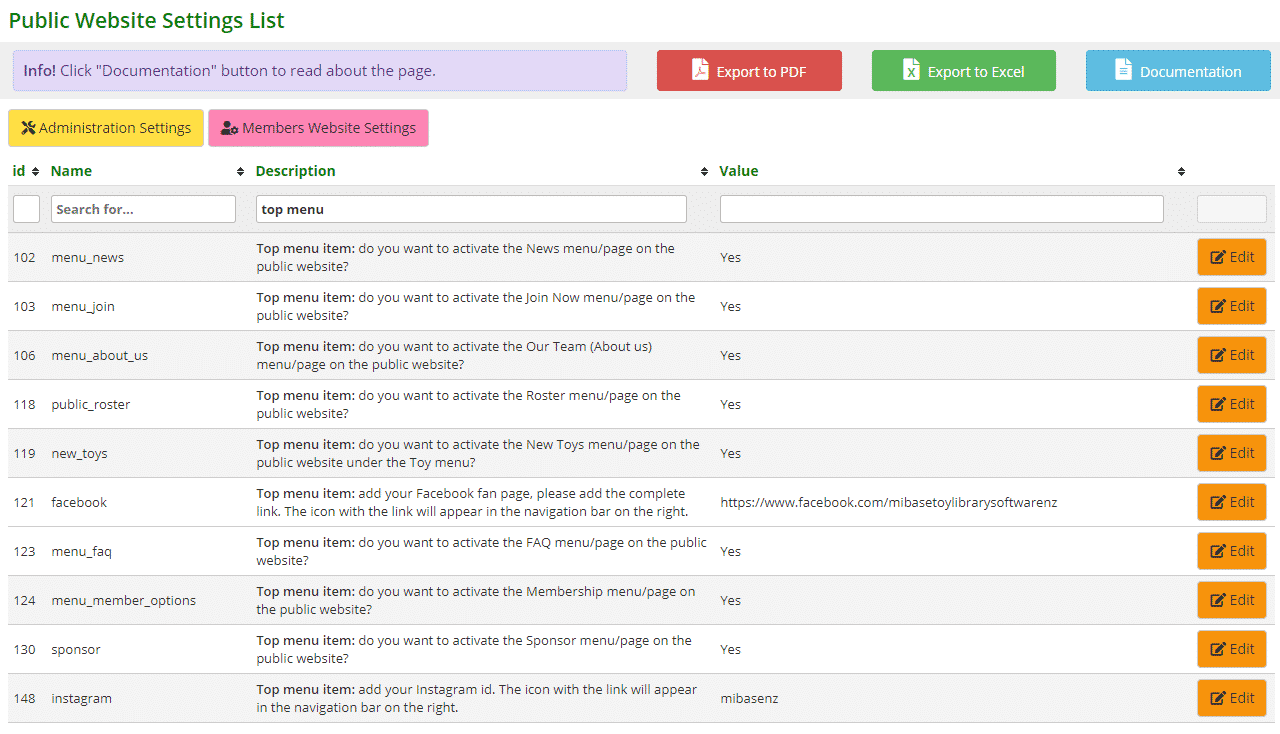
- #102: select Yes to activate the News page in the navigation bar. Follow the link to learn how to add a news article to this page
- #103: select Yes to activate the Join Now page in the navigation bar, selecting No the page will not appear. Follow the link to learn how to setup the Join now page
- #106: select Yes to activate the Our Team page in the navigation bar. Follow the link to learn how to edit the Our Team page
- #118: select Yes to activate the Roster page in the navigation bar. Follow the link to learn how to add or delete roster preferences to this page
- #119: select Yes to activate the New Toys page under the Toys menu in the navigation bar, selecting No the option/page will not appear
- #121: by adding the link to your Facebook page (if you have one), the Facebook icon will appear in the navigation bar on the right (see above) as well as under the Follow us section in the right column of the Public Website.
- #123: select Yes to activate the FAQ page in the navigation bar. Follow the link to learn how to add FAQ’s to this page
- #124: select Yes to activate the Membership page in the navigation bar. To add all your membership options to this page, you will need to go to Setup -> Edit Website. Scroll down to the heading Member Options on Website and type in the details there
- #130: select Yes to activate the Sponsors page in the navigation bar. Here you can add the logos of all your sponsors. Follow the link to learn how to upload files/logos to this page
- #148: by adding the link to your Instagram account (if you have one), the Instagram icon will appear in the navigation bar on the right (see above). You need to add your library name without the ‘@’ icon.
The post Settings for Top Menu items appeared first on MiBase New Zealand.
]]>