The post MiBaseNZ Admin Website home page schema appeared first on MiBase New Zealand.
]]>Most functions on the page are automatic but there are some that can be activated or deactivated depending on what your library would like to use.
The Home Page schema is described in the image below.
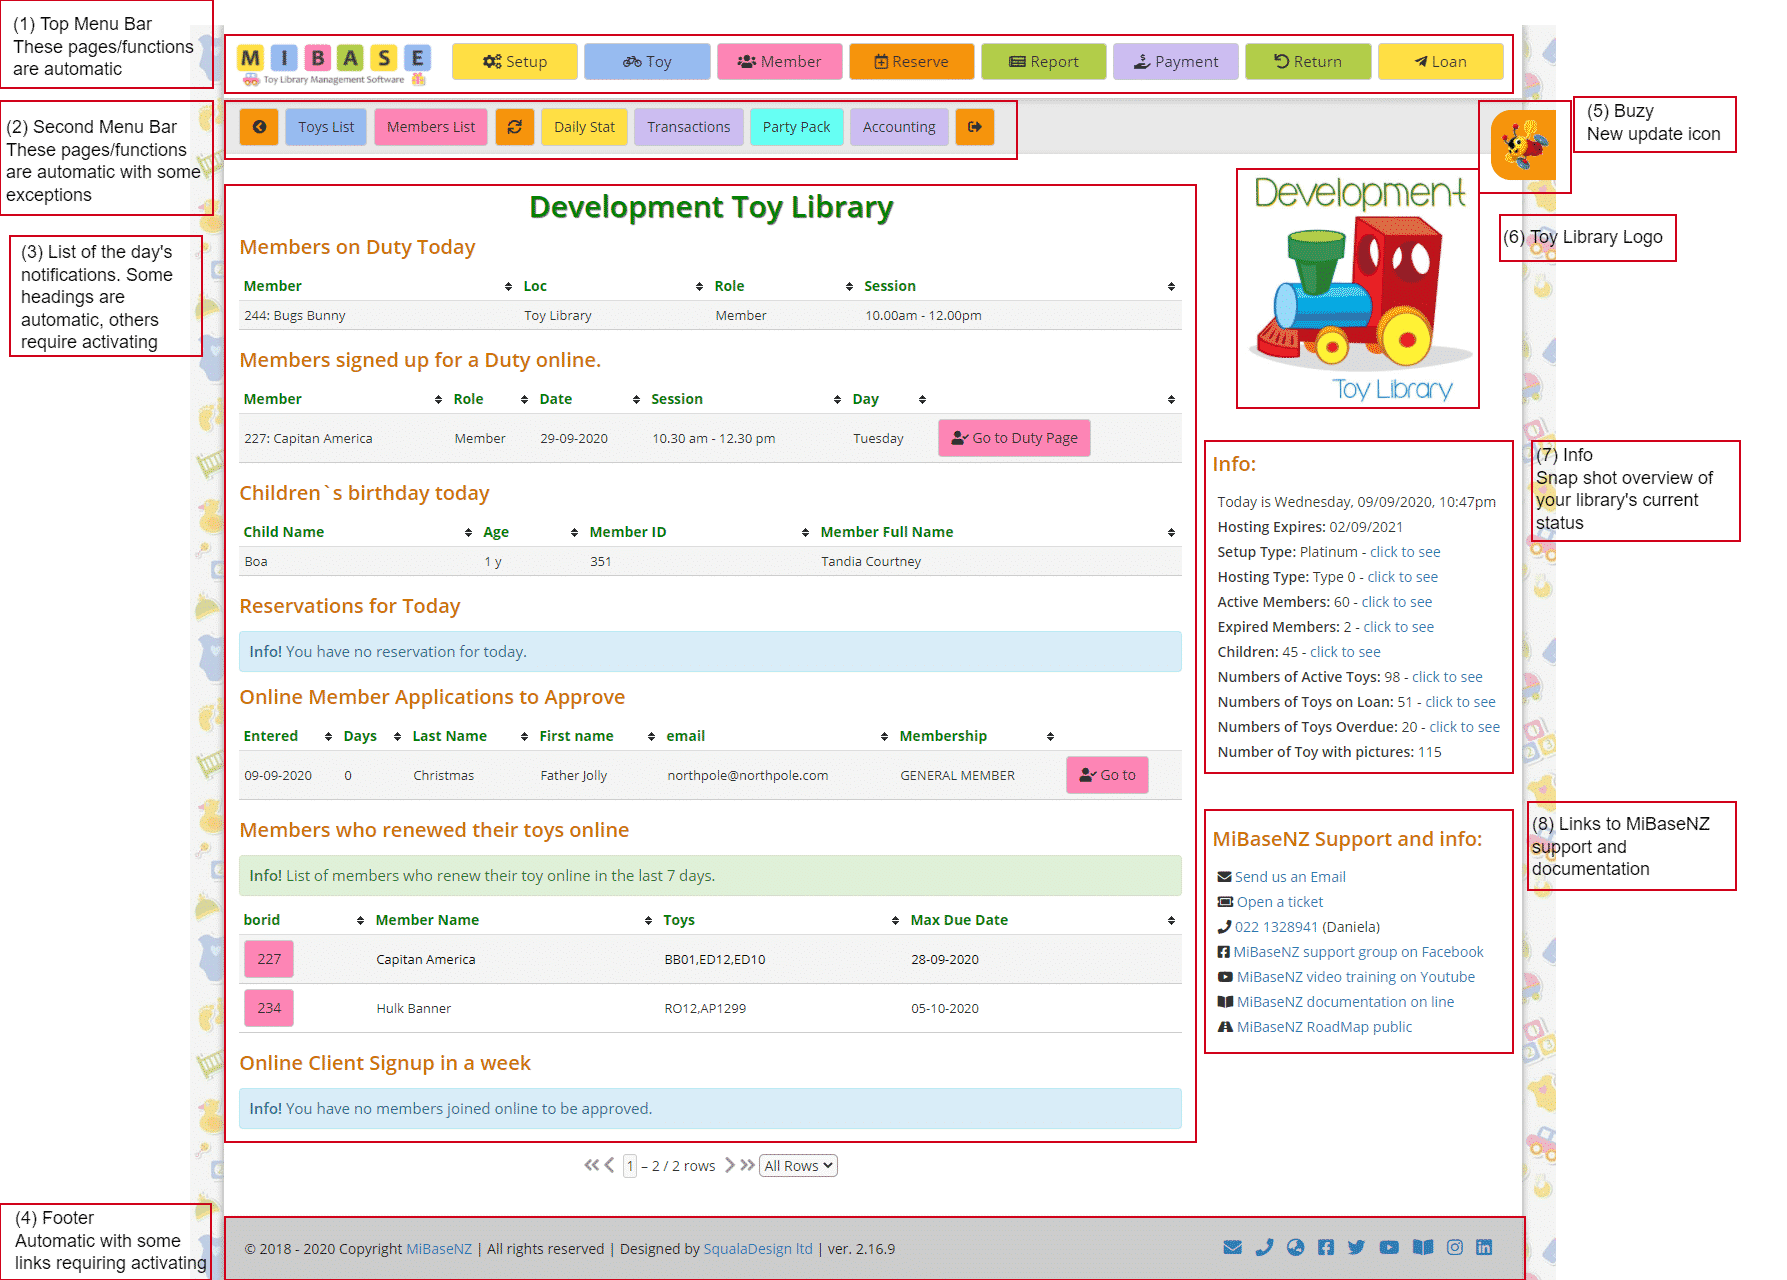
(1) Top Menu Bar:
Located at the top of every page on the admin website, this bar-shaped menu lists all the categories needed for managing, maintaining and using MiBaseNZ.
- MiBaseNZ Logo: Clicking this logo no matter what page you are in will take you back to the Home Page.
- Setup/Toy/Member/Reserve: these pages have further sub-categories related to the heading. Under each of these headings in the Documentation page, you will see a list of articles for each of these sub-categories explaining in detail how to use them.
Note: the Reserve button will only be seen if your toy library setup type is GOLD or PLATINUM and only if you have activated the Reservation function. - Report: this page is where you will find a rather extensive list of reports that you can choose from and download or print. The reports can be one-off or daily or selected over a date range.
You also have the option of downloading bag labels in bulk for specific toy categories.
Go to the article Reports for further explanations - Payment: this page is where you will see the full list of transactions and payments for an individual member. Go to the article Payments for further explanations
- Return: this page is quite simple and is where admin can return toys that have been on loan. To see how to use this page go to the article How to return a toy
- Loan: this page is a lot more involved compared to the Return page. Not only can admin loan toys from this page but also return toys as well as a number of other functions. Go to Understanding the Loan page for detailed explanations
(2) Second Menu Bar:
Located at the top of every page in the admin website, this bar-shaped menu lists the most commonly used or most relevant day to day functions. Go to the article Second Menu for further explanations
(3) Daily Notifications:
This section of the home page will list the notifications (if any) relevant for that day as well as any actions required by admin. Some of these headings are automatic, others can be activated/deactivated.
- Members on Duty Today & Members Signed up for Duty online: these two notifications are only relevant if you are using the Roster System in Admin and/or in the Member Website in which case they will need to be activated. Follow this link to see how
- Children’s birthday today: this is automatic
- Reservations for today: this notification needs to be activated if you are allowing members to make their own reservations through the Member Website. Follow this link to see how
Note: as mentioned above, this list will only appear if your toy library setup type is GOLD or PLATINUM and only if you have activated the Reservation function. - Online Member Applications to Approve: if you have decided to activate the Join Now page on the Public Website, this notification will automatically appear on the home page. To activate this page follow this link. If a member has signed up online you will need to approve their application by clicking the pink “Go to’ button
- Members who renewed their toys online: if you are using the Member Website, this will be automatic. A list will appear of the member/s and toy/s they renewed within the last 7 days if any
- Online Client Signup in a week: this notification will only appear if you have paid for the Party Pack Module.
(4) Footer:
Located at the bottom of every page in the admin website, highlighted in blue are links and icons to MiBaseNZ’s website, contact details and public forums. There is also the latest updated version of the system.
(5) Buzy:
Buzy is the new updates icon located on the right of every page in the admin website. If you click on it a popup box will appear with information about the latest updates, the list of bugs fixed, a link to the article in MiBaseNZ’s website and any links to the necessary documentation as well.
(6) Toy Library Logo:
The logo is automatic and will appear on the home page of all the websites; admin, public and member. It is part of the initial setup with MiBaseNZ, if you need to change it, please send an email to daniela@mibase.co.nz.
(7) Info:
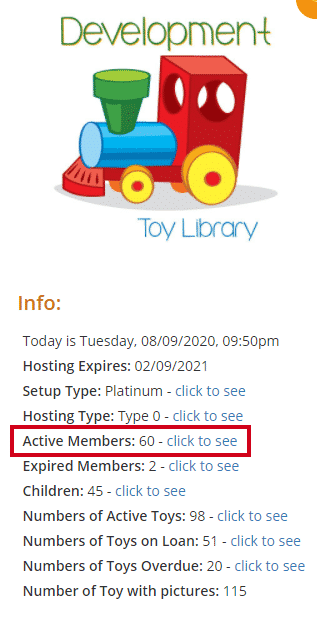
As well as the day’s date and your hosting and setup type, you will also see a list of your library’s statistics as well as quick access links to this information.
(8) MiBaseNZ Support and info:
Here you will see quick access links to various types of support.
- Email & mobile number for Daniela if you have any queries
- Open a ticket is the link to MiBaseNZ’s Helpdesk where you can submit tickets for bugs, issues, information, suggestions etc.
- Facebook – MiBaseNZ has a support group on Facebook for toy libraries to join
- Video Training – Daniela has held some training webinars around specific MiBaseNZ functions which were recorded and saved on Youtube where anyone can view, there are also some very short videos, less than 10 minutes, to show a specific page/function.
- Documentation – this is where you can find articles or ‘How to use’ guides written on each page/function/module for MiBaseNZ
- Roadmap – this is a direct link to the system to keep track of all improvements, new modules and bugs to fix which toy libraries can access and view
The post MiBaseNZ Admin Website home page schema appeared first on MiBase New Zealand.
]]>The post Timesheet page – Second Menu appeared first on MiBase New Zealand.
]]>Before using this page you must ensure you have added your employee/s. Follow this link to see how to Add Employees.
There are two places to access the Timesheet page.
- A quick-access button has been created in the second menu bar

- Via the Human Resources module
Go to Setup -> Human Resources -> Timesheet
To start adding timesheets, click Add New.
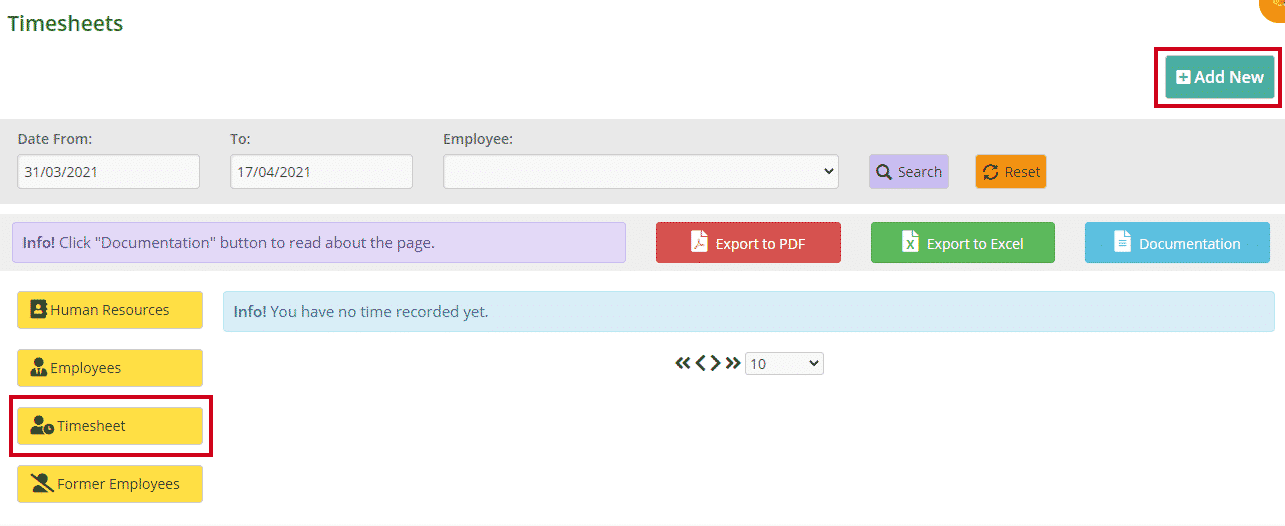
Fill in the boxes.

- Employee’s Name: select from the dropdown menu
- Date: this is compulsory. Click the box and select the date from the calendar that appears
- Time in/out: either type in the time and whether it is AM or PM or click the clock and select a time scrolling up or down till you find the correct hour/minutes.
- Note: add something if you would like but not necessary otherwise
Click Save.
A Success box will appear. Click OK and it will take you back to the Timesheets page where you will see the timesheet you have added.

If you have made a mistake or would like to update a timesheet, click the yellow Edit button alongside it make the changes and click Save.
If you would like to delete a timesheet, click the orange Delete button.
There are a couple of ways to sort or filter this table.
- Use the date range fields at the top of the page. Select the dates whether it’s weekly, monthly or fortnightly, and then select an employee from the dropdown menu. Click Search. To download this list to PDF or Excel, click the relevant buttons. Click Reset to see the full list again
- Click the arrows next to the heading you want to sort or filter the table by or type in the search boxes underneath the headings. This filtered list cannot be exported to PDF or Excel as it does for the above example. It will export the full list. If you want to download this filtered list, export to excel and sort or filter through there.
Next to these export buttons is the blue Documentation button. Clicking this, a short page instruction will appear giving you a quick overview of this page.
The post Timesheet page – Second Menu appeared first on MiBase New Zealand.
]]>The post Dynamic Second Menu appeared first on MiBase New Zealand.
]]>Below is MiBaseNZ home page. It is the first screen you see when you log in. Underneath the MiBaseNZ logo, you will see a horizontal bar of buttons (outlined). This is the second menu.
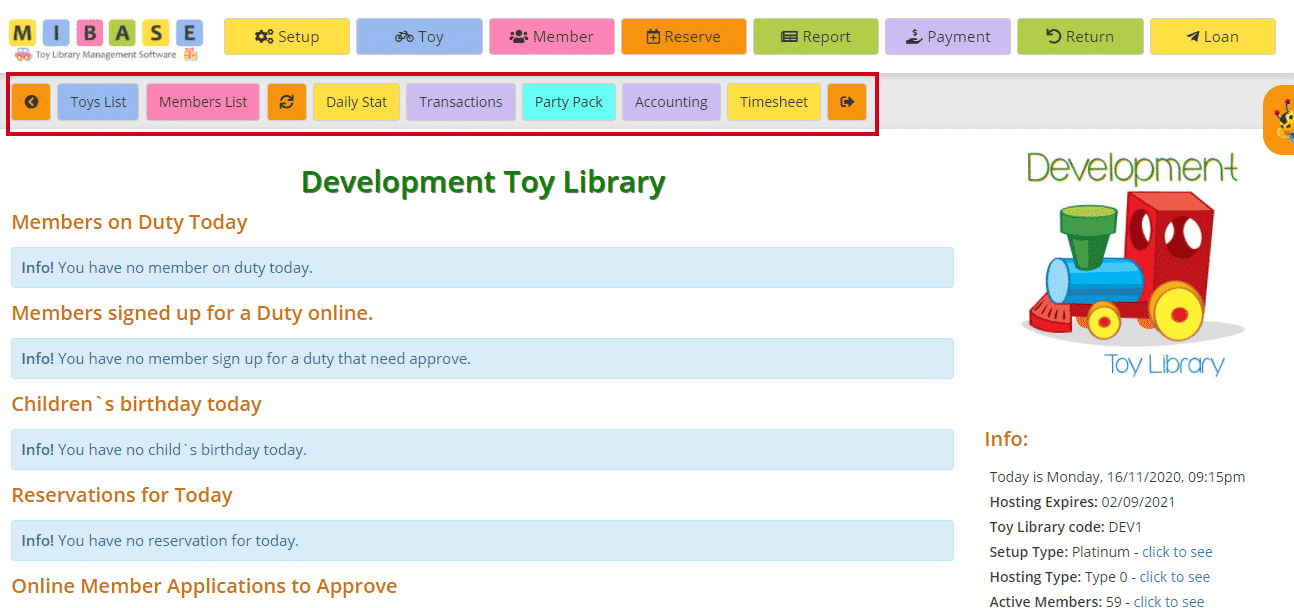
Note: Some extra functions will appear in the second menu depending on certain pages you have viewed in MiBaseNZ. This is explained below.
Explaining each function in the second menu

Back Arrow
The first orange button is the go back function; as the name suggests it is a quick way to go back to the previous screen.
Toy List
This function allows you to view all your library’s list of active toys as well as a range of information about each toy. For a comprehensive explanation of this function please refer to the Viewing the Toy List article.
Toy number
Sometimes you will notice a toy number appear on the second menu next to the Toys List, for example, the number BB01 in the image above (in blue). This is usually because you have just clicked into viewing or editing that particular toy’s details.
Bookings
Sometimes this function appears on the second menu because you have gone into editing or viewing a toy. The bookings screen allows you to view and add reservations or bookings of toys.
Picture
Sometimes the picture tab appears on the second menu because you have gone into editing or viewing a toy. The picture screen allows you to view and upload an image for a toy. For more information on this go to the article on Toy Images.
Member List
The Member List page has been set up to display all member details, account balances and duty status. Please refer to the Member List article for a more in-depth look at this functionality.
Member number
Sometimes you will notice a member number appear on the second menu next to the Member List, for example, the number 227 in the image above (in pink). This is usually because you have just clicked into viewing or edit that particular member’s details.
Refresh
Click this orange button if you would like the page reloaded.
Daily Stat
This page has been designed to show the statistical information for each daily session at your toy library. If you would like to read more about generating daily stats on your toy library please refer to the Daily Stat article.
Transactions
Daily transactions of your toy library are displayed here. There are many ways to sort the data according to your preferences. If you would like more help with entering and managing transactions please refer to the Transactions article.
Party Pack
This module allows for non-members of the toy library to hire toys for a party. Here you can set up the content relating to party pack and how it looks on the public website. This button will appear only if you purchased the module. For more information click this link: Party Pack Module
Accounting
This function is used by Treasurers and Administrators to keep track of all money-related transactions that take place at your toy library. For more information on how to view and display your daily toy library transactions please refer to the Accounting article.
Timesheet
This is a brand new functionality. It is part of the Human Resources module. Toy Library employees will now be able to record their hours using this function. Article to follow soon.
Forward Arrow
The last function you will see is the orange log out button. If you forgot to log out when you finished your session, the system will log you out after 15 minutes.
The post Dynamic Second Menu appeared first on MiBase New Zealand.
]]>The post Members List – Second Menu appeared first on MiBase New Zealand.
]]>This list does not include the expired members, even though they are also deemed active. To see this list go to Members Expired page. If you would like to see a list of all your Not Active Members, follow this link.
MiBaseNZ’s Members List page is easily located in the second menu bar allowing you quick access to the list.
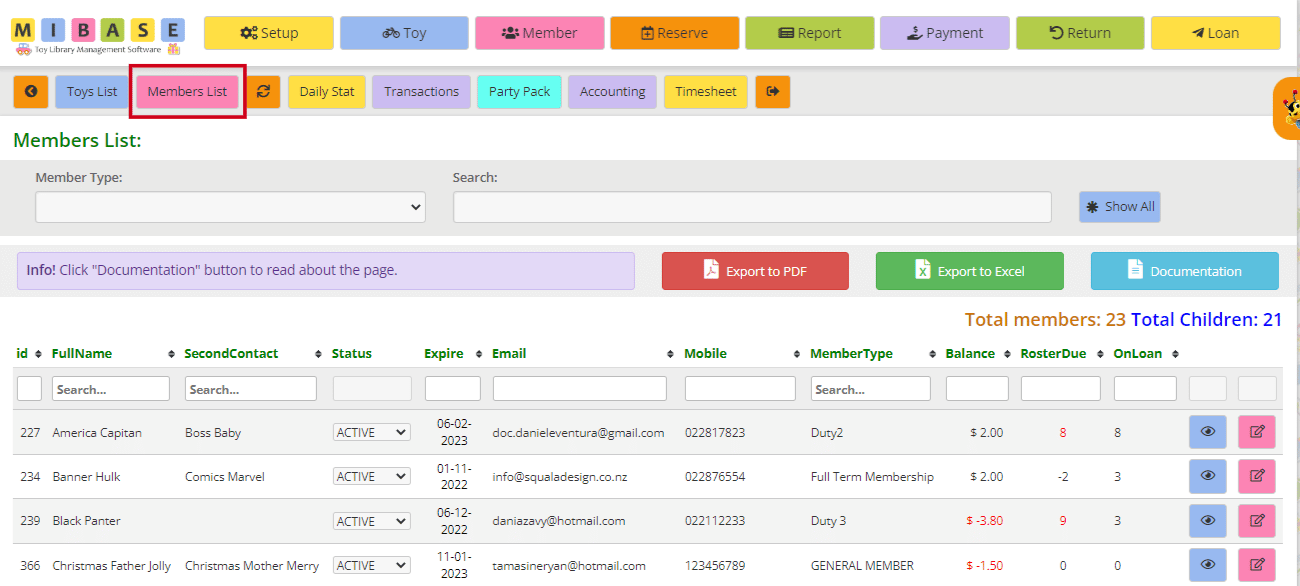
The total number of members and the total number of children are displayed in the top right corner above the table.
At the top of the page, you can see two search boxes. The first is a dropdown menu where you can filter the list by membership type. The second box, you can use to type in a name for example for a more specific search. Click the blue Show All button for the full list to appear again.
You can also sort or filter the list by clicking the arrows next to the heading you want to sort or filter the list by or just type in the search boxes underneath the headings.
So, looking at the above list, you can see the following information for each member:
- id: the member’s id number.
- FullName: the member’s full name
- SecondContact: the full name of the second contact
- Status: all these members’ statuses will be Active however if you need to change a member’s status to locked or resigned you can select either option from the dropdown menu.
- Expire: the date the membership expires. If the date is blue, it means the membership will expire in a month or less
- Email address
- Mobile/Phone numbers
- MemberType: membership type
- Balance: this is the member’s account balance. If it is red, it means the member is owing money
- RosterDue: this lists the number of duties the member is owing. If the number is red, the member owes duties. If the number is negative, the member has completed more duties than expected
- OnLoan: this is the number of toys the member is currently hiring out
To view the member’s full list of details, click on the blue ![]() “View” button.
“View” button.
To edit or update the member’s details, click on the pink ![]() “Edit” button.
“Edit” button.
To download the list to PDF and/or Excel, either click the Export to PDF or Export to Excel buttons. This will export the full list, not a filtered list. If you want to download a filtered list, export it to excel and sort or filter through there.

You can also access the Members List via the homepage.
The post Members List – Second Menu appeared first on MiBase New Zealand.
]]>The post Daily Stat page – Second Menu appeared first on MiBase New Zealand.
]]>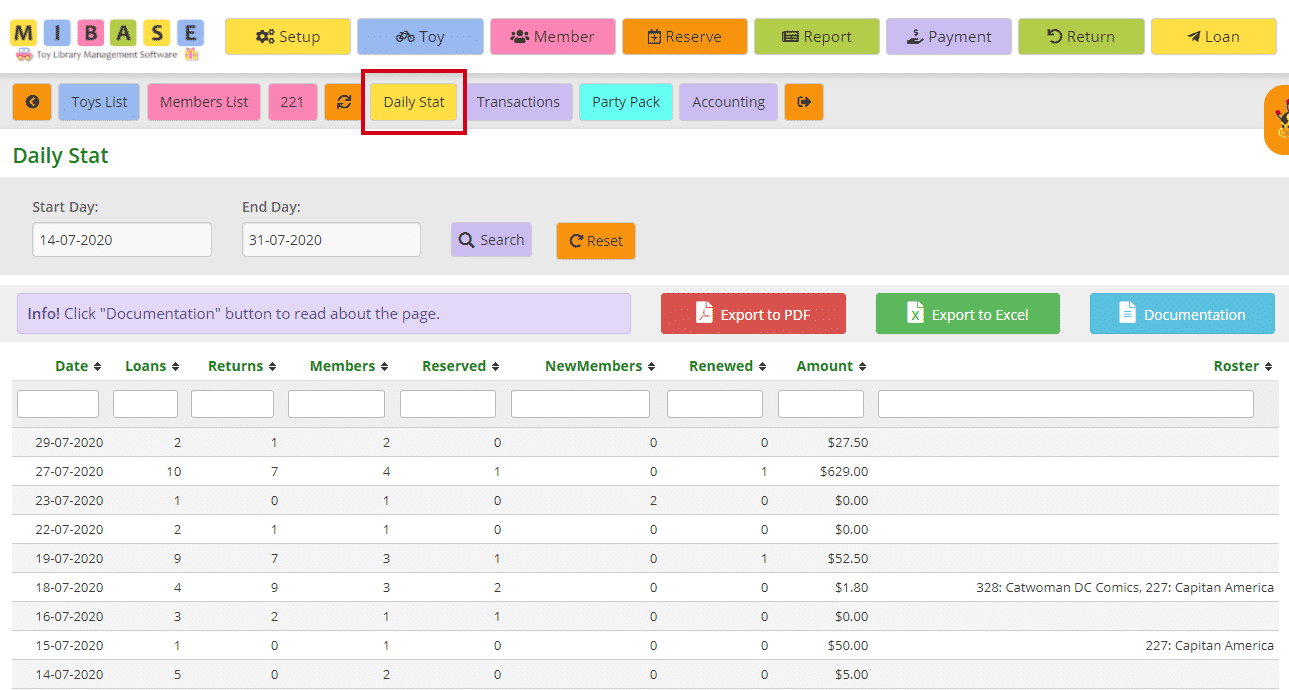
The most recent sessions will be listed first.
If you wish to view sessions in a given period, select the Start Day and End Day from the dropdown calendars, and click Search.
Click Reset to refresh the page to the current library sessions.
- Date: usually the day the library is opened however dates can appear for days not opened if a member has reserved a toy online or a new member joins online or if admin is working in the system out of hours.
- Loans: number of toy loans during that session
- Returns: number of toy returns during that session
- Members: how many members came into the library during that session
- Reserved: how many toys were reserved during that session
- NewMembers: number of new members that signed up during that session, an admin added a member or/and a member joins online
- Renewed: number of membership renewals during that session
- Amount: total amount of money received for that day for all transactions
- Roster: lists the member/s who completed a duty for that session
*Note: the name will only show if an admin has clicked ‘Complete’ in the Duty Roster page
You can download this list to PDF and/or Excel by clicking the Export to PDF or Export to Excel buttons. This will export the full list. If you want to download a filtered list, either use the date range option mentioned above OR export to excel and sort or filter through there.
The post Daily Stat page – Second Menu appeared first on MiBase New Zealand.
]]>The post Transactions – Second Menu appeared first on MiBase New Zealand.
]]>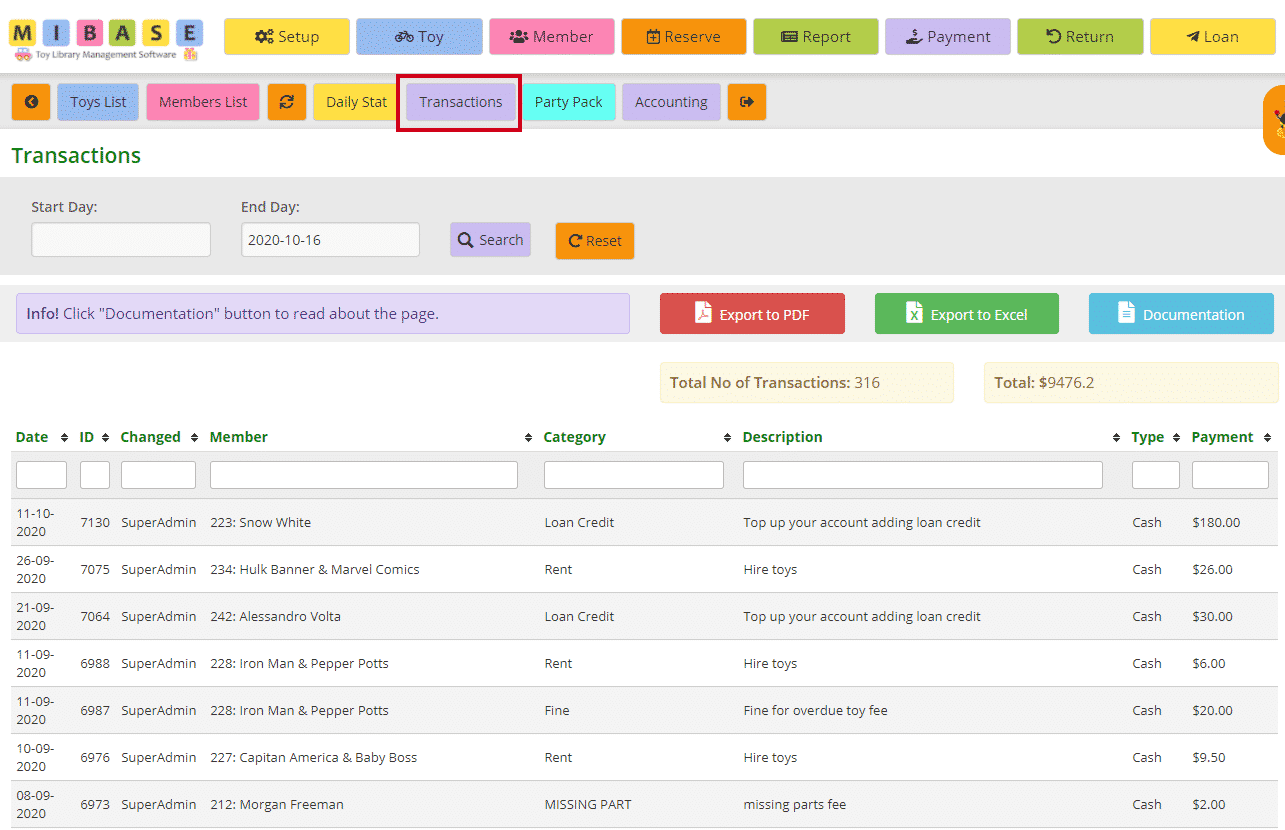
The most recent transactions will be listed first.
If you wish to view transactions on a certain day or in a certain period, select the Start Day and End Day from the dropdown calendars, and click the purple Search button.
Click the orange Reset button to refresh the page to the current library sessions or to make another selection.
Just above the table and to the right you will see the Total Number (No) of Transactions that have been made and the Total money value of these transactions.
You can also sort the list according to the table headers by clicking the arrows alongside it.
- Date: the day the transaction was made
- ID: the number generated for each transaction; the higher the number the more recent the transaction
- Changed: the login name of the user who entered the transaction
- Member: the name of the member incurring the transaction
- Category: when a transaction is entered in the Payments page, a category would have been selected
Note: each toy library will have their own specific categories set up for their transactions, no one will be the same.
To set up a list of categories follow this link Creating New Payment Options to learn how - Description: of the transaction. This is also usually set up when creating a payment option
- Type: the payment method such as credit, internet (or online), cash, or Visa. Again this is also usually set up when creating a payment option
- Payment: the value of the transaction
You can download this list to PDF and/or Excel by clicking the Export to PDF or Export to Excel buttons. This will export the full list. If you want to download a filtered list, either use the date range option mentioned above OR export to excel and sort or filter through there.

You can also decide how many rows you wish to see on the screen by using the pagination at the bottom of the list.

The post Transactions – Second Menu appeared first on MiBase New Zealand.
]]>The post Toys List – Second Menu appeared first on MiBase New Zealand.
]]>Please note Toys List does not show the not active toys, toys that are lost, damaged, sold or withdrawn. To see this list go to the Not Active toys page.
MiBaseNZ’s Toys List page is easily located in the second menu bar allowing you quick access to the list.
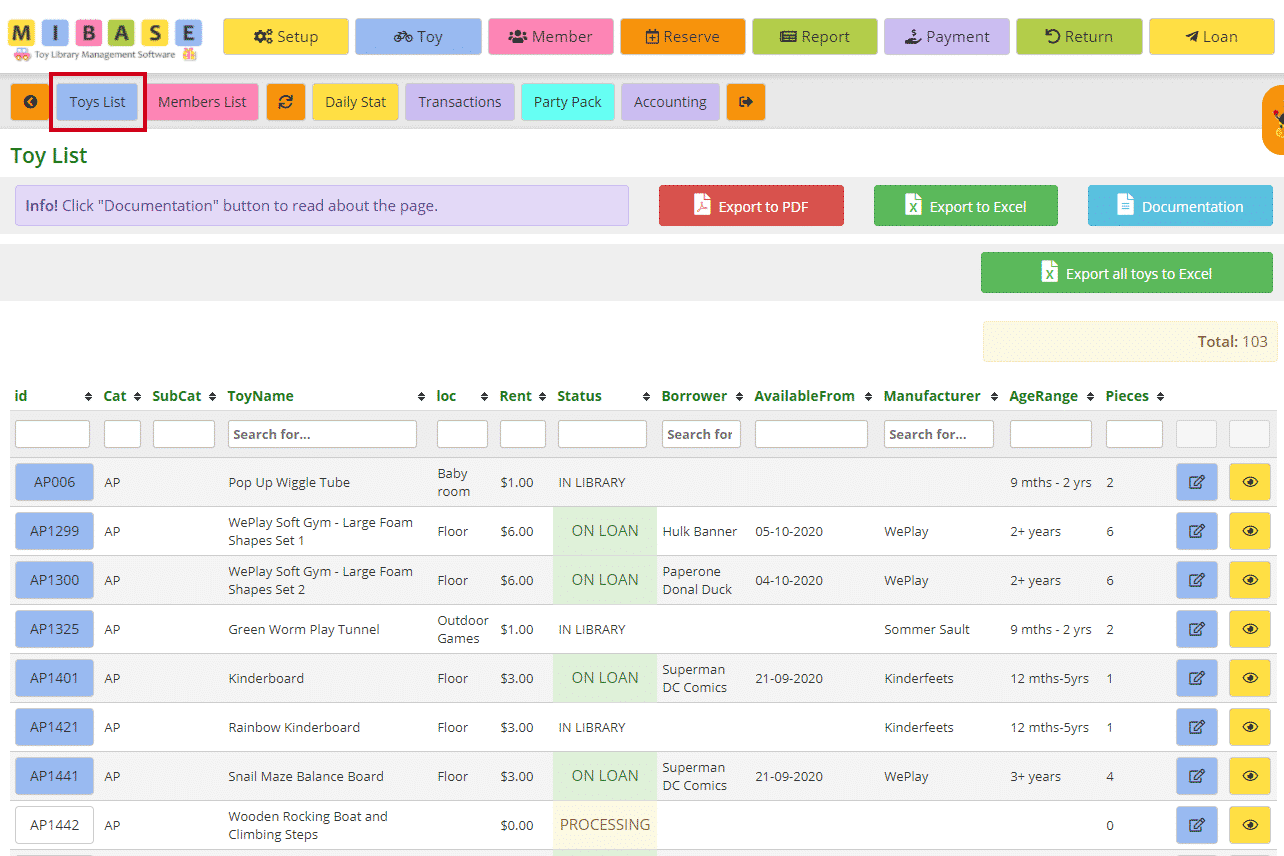
The total number of active toys is displayed in the top right corner above the table.
Looking at the list you can see the following information for each toy:
- id: the toy’s individual id. If the box is blue, an image has been added for the toy. A white box means no image. If you hover your mouse over the box the image will appear. Click on the image box and it will take you to the toy’s detail page
- Cat: the toy category the toy has been saved under. If you would like to Add a new toy category, follow this link
- SubCat: if your library is using sub-categories it will be listed here. If not it will be blank. For further information on how to Add new sub-categories, follow this link
- ToyName: name of the toy
- Loc: location of the toy within the toy library. To Add a new location, follow this link
- Rent: toy hire fee for the toy
- Status: the status of the toy whether it is in the library, on loan (highlighted green) or processing (highlighted red)
- Borrower: the name of the member the toy is loaned to
- Available From: the date the toy is due back
- Manufacturer: name of the manufacturer of the toy, who made the toy
- AgeRange: the age range the toy is suitable for. To Add a new age range, follow this link
- Pieces: the number of pieces in the toy
To edit or update the toy’s details, click on the blue Edit button.
To view the toy’s details page, click on the yellow View button.
More info
To sort or filter the list, click the arrows next to the heading you want to sort or filter the list by or type in the search boxes underneath the headings.
You can also download the list to PDF and/or Excel by clicking the Export to PDF or Export to Excel buttons. This will export the full list, not a filtered list. If you want to download a filtered list, export to excel and sort or filter through there.
For a more comprehensive toy list which includes every detail listed in the toy’s details page, such as description, contents list, warnings if any, click on Export all Toys to Excel.
You can decide how many rows you wish to see on the screen by using the pagination at the bottom of the list.

The post Toys List – Second Menu appeared first on MiBase New Zealand.
]]>