The post Setting up the Reservation System appeared first on MiBase New Zealand.
]]>Also, if you have not done it already, you will need to make sure the opening days for your library are set up correctly as you want them to appear on the reservation calendar.
Admin Website
For the admin website, go to Setup -> Administration

In the Name search box type in ‘reserve’ and change the settings in the image below by clicking the Edit button.
Once the settings are changed you must log out and then log back in again for the settings to take effect.

- #13: this refers to the Reservations for Today heading on the admin home page. Selecting Yes will show this heading and a list of toy reservations for that day if any
- #63: decide if you want to charge for reservation, yes add the amount, no leave it as 0
Member Website
If you are using the member website, go to Setup -> Members
In the Description search box type in ‘reservation’ and change the setting in the image below by clicking the Edit button.
Once the settings are changed you must log out and then log back in again for the settings to take effect.

- #208: if you would like your members to be able to make their own reservations on the member website then select Yes.
- #221: this setting prevents members from making back-to-back reservations, particularly for popular toys allowing other members the opportunity to reserve them. Type in the number of days after a reservation a member can make another one for the same toy
- #222: this setting prevents members from making a reservation on the day the library is opened or as many days prior to the session of your choosing
- #223: this setting prevents members from booking toys too far into the future. You can set the limit
Opening Days
As mentioned above, what you set up as your opening days as well as holiday closures, will appear in the reservation calendar.
Follow this link How to setup Days and Times of your Library to see how.
Once all these settings have been changed to your liking then your Reservation System is ready to go.
Other Info
Follow this link to find out how to make a reservation in the admin website
Follow this link to find out how members can make a reservation in the member website
Follow this link to find out how to access your list of reservations
Follow this link to view historical reservations
The post Setting up the Reservation System appeared first on MiBase New Zealand.
]]>The post Reserving a toy in the Admin Website appeared first on MiBase New Zealand.
]]>Go to Reserve -> NEW Reservation 
Toy List for Reservations
You will see the full list of your library’s toys that can be reserved.
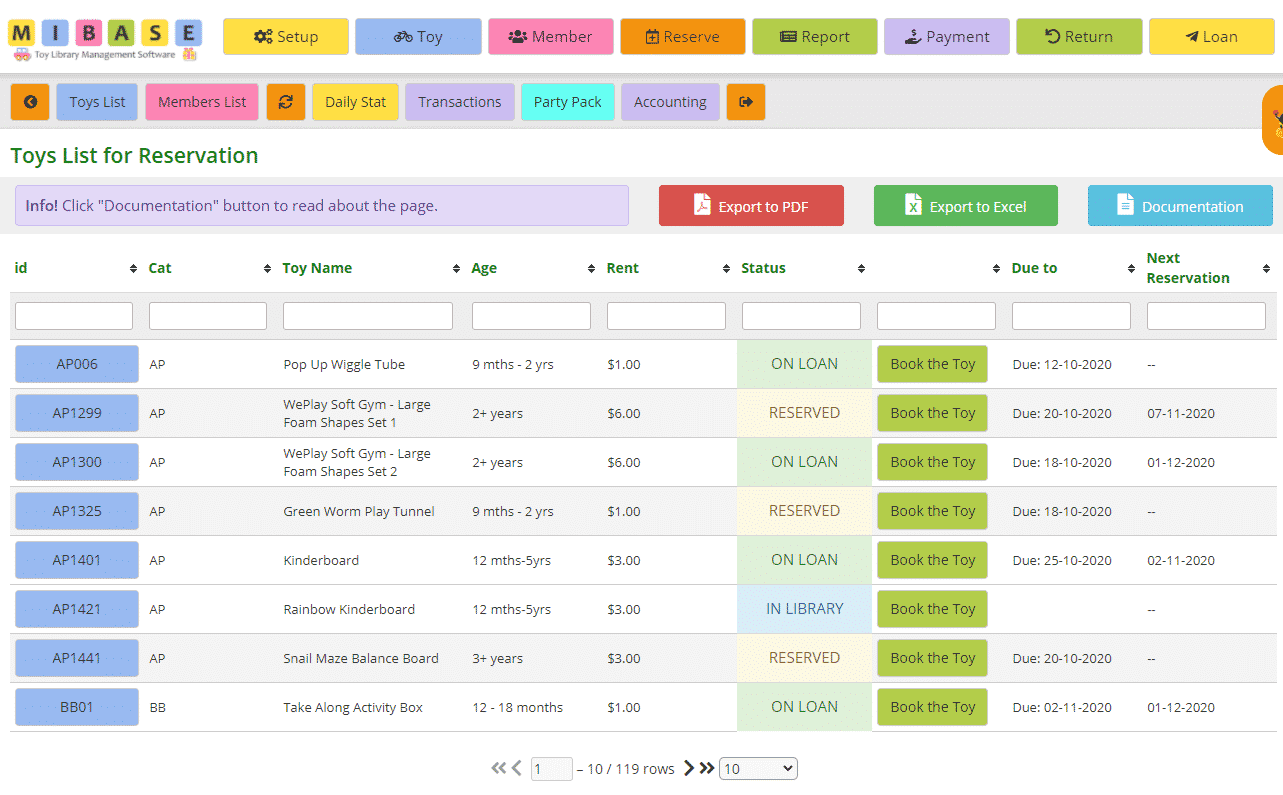 The last 4 columns are the most important when reserving toys:
- Status: will tell you if the toy is currently on loan, has a reservation already or is in the library
- Book the Toy: clicking this button will take you to the toy’s reservation page
- Due to: if the toy is currently on loan, this is its due date
- Next Reservation: when the toy has been reserved next. If the toy has multiple reservations, you will need to go to its Reservation page to see them all and the date in this table will show only the next one.
The remaining columns are self-explanatory.
Reserving a toy
Step 1
Locate the toy you would like to reserve by typing in the appropriate search boxes at the top of the table.
Step 2
Click the green Book the Toy button. You will be taken to the reservation page for that specific toy. If any reservations have already been made for the toy they will be listed here under the Active Reservations List as you can see in the example below.
Step 3
Find the member for whom the reservation is to be made to by typing in the Member id or Search Member boxes. Once you have selected your member, the page will update with the member’s details, the toy’s details and the reservation calendar. The list of reservations will move to the bottom of the page. To the right of the page, you will see a Legend, a coloured guide to show the toy’s availability in the calendar.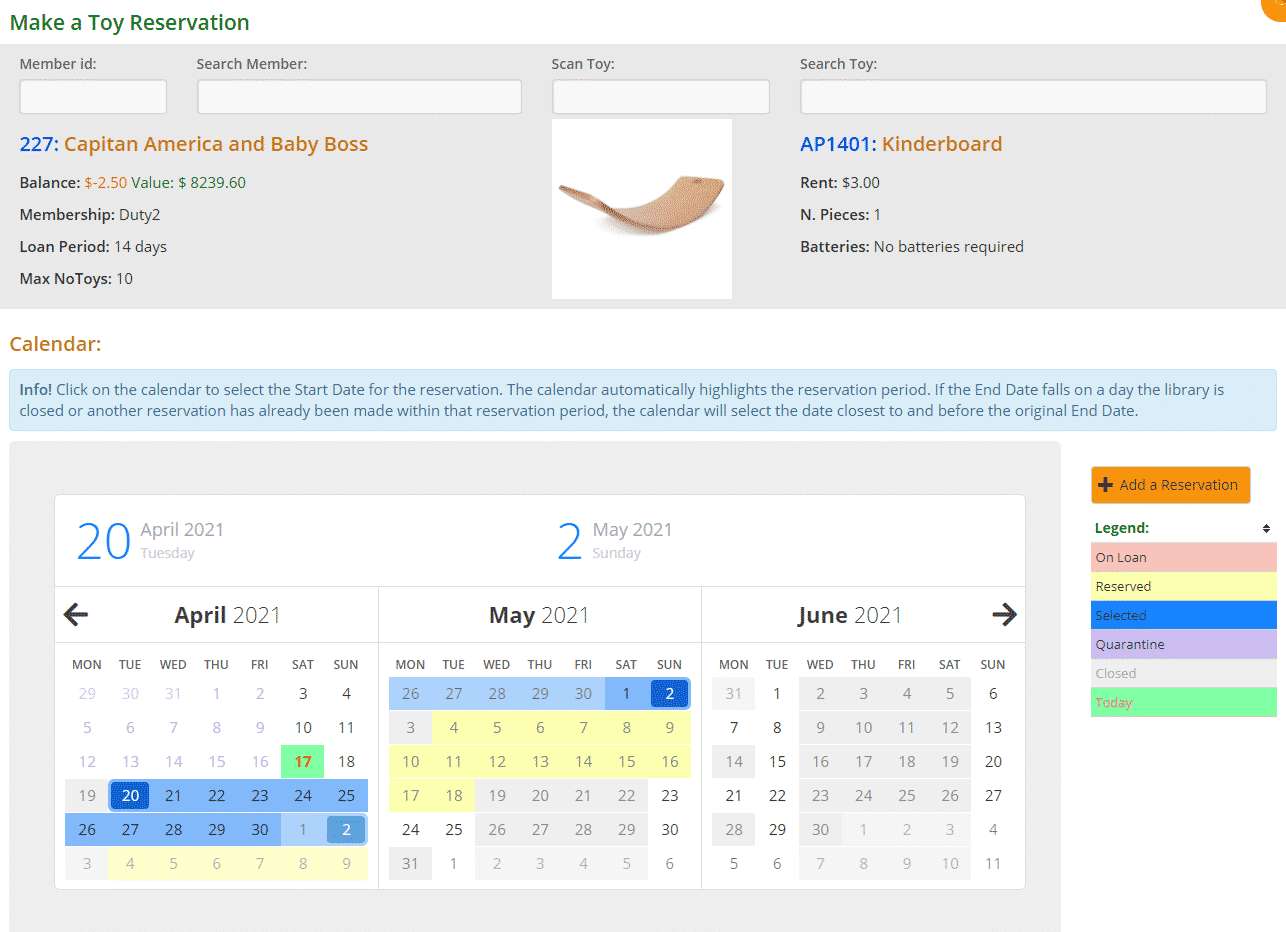
Step 4
Click on the calendar to select the Start Date for the reservation. The calendar will then automatically highlight in blue the reservation period according to the number of days you have set up in the settings (see above calendar).
Note: if there is a period between reservations or toys being on loan that is less than your library’s loan/reservation period, ie. a few days or a week, admin and members can still reserve toys in that time. If this happens, the calendar automatically selects the next appropriate End Date making sure there is no overlap and the toy can be returned in time for the next reservation.
Step 5
Click the orange Add a Reservation button above the Legend. A green Success message will appear under the blue box The reservation will appear in the reservation list at the bottom of the page.
If you have made a mistake or the member no longer wants to reserve that particular toy, simply click the orange Delete button and start again.
Or, if you have selected the wrong dates, simply click the green Edit button make the changes, and click Save.
Read the article Editing a Reservation for further explanation.

Maximum loans for same day/date
If a member has reached their quota of toys they can reserve/loan according to their membership, MiBaseNZ will prevent you from reserving any more toys. A red Error message will appear under the blue box stating the maximum number of toys this member can reserve. 
Multiple toy reservations for a member
If a member has more than one toy they would like to reserve, simply search for the toy by typing in the Scan Toy search box and clicking Enter on the keyboard or Search Toy box and selecting from the dropdown menu. Go through Steps 4 and 5.
Where to view toy reservations in MiBaseNZ
There are several places to view members’ toy reservations besides on the reservation page.
- the Reservations List page where you can view all toy reservations for your library. Follow this link to see where you can view your list of reservations
- the Member Detail page where you can view toy reservations for a specific member
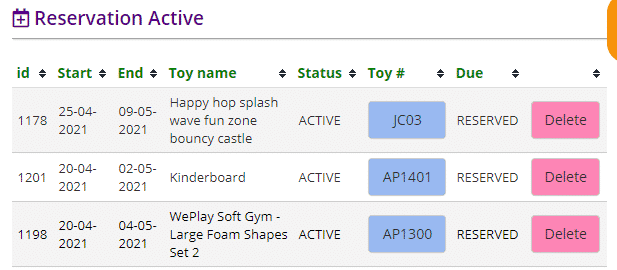
- a member’s Loan page. Scroll down and you will see a list of their reservations if any

To view a list of historical reservations to see whether they had been loaned or deleted you can go to the Reservation History page. Follow this link to see where you can view your list of historical reservations.
The post Reserving a toy in the Admin Website appeared first on MiBase New Zealand.
]]>The post Setting Up Automatic Emails appeared first on MiBase New Zealand.
]]>These Automatic Emails, also known as Cron Jobs, will be sent during the night, between 1:00 am and 4:00 am. The cron job is always active within MiBaseNZ, you just need to specifically activate them for your system.
There are a number of different types of automatic emails you can choose to use. You can choose the day you would like them sent and how many days before or after the event they are sent.
To see the full list of automatic emails, go to Setup -> Automatic Email 
Before you start activating and using these emails, you will need to set up the Header and Footer templates. Once set up, every email, when sent, will automatically have the header and footer included.
Follow these links to set up your library’s header and footer templates:
Header template
Footer template
You can see by the list below how many Automatic Emails you can choose to activate and use.
Above the list, you will see two buttons, Activate All and De-activate All. These buttons allow you to either activate all the emails at once (make sure they are set up ready to go) or de-activate them all (great if your library is closed for a short while and you do not want emails to be sent out) saving you from having to do them individually.
Simply click the required button and a Success message will appear stating the changes have been made.


You can also decide on whether you would like to receive the admin email report or not. Under the Email Admin column if you choose Yes, you will receive the admin email report even if members will not be receiving the automatic email from the system. If you choose No, the admin report will only be sent when at least one member receives the automatic email.
You also have the option of being able to send an email whenever you want and to all the members at once by clicking the Send it Now button. The automatic email must be active for this to work.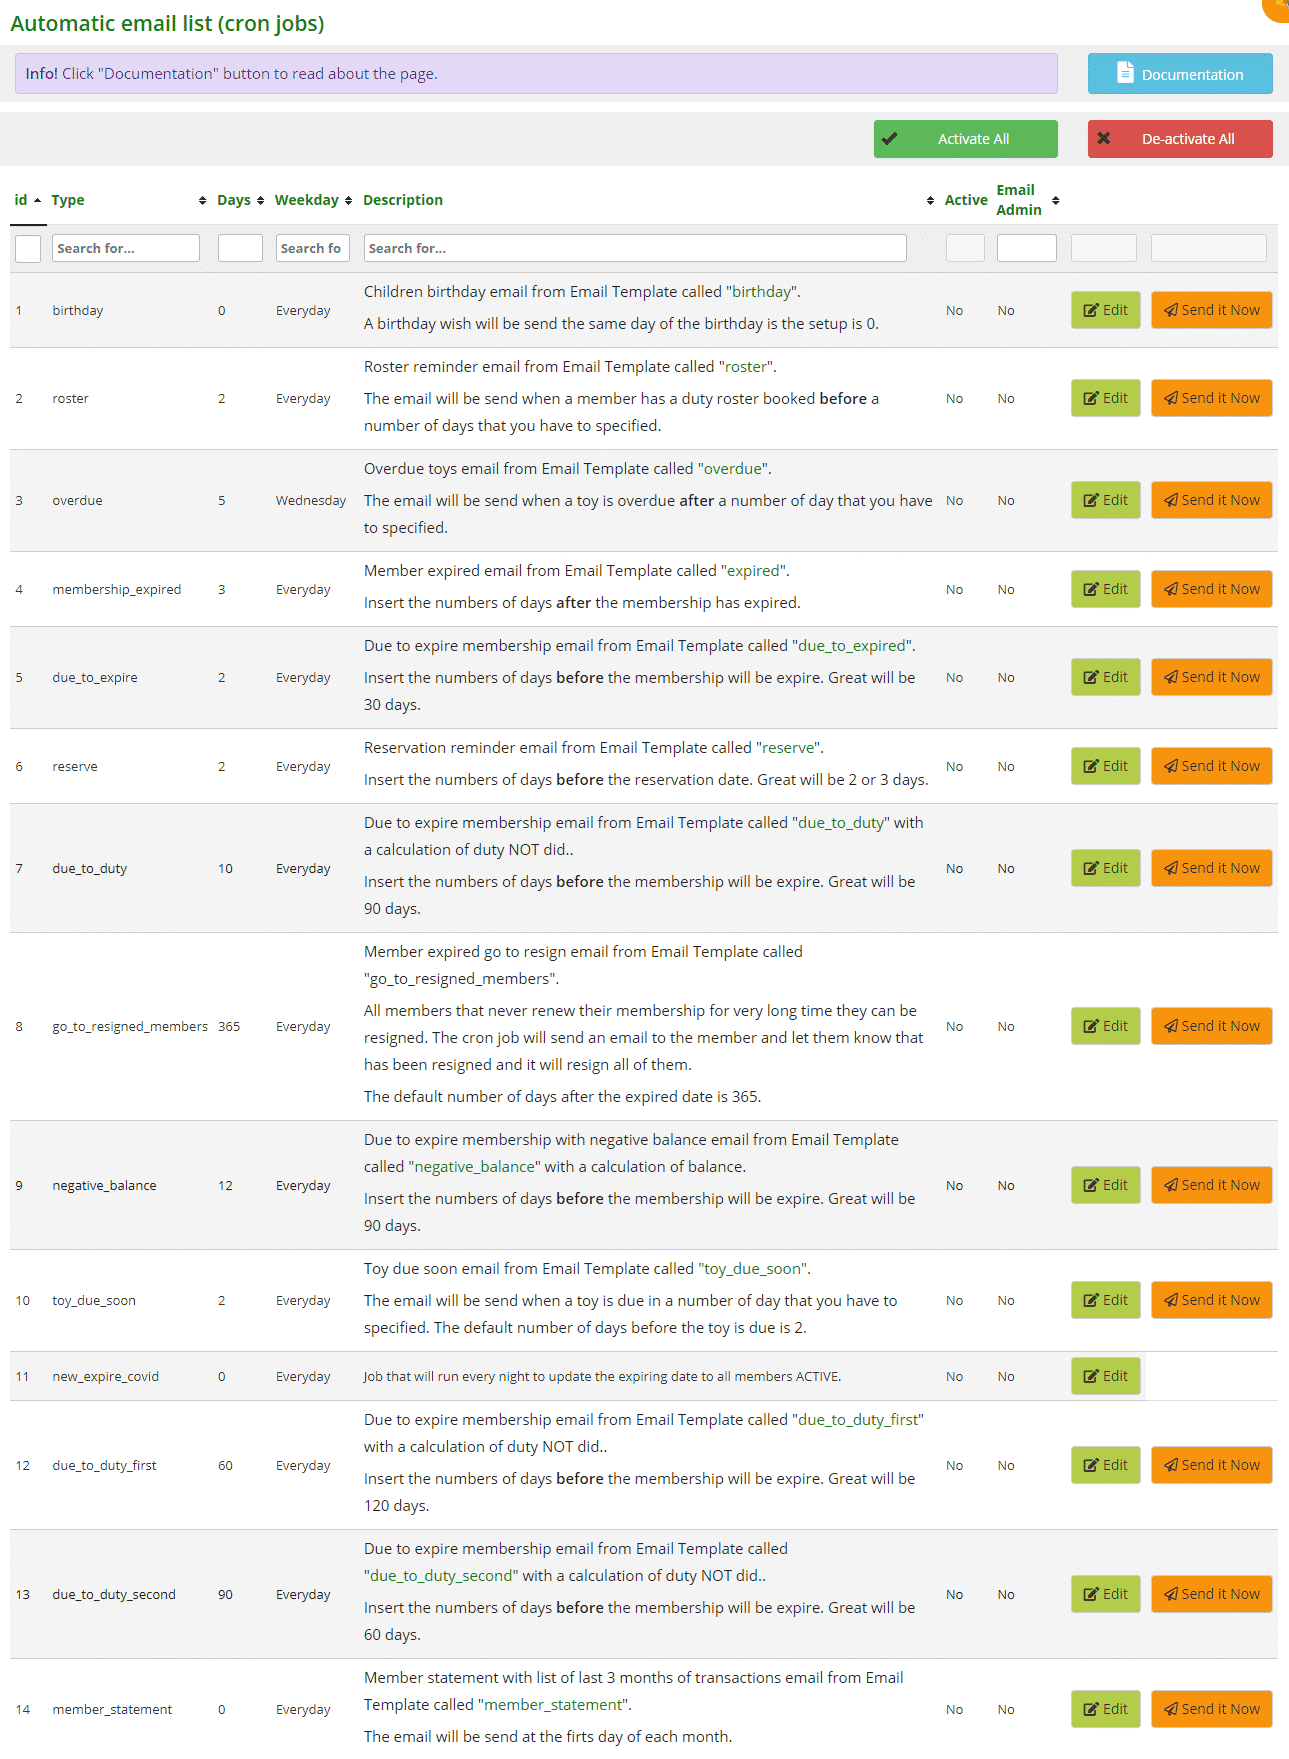
- #11 new_expire_covid: this one does not have an email template. It is linked with activating and deactivating the Temporary Closure module.
By clicking the links below, you will go to that specific Automatic Email to see how to set it up correctly.
- Birthday
- Roster reminder
- Overdue toy
- Membership Expired
- Membership due to expire
- Reservation reminder
- Duty due reminder Note: there is a further two duty due reminder templates, first and second. These were created for libraries to set up multiple reminders. Click the above Duty due reminder link for further explanation
- Member expired go to resign
- Due to expire membership with a negative balance
- Toy due soon reminder
- Member Statement
The post Setting Up Automatic Emails appeared first on MiBase New Zealand.
]]>The post How to loan a reserved toy to a member appeared first on MiBase New Zealand.
]]>
Click the yellow ‘Loan Toy’ button. The toy will be added to the Toy Loan list.
A blue Info and green Success message box will then appear above the list.
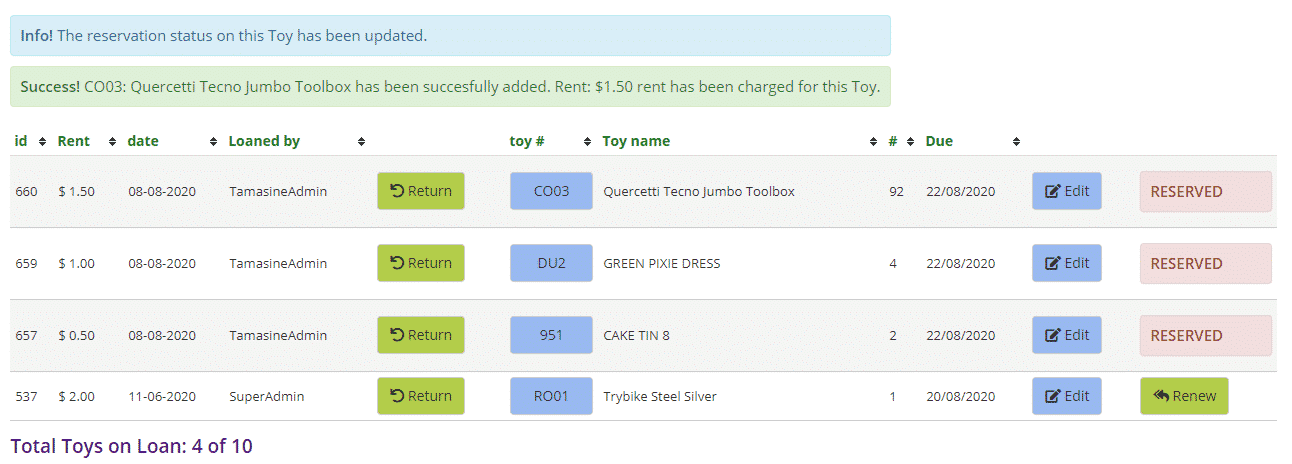
Once the toy is loaned and is on the toy loan list, the toy will disappear from the Reservation list.
The post How to loan a reserved toy to a member appeared first on MiBase New Zealand.
]]>The post Viewing Toys in Quarantine appeared first on MiBase New Zealand.
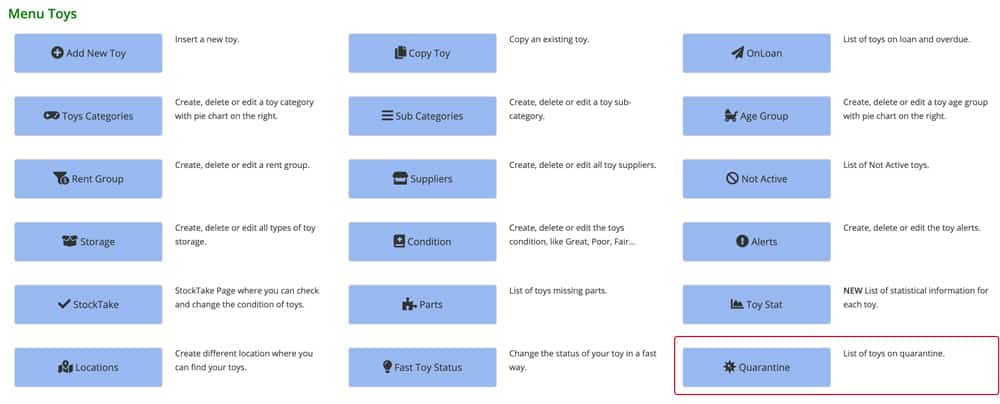
]]>
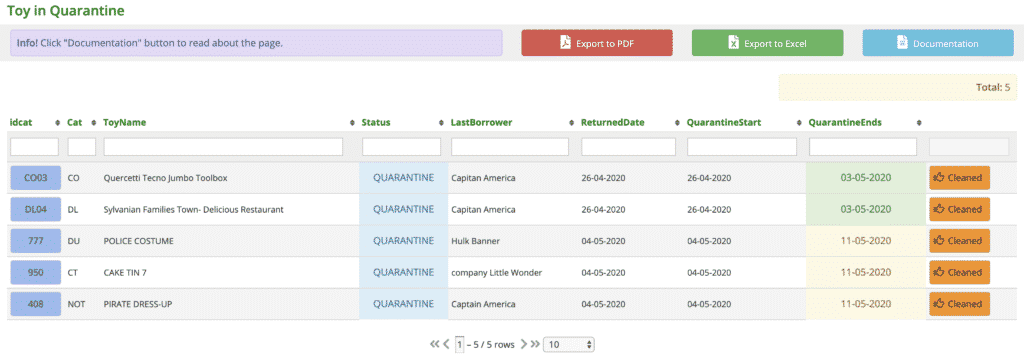
On this page, you can see certain information for each toy. The last date is when the toy will end quarantine. If the date is green, the toy has finished the quarantine period. Once you have cleaned the toy, click the Cleaned button and the toy will be available for hire again.
Whilst the toy is in quarantine it is not possible to reserve it, in fact, you will see in the calendar the days the toy is in quarantine.
Go to Reserve -> NEW Reservation and reserve a toy that you have returned and put in quarantine.

Whilst the toy is in quarantine, the toy’s detail page on the Member’s Website will list the Quarantine Ends date to show when the toy will be available again.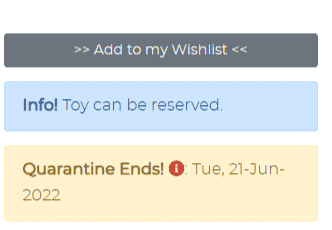
The post Viewing Toys in Quarantine appeared first on MiBase New Zealand.
]]>The post Reserving a toy in the Member Website appeared first on MiBase New Zealand.
]]>
Step 1: Member login
Members need to log in to the member website using their login details. 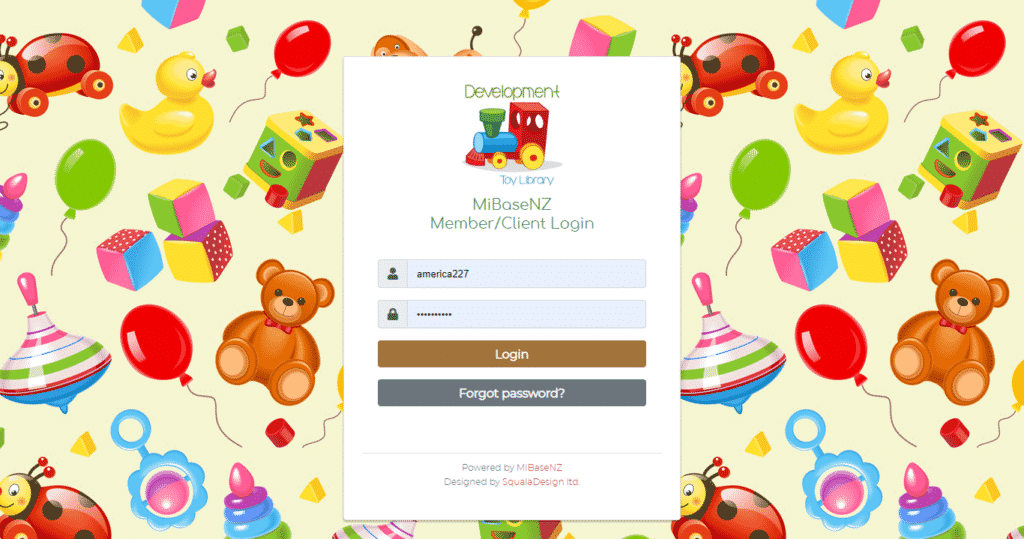
Step 2: Select Toys at the top of the page.
Members will be able to see the full list of toys the library has to offer by scrolling down. If they want to look at specific toys, members can select from the Category and Status dropdown menu to filter the toys further. Or if they know the toy they are after, they can do a search in the Search box. 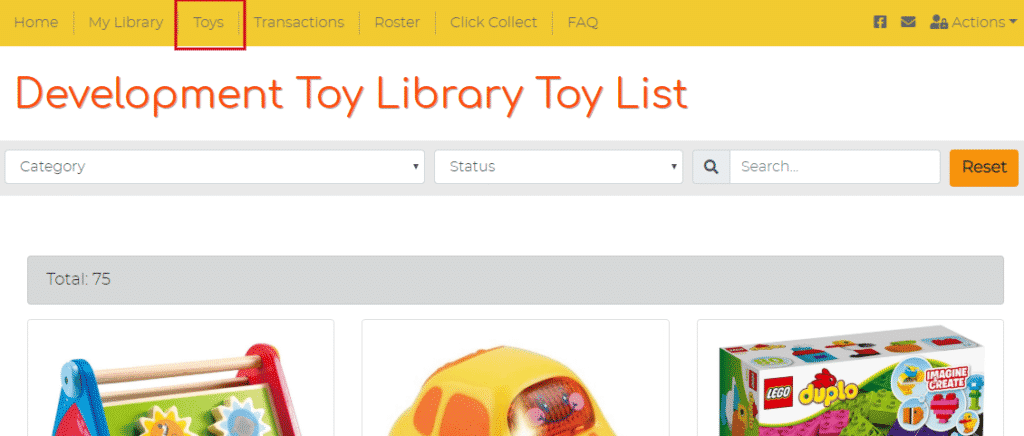
Step 3: Find toy
Find the toy they would like to reserve and click on the View toy button. 
Step 4: Reserve Toy
The member will be taken to the toy’s detail page. Scroll to the bottom and click on the Reserve Toy button.

Step 5: Reservation calendar
The member needs to click on the calendar to select the Start Date for the reservation. The calendar will then automatically highlight in blue the reservation period. Click the Reserve button to the right.
Note: members can see the availability of the toys on the calendar using the coloured availability chart underneath.
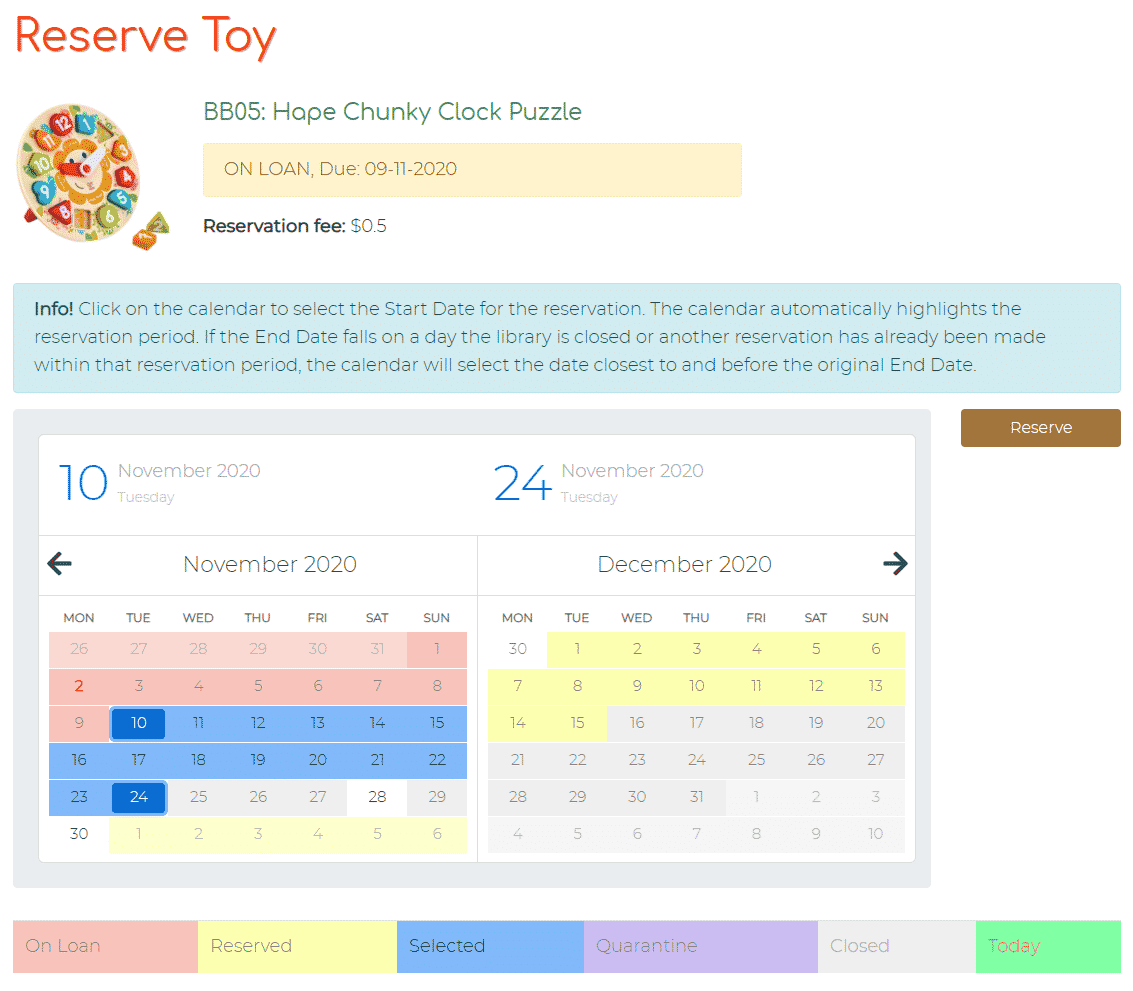
With the reservation complete, the calendar will change from blue highlighted dates to yellow ‘Reserved’ dates. A Success message will also appear.
Step 6: My Library
Select My Library at the top of the page. Scroll down to Reserved Toys and the member will see the toy has been added to the list. 
If the member would like to book a pickup time using the Click and Collect Booking system, go to the article How to use Click and Collect in the Member Website.
The post Reserving a toy in the Member Website appeared first on MiBase New Zealand.
]]>The post Editing a reservation in the Admin Website appeared first on MiBase New Zealand.
]]>There are two places you can edit the reservation.
- If the wrong dates have been selected whilst reserving the toy, you can edit on the Make a Toy Reservation page.
- Or, you can simply go to the Reservation List page.
On the Make a Toy Reservation page, the Edit button is green.
On the Reservation List page, the button is orange.
Clicking the Edit button will take you to the Edit Reservation page.

As you can see it will list the toy and the member the reservation is for.
Select the new start and/or end dates from the dropdown calendar and click Save Reservation.
A Success message will appear if the toy can be reserved for the changed dates. Clicking OK will take you back to the Reservation List.
If the dates selected overlap with another reservation an Error message will appear letting you know those dates don’t work. 
The post Editing a reservation in the Admin Website appeared first on MiBase New Zealand.
]]>The post Setting up the Click and Collect Booking Module appeared first on MiBase New Zealand.
]]>MiBaseNZ has created this Click and Collect booking system for admin and members to be able to book a time to pick up and/or drop off toys.
Before you can start using this system, you will need to complete two steps first.
Step 1: ensure your toy library’s opening times have been set up correctly. To learn how to do this read the article Days and Times page. Once set up, these opening times will be seen by admin and members when they go to reserve a toy as you will need to reserve a toy first before you can book a pick-up/drop off time.
(To see how to reserve a toy, go to the article How to Reserve a toy in the Admin Website for admin or for members go to the article How to Reserve a toy in the Members Website).
Step 2: set up the booking system. To do this go to Reserve -> Click and Collect

Click the Settings and content button.

There are six settings to change.
To make these changes click the Edit button alongside each setting, use the arrows or type in your preference and click Save.
Once the settings are changed you must log out and then log back in again for the settings to take effect.
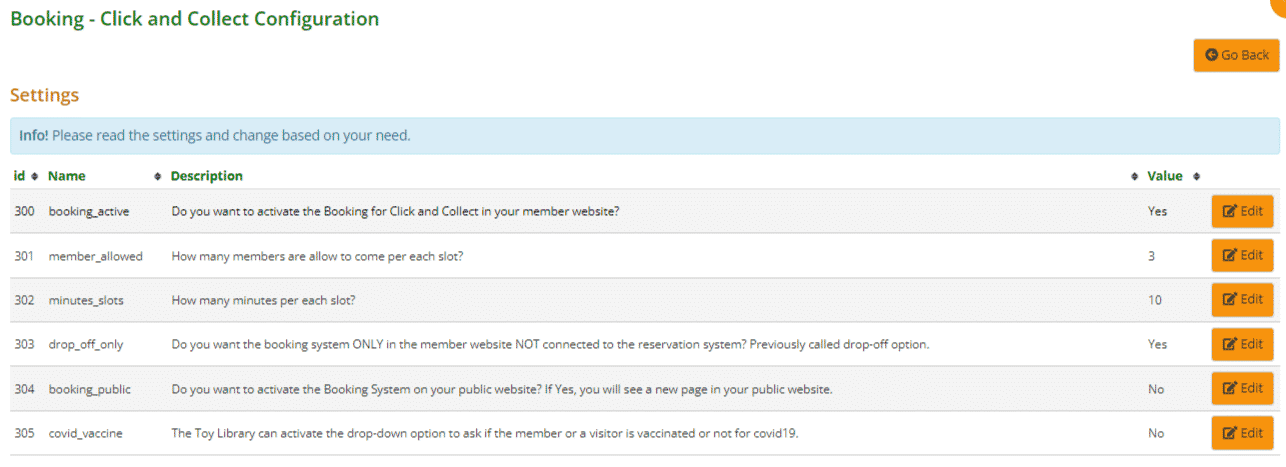
- #300: select Yes for the booking system to be activated
- #301: decide how many members you would like per time slot
- #302: decide how many minutes would you like to allocate to each time slot
- #303: select Yes if you would like to activate the Bookings setting in the Member Website. This will allow members to book a time to drop off toys only
- #304: select Yes for the booking system to be activated on the Public Website
- #305: select Yes to activate the dropdown menu for vaccine passes. This will allow members to inform you whether they are vaccinated or not
Select the Go Back button to take you back to the Click and Collect Booking page.
With this part of the setup complete, the module has now added the Click and Collect page on your Member Website.
![]()
It has also added a Book a Visit button underneath the Google map on the home page of your Public Website.

To personalise your Click and Collect page, you will need to edit the title and content of the Member/Public website content page listed under the settings. Once you have made the changes click Save.
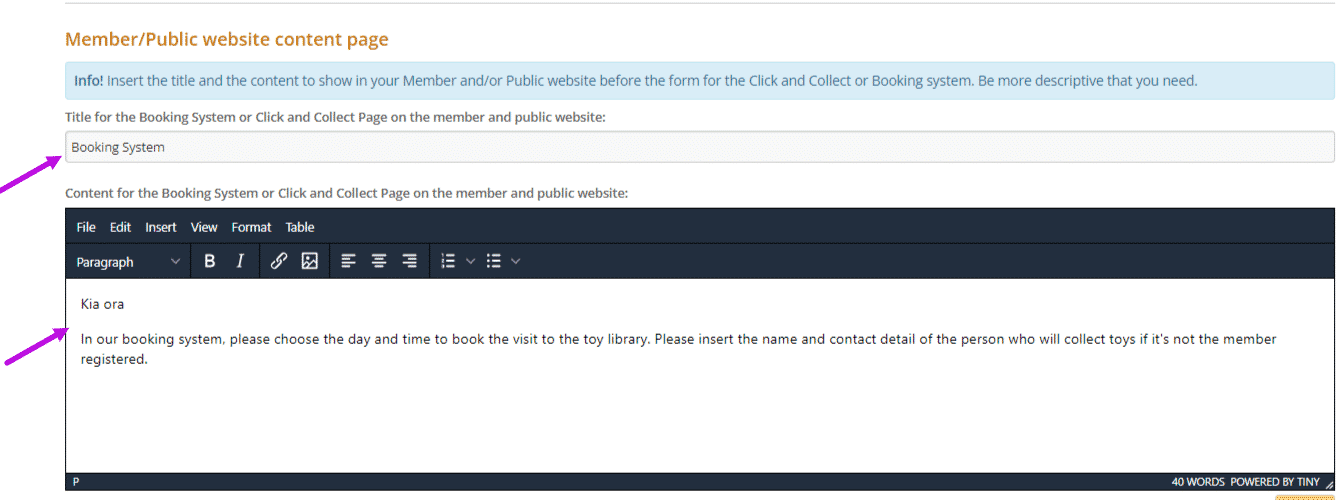
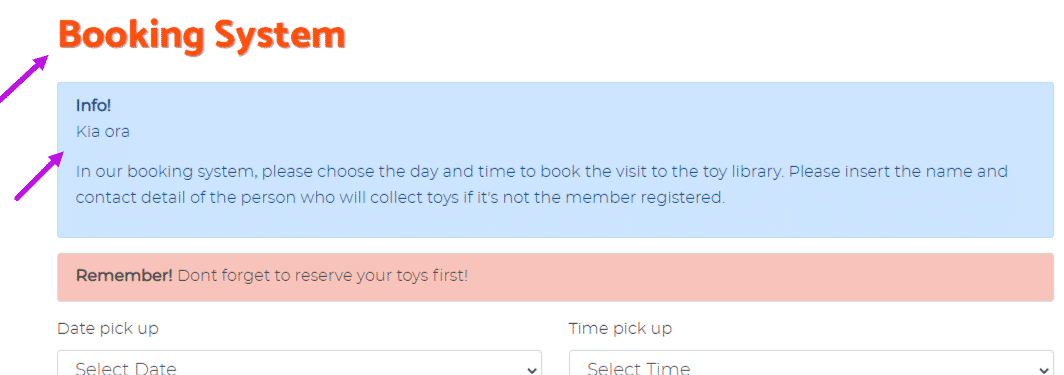
This will automatically update the Member/Public Website and the title and content will appear on the Click and Collect page before the booking system.
View the video here:
(This video has two sets of instructions in it. The first will show you how to set up the booking system, the second, how to use the booking system on the admin website)
Now that you have set up the Days and Time page and the Click and Collect page, you are ready to make a booking. The following two articles will tell you how to use the booking system on the admin website and on the member website.
How to use Click and Collect in the Admin Website
How to use Click and Collect in the Member Website
The post Setting up the Click and Collect Booking Module appeared first on MiBase New Zealand.
]]>The post How to use Click and Collect in the Admin Website appeared first on MiBase New Zealand.
]]>Booking option 1: toy drop off only where no toy reservations have been made.
Booking option 2: reserving a toy first then selecting a pick-up and drop off time for this toy.
To see how to reserve a toy, go to the article Reserving a toy on the Admin Website.
Once you have done that, you are ready to book a pick-up and drop off time. (These times will be based on what you set up on the Days and Times page.)
Go to Reserve -> Click and Collect

You can see on this page a list of all the bookings made by admin and by members from the Member Website. You can also see which toys were reserved or whether it is a drop-off only.
As mentioned above, the dates and times are taken from the Days and Times page.

You can delete a booking by clicking the yellow ![]() Delete button alongside it.
Delete button alongside it.
Drop off only booking
To add a drop off only booking, click on the Add Visit button at the top of the page.

Fill in all fields from the dropdown menus:
- Borid: lists all the toy library members. Select the member you are making the booking for.
- Date: lists the dates the toy library is open based on what you set up on the Days and Times page. Select a date.
- Time: lists the time slots that were set up in the Settings and contents page. Select the time slot the member would like to drop off the toy/s.
- Covid Vaccine: select an option from the dropdown menu to indicate if the member is vaccinated or not
- Note: type in the name and contact number of the person who will drop off the toy/s if that person is not the member the toy has been reserved to. Or you can add any other notes you think are relevant.
Remember, the note will show up on the Member Website on the My Library page under Bookings.
Once all fields have been completed click Save.
You will see the Success message appear underneath. An Error message may appear if there is a problem.
Click OK and you will be taken back to the Click and Collect – Booking time and date page.
Add a new pick up and/or drop off booking connected to a reservation
To add a new pick up and drop off booking, click on the Add New C&C booking button.
Note: Members who have reserved multiple toys will only need to make one booking.

Fill in all fields from the dropdown menus:
- Borid: lists all the members who have reserved a toy. Select the member you are making the booking for
- Covid: select an option from the dropdown menu to indicate if the member is vaccinated or not
- Date pick up: lists the date the member has reserved the toy/s for. Select a date.
- Time pick up: lists the time slots that were set up in the Settings and content page. Choose a time slot the member would like to pick up the toy/s.
- Date drop off: this date will be based on how long your library hires toys for. For example, if you hire toys for two weeks, the date will be two weeks from the pick-up date. Select a date.
- Time drop off: lists the time slots that were set up in the Settings and content page. Choose a time slot the member would like to drop off the toy/s.
- Note: type in the name and contact number of the person who will collect the toy/s if that person is not the member the toy has been reserved to. Or you can add any other notes you think are relevant.
Remember, the note will show up on the Member Website on the My Library page under Bookings.
Click Save once all fields have been completed.
You will see the Success message appear underneath. An Error message may appear if there is a problem.
Click OK and you will be taken back to the Click and Collect – Booking time and date page.
A toy has been reserved but the date is not available
If this happens it means all time slots have been taken for that day. You will need to change the dates of the reservation to another day. To do this, you can simply edit the dates on the Reservation List page or delete the reservation and reserve the toy/s again for another day.
Booking List Page
Your booking will now be listed here. If it is a rather long list, you can search for the member by typing the name in the “MemberName” box.
You can also sort this list by the categories listed depending on your preference. Click the arrows next to the category you want to sort the list by.

You can also download/print the list to PDF and/or Excel by clicking the Export to PDF or Export to Excel buttons.

View the video here:
(This video has two sets of instructions in it. The first will show you how to set up the booking system, the second, will be how to use the booking system on the admin website)
Now you know how to book a pick up/drop off time on the admin website, the following article will explain how a member can book a time on the member’s website.
How to use Click and Collect on the Member Website
The post How to use Click and Collect in the Admin Website appeared first on MiBase New Zealand.
]]>The post How to use Click and Collect in the Member Website appeared first on MiBase New Zealand.
]]>Step 1
Members need to log in to the member website using their login details.
Step 2
Decide if they want to reserve a toy and choose a pick up/drop off time (first booking form) or choose a drop off time only, no reservation required (second booking form).
Note: they can only use one booking form at a time.
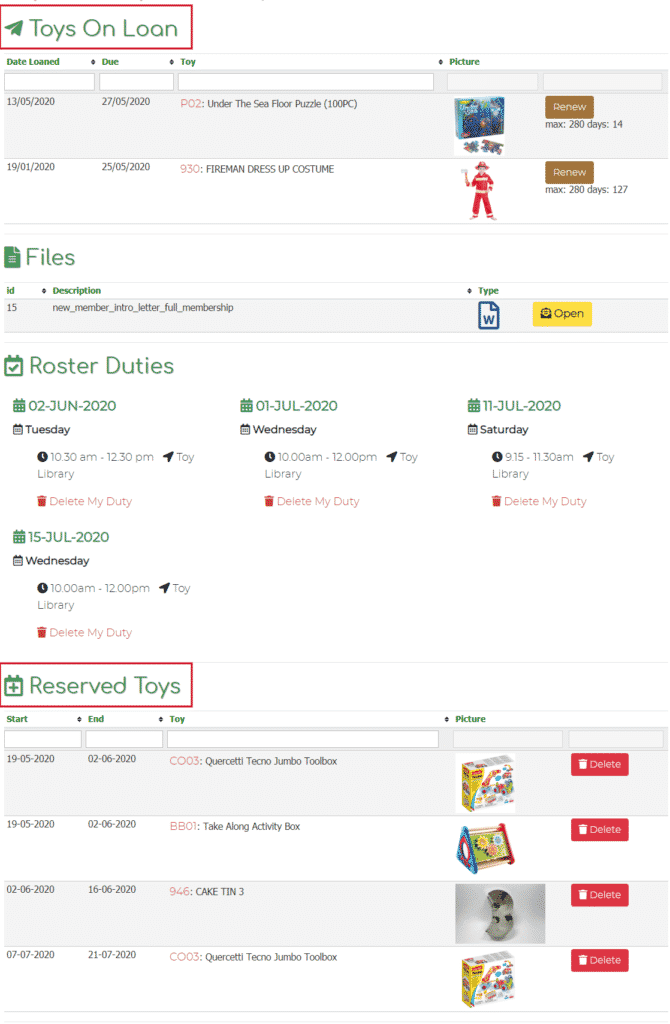
Select My Library at the top of the page.
![]()
Members can see their Toys on Loan or scroll down to see their Reserved Toys if any.
Step 3
Using the booking forms.
Booking form 1: To use this form, members will need to reserve a toy first.
To find out how to reserve a toy, go to the article Reserving a toy on the Member Website.
Once a toy is reserved, select Click and Collect at the top of the page.

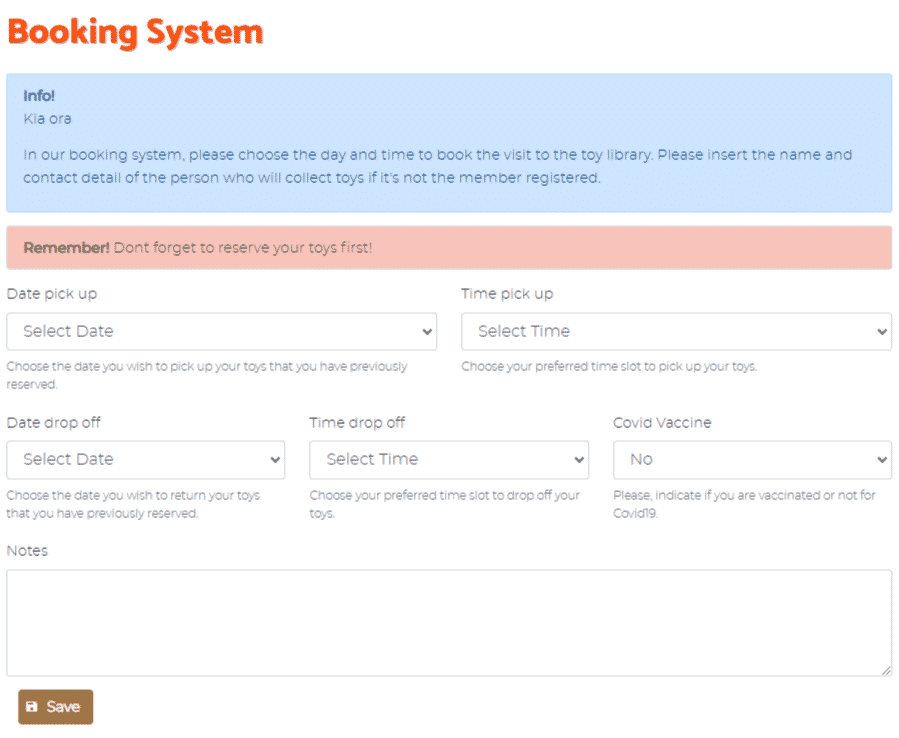
Fill in all fields from the dropdown menus
- Date pick up: choose a date to pick up the reserved toy/s
- Time Pick up: choose a time to pick up the reserved toy/s.
- Date drop off: choose a date to return the toy/s
- Time drop off: choose a time to drop off the toy/s
- Covid Vaccine: select an option from the dropdown menu to indicate if the member is vaccinated or not
- Notes: type in the name and contact number of the person who will collect the toys if that person is not the member the toy has been reserved to.
Click Save once all fields have been completed. They will see the Success message appear underneath. An Error message may appear if there is a problem.
Click Back to Booking.

Booking form 2: Select Click and Collect at the top of the page and scroll down.
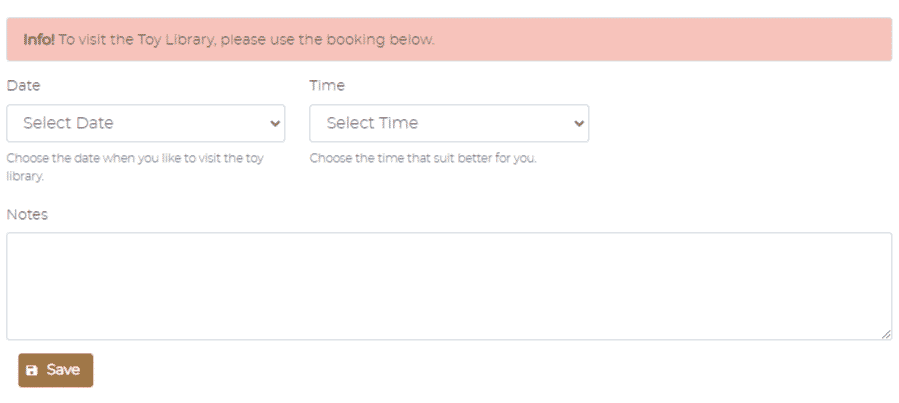
Fill in all fields from the dropdown menus
- Date: choose a date to return the toy/s
- Time: choose a time to drop off the toy/s
- Notes: type in the name and contact number of the person who will drop off the toys if that person is not the member the toy has been reserved for.
Click Save once all fields have been completed. They will see the Success message appear underneath. An Error message may appear if there is a problem.
Click Back to Booking.

What happens if there are no time slots available?
If this happens it means all time slots have been taken for that day and the member will need to change the dates of their reservation to another day. To do this, they will need to delete the reservation and reserve the toy/s again for another day.
For further information go to the article There are no more time slots available – what do I do?
Step 4
Select My Library at the top of the page.
Scroll down to Booking. They will now see a list of all their bookings.
If a member has made a mistake or would like to change the booking, they will need to delete the booking by clicking the yellow Delete button alongside it and start from Step 3 again.

Once a member has made a booking, a confirmation email will be sent to their email address.
Admin can edit this template to their liking by going to Setup -> Email Templates and editing the template “click_collect_booking “. For more information read the article Booking Confirmation – Email template.
An email will also be sent to the toy library email address informing admin a new booking has been registered.
View the video here:
The post How to use Click and Collect in the Member Website appeared first on MiBase New Zealand.
]]>