How Can We Help?
MiBaseNZ’s Edit Website page has been created for your toy library to add introductions or specific content and information for certain pages within each of your Public and Member Websites.
Some sections may be relevant to both or to just the Public Website or the Member Website.
Some sections may not be relevant if your toy library has chosen to not use them in which case you will just need to leave them blank.
Go to Setup -> Edit Website

At the top of the page, you will see a blue Save Web Info button. Once you have added the content for each section, you will need to click this before leaving the page and for the information to be updated in the websites.
If you are making any changes, once you click Save Web Info, you will also need to refresh your website to view these changes. 
Using the toolbar text editor
Each section will have a toolbar text editor along the top to help you to improve the description and general layout of your text as well as provide some formatting.

The best way to understand how to use each setting is to have a play, however, here are some points to help you:
- To create a heading, select the size of the Heading (1-6) from the Paragraph drop down menu. If you have read the Design your website article, you will see whatever heading size you choose will take on the heading colour and font style you have selected here.
- To insert an image or link into the text, read this article How to add an image or link to learn how.
- To create a new paragraph just press ENTER on your keyboard. However, if you just want the next line down without a new paragraph and space between, press SHIFT + ENTER.
- Rather than scrolling through the text box to see what you have written, you can enlarge the text box by dragging the diagonal lines down which are located bottom right of each box.

Home Page
This section is only relevant to the home page of the Public Website.
In this section, you can add whatever content or images about your toy library you like. You can even add links to other pages within your website too. Remember this is the first page people will see when they view your website.
Right Column
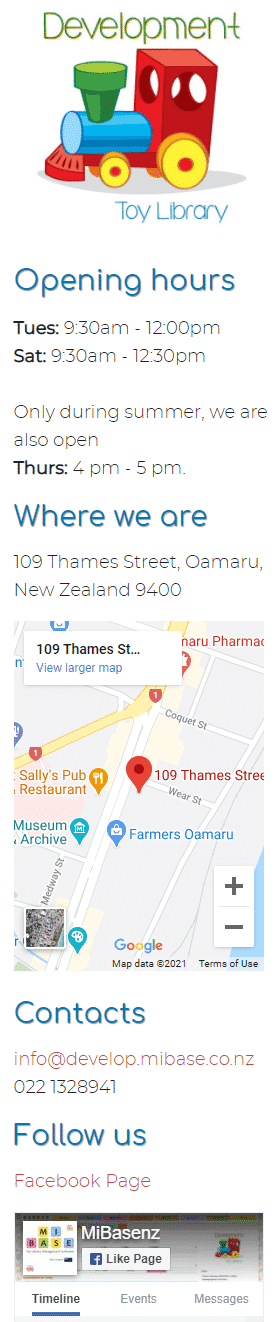
This section can be seen in both the Public and Member Websites and appears on almost all pages. Your toy library logo, Opening hours, Contacts and Follow us are all automatically added from the admin settings if you have set them up.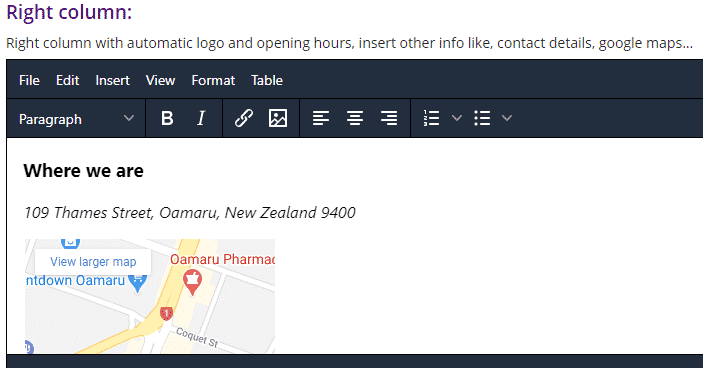
Where we are needs to be manually added here.
It is highly recommended you add a google map here as well as the written address.
To add a map into this section please read this article, How to add a Google map on your website.
FAQ Page
This section can be seen in both the Public and Member Websites IF you have activated the FAQ page. To activate this page, follow this link to see how.
Here is where you add an introduction to the FAQ’s, it is not where you add the questions and answers.
To add the FAQ’s, go to FAQ’s List to see how.
If you choose to not add an introduction, you will just see the list of questions and answers in the FAQs page.
Sponsors Page
This section can only be seen on the Public Website IF you have activated the Sponsors page. To activate this page, follow this link to see how.
The Sponsors page is where you add the logos of all your sponsors. You have two options here:
- Option 1 – is great if you just want to add the logos with no explanation. Like the FAQ page, you can just add an introduction (or not) and the logos are added in Setup -> Upload Files. To learn how to add the logos read this article How to upload files.
- Option 2 – is great if you want to write a little blurb about each sponsor. You can add an introduction (or not) and then add the logos underneath by uploading the images. This is easily done in this section. To learn how, please read this article How to add images.
Our Team page
This section can only be seen on the Public Website IF you have activated the Our Team page. To activate this page, follow this link to see how.
Here is where you add an introduction, it is not where you add your list of committee members/volunteers.
To add your toy library team, go to Our Team page to see how.
If you choose to not add an introduction, you will just see the list of committee members/volunteers on the Our Team page.
News Page
This section can only be seen on the Public Website IF you have activated the News page. To activate this page, follow this link to see how.
Here is where you add an introduction, it is not where you add your news articles. To add these, go to Adding a news article to see how.
If you choose to not add an introduction, you will just see the list of articles.
Member Options
This section can only be seen on the Public Website IF you have activated the Membership page. To activate this page, follow this link to see how.
This is where you add all information on your toy library’s membership options. There is no other page for this. Once the page is activated, this information will be listed there.
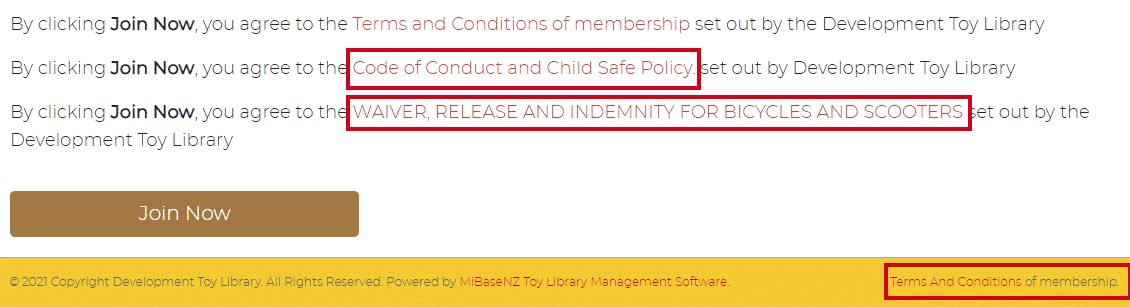
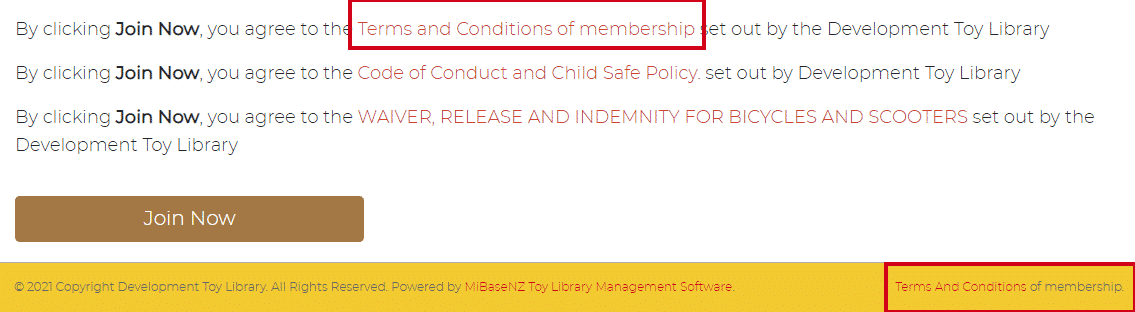
Conditions of Membership
This is where you add your toy library’s Terms and Conditions. These can be viewed in two places:
- the footer of both your Public and Member Websites which is seen on every page. The link will take you to the Terms and Conditions page.
- the bottom of the Join Now page (if you have activated it). This link will bring up a pop-up screen showing the Terms and Conditions.
Members Home Page
This section is only relevant to the home page of the Member Website. It is the very first page members will see when they log in.
In this section, you can add whatever content you think is relevant for your members to know about your toy library such as what they can and cannot do, for example, how many times they can renew toys, how long reserved toys are held for if not collected on the day. You could also mention certain functions they can use on the website. You could also add shortcodes such as the member’s ID or their account balance.
To see the list of shortcodes please follow this link Using Shortcodes.
Payment Information: Instructions for members – Joining
This section is linked to the shortcode [payment_info]. You can add your account details and any other message that relates to it as seen below and when you use the above shortcode in an email this information will automatically appear.

Email template example: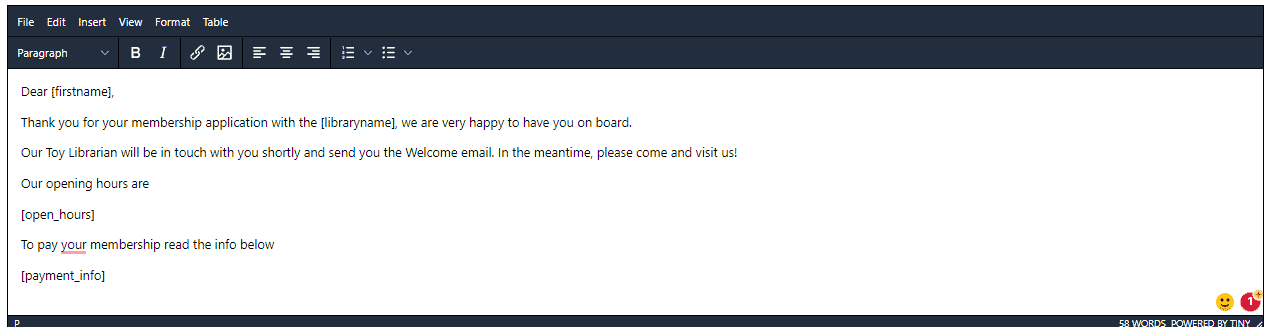
Email example: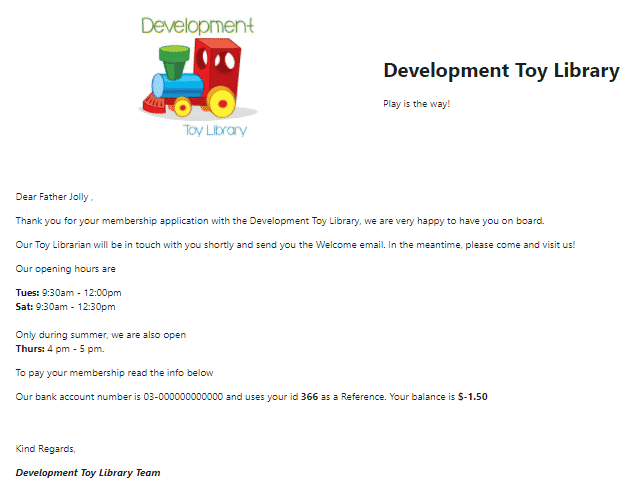
Payment Information: Instructions for members – Renewing
This section is currently being tested. Please do not use it until further notice.
Bouncing Castle Terms and Conditions / Jumping Castle comments for popup
Please do not use these sections as they will be removed in the near future.
Helmet Waiver /Child Safe Policy & Code of Conduct
If your toy library has these policies then they can be added here, if not, leave the sections blank. If you do add these policies, they will appear in the same places as the Terms and Conditions.
With regards to the link in the footer of both your Public and Member Websites, these policies will not have a separate link, they have been added to the end of the Terms and Conditions so when you click the link for the Terms and Conditions, both these policies will be listed there as well.
For the bottom of the Join Now page (if you have activated it), you will see separate links for each policy and clicking on them will bring up a pop-up screen showing the policy.