The post How to change the rent value of toys appeared first on MiBase New Zealand.
]]>To change the rent value of an individual toy, find the toy in the Toy List, click the blue Edit button and change the rent value from the dropdown menu, remembering to click Save.
To change the rent value in bulk, however, can only be done by changing the rent assigned to a toy category which means all toys within that category will update to the new rent value selected. The issue with this though is if toys in that category have different rent values.
Unfortunately, MiBaseNZ cannot isolate all toys with the same rent value across different categories to update them. If you do not want to change all the toys within that toy category to be the same, you will need to change the toys individually as outlined above.
If you are happy for all toys within that category to have the same rent value then go to Toy -> Toy Categories.
Click the blue Edit button on the category in which you like to change the rent, change the rent value and click Save.
Click the OK button and it will take you back to the Toy Category List page.
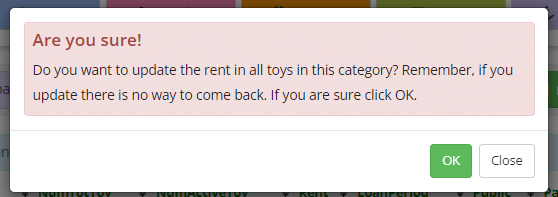
Click the purple Update all toys button and click OK to the alert message. All toys within that toy category will now have the same rent value.
The post How to change the rent value of toys appeared first on MiBase New Zealand.
]]>The post How to optimise an image with Imagify appeared first on MiBase New Zealand.
]]>So with regards to MiBaseNZ, optimizing your images on the website is important for the following reasons:
- All images (toy picture, slideshow, images in news articles, profile pics, etc) are used in your Public and Member website, and if they are NOT optimized the website will become very slow and, in some cases, members will not be able to use it.
- The administration will be faster.
- You will save us, MiBaseNZ, from paying for more space which would keep the hosting costs from increasing.
- MiBaseNZ accepts only PNG and JPG, Imagify will help you to convert the file type if you have the image in a different format.
So, how can you ensure your images are optimized before uploading them?
Don’t worry, we have a very simple solution for you 
We have subscribed to a web application and we are sharing it with everyone. You will be able to use the web application called Imagify any time you need. You will have 10 GB, which is around 10,000 MB, each month to compress and resize your images.
To access Imagify
To access the application click here https://app.imagify.io/#/login, the username is your toy library email and the password has been sent to you. This is the email that you should receive from Imagify.
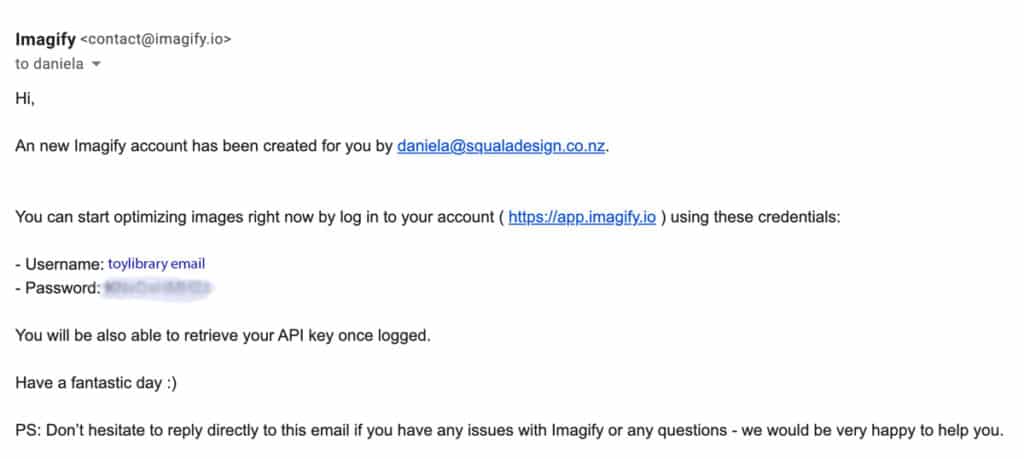
If you did not receive this, please open a ticket.
**The API key is not relevant to MiBaseNZ, please ignore this**
How to use Imagify
Once you log in, you can see the configuration on the left and the uploader on the right.
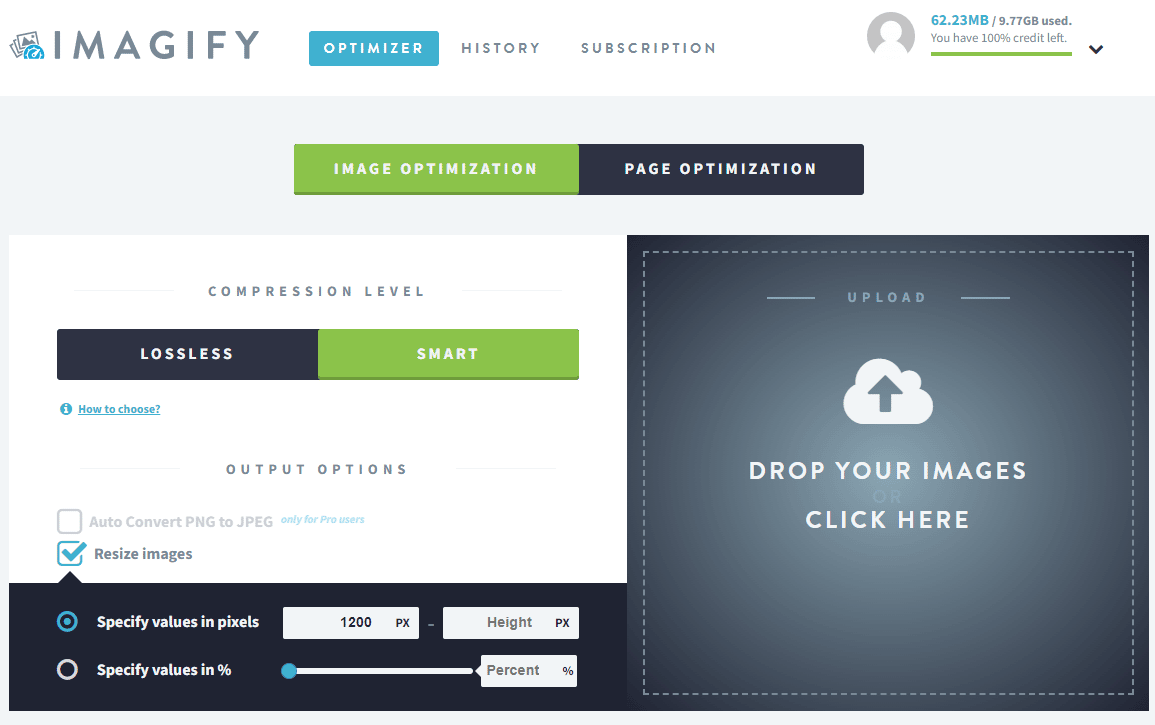
The Compression level should be SMART.
Select Resize images and Specify values in pixels.
Type 1200 in the width field.
Then, click the uploader box and select the images that you need to optimize.
Give the photos a little time to upload and compress. Once done, the following message will appear with the list of photos you have compressed. As you can see, it will tell you the old file size and the new compressed file size and also how much compression had been done.
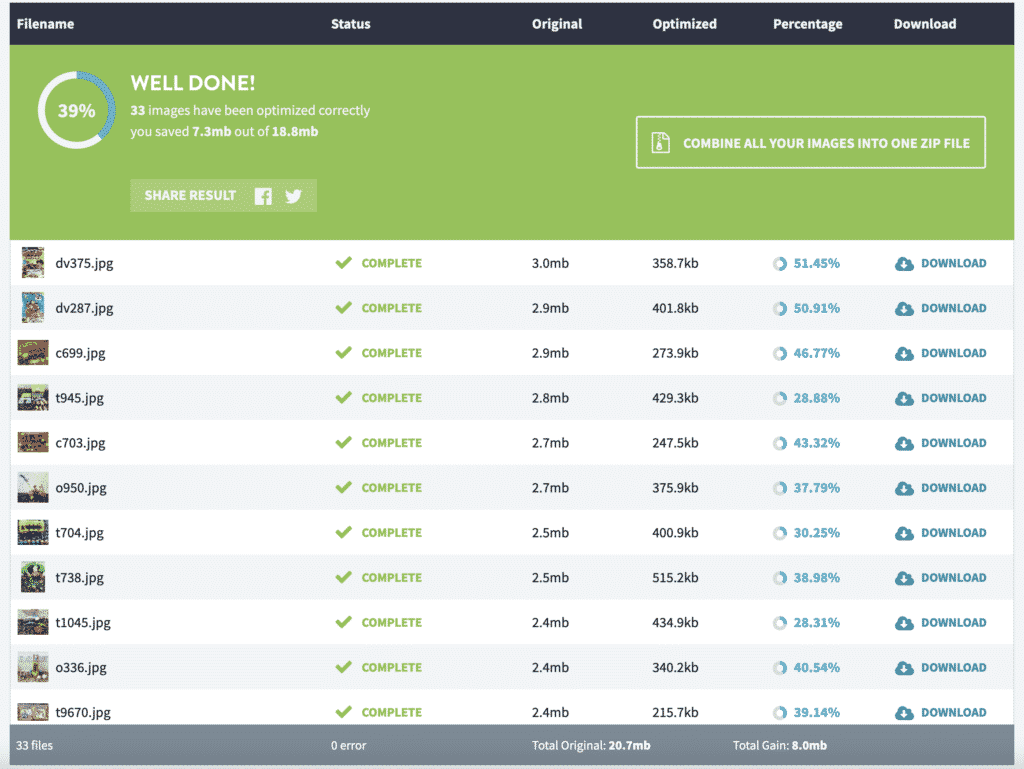
Click Combine all your images into one zip file, wait a bit and then click Download the zip file.
Uncompress the zip file and you are ready to upload all your pictures!
You can also download the image individually if you have only done one or two images. In which case once you click Download, the image will appear and you will need to right-click it and select Save image as… OR depending on the setup of your device it may automatically save in your downloads folder.
It is much easier to download a zip file.
The post How to optimise an image with Imagify appeared first on MiBase New Zealand.
]]>The post Toy pages – how they differ from the Public Website appeared first on MiBase New Zealand.
]]>The first difference is on each toy page. A sub-category dropdown menu has now been added. This cannot be seen on the Public Website.
The second difference is only apparent if you have activated the Reservable Toys page. If you have, you will now see two date range fields. This will allow members to view toys that are available to reserve in a certain period of time.
Sub-category dropdown menu
Sub-Categories help to reduce clutter on your websites, which prevents people from being overwhelmed by a long list of choices. If your library has decided to use sub-categories, your members can now be more specific in their search for toys. If your library does not use sub-categories, this field will still be seen however no options will appear.
To find out how to Add, edit or delete sub-categories, follow this link to the article.
Remember: Sub-categories are not related to a specific category.
Reservable Toy page
If you would like to activate the Reservable Toys page follow this link to see how – Reservable Toys.
When a member opens this page, they will not see any toys listed. 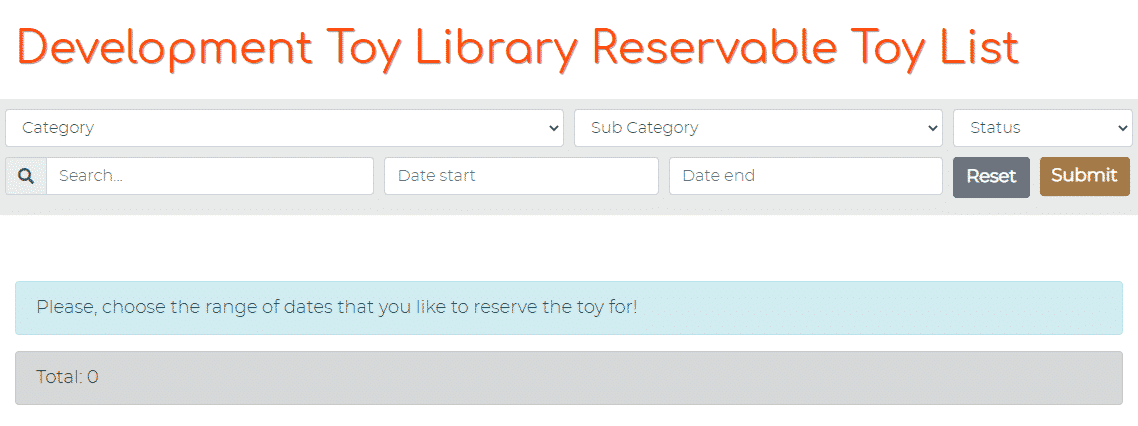
The toys will only appear after they have chosen the dates for when they would like to reserve the toys and have clicked Submit.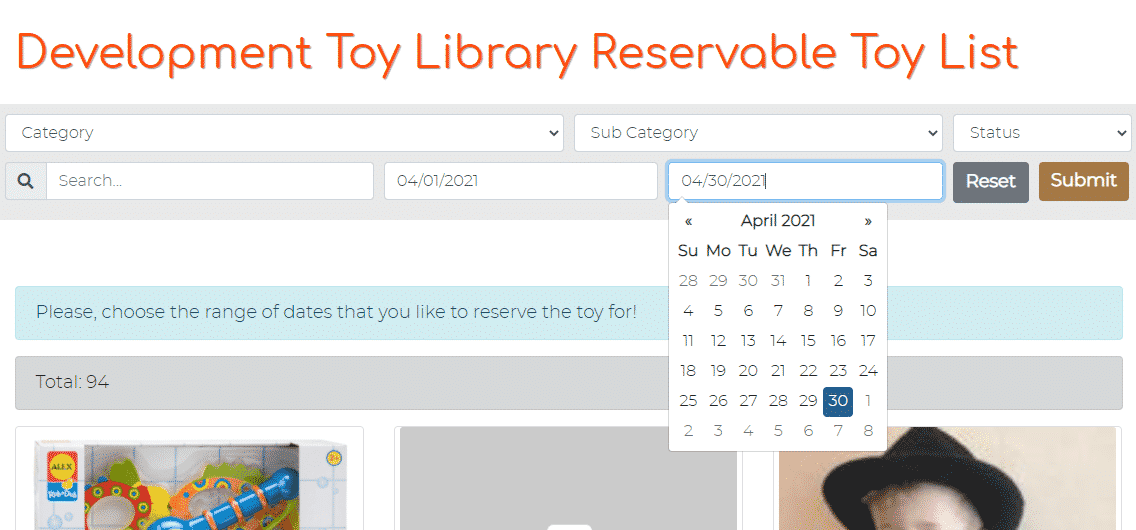
A cache system has also been added to the page, which means when a member views a toy then clicks back to the toy list, the filter settings will remain.
The post Toy pages – how they differ from the Public Website appeared first on MiBase New Zealand.
]]>The post Renewing a toy in the Member Website appeared first on MiBase New Zealand.
]]>
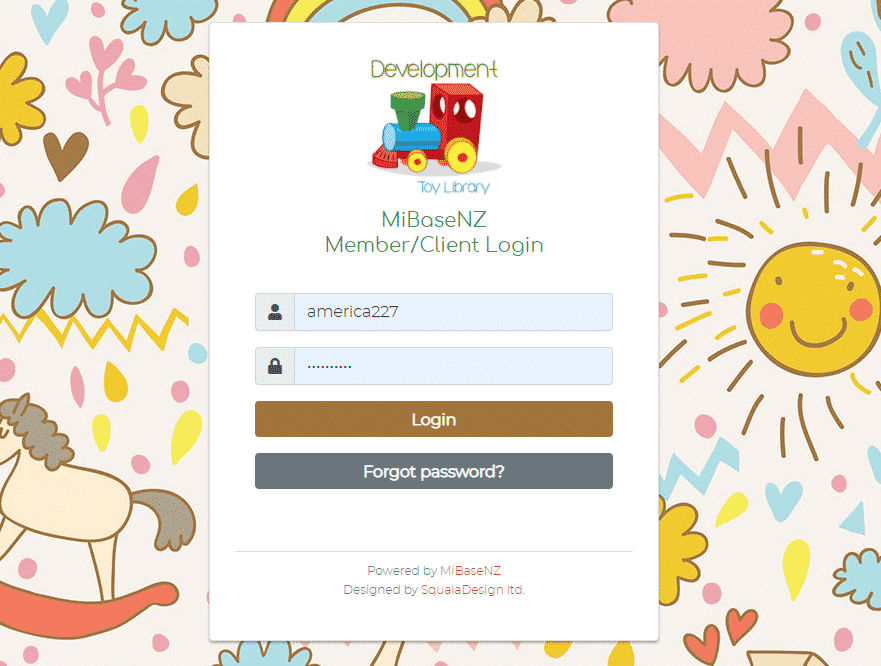
Step 1: Member Login
Members need to log in to the Member Website using their login details.
Step 2: Select My Library at the top of the page
Under the first heading Toys On Loan, the member will see the list of toys they currently have out on hire.
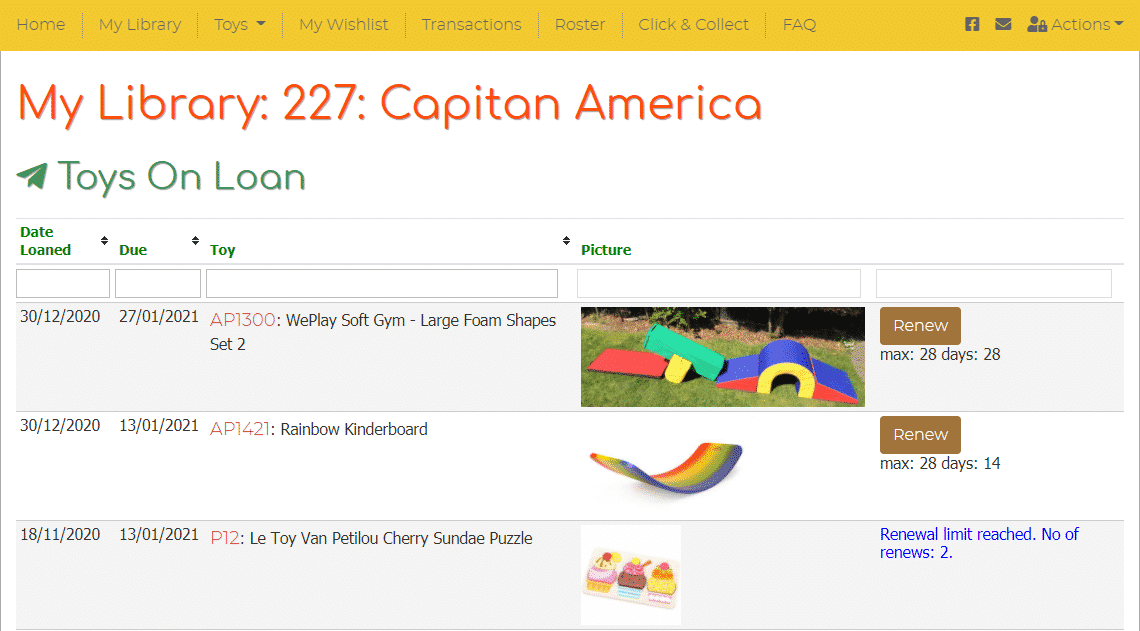
Step 3: Click Renew
Find the toy they would like to renew and simply click the Renew button next to it. A confirmation message will appear as shown below.
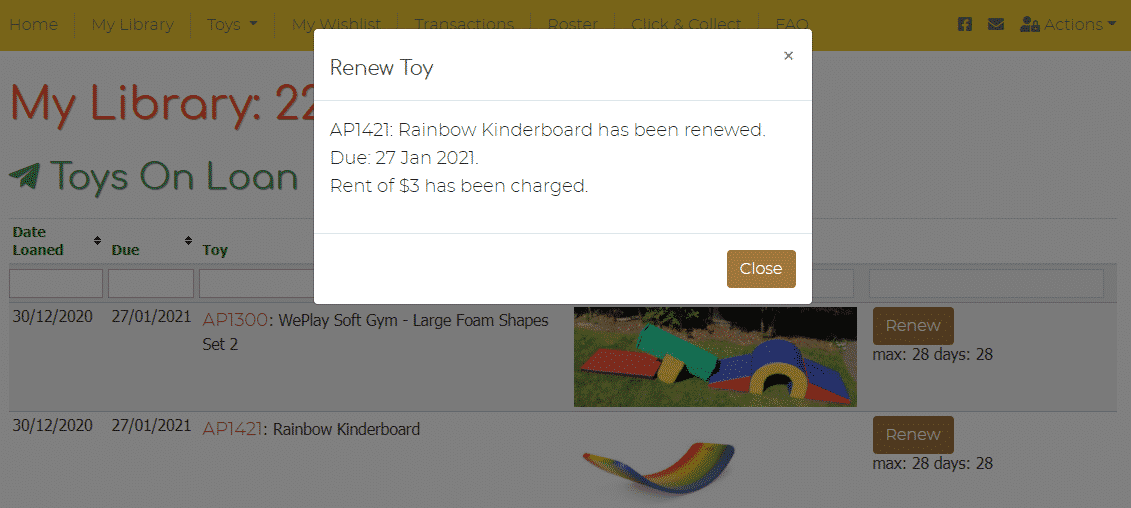
Once the member has reached the limit of renewals, which depends on the number of renewals you have set up for your library, the Renew button will disappear and will be replaced with the message Renewal limit reached.

If a toy is overdue, you can decide, by changing the relevant setting, whether the member can renew an overdue toy or not. If they can they simply click the Renew button. If they can’t the Renew button will be replaced with the message Overdue toy cannot renew.

The post Renewing a toy in the Member Website appeared first on MiBase New Zealand.
]]>The post Setting up the Reservation System appeared first on MiBase New Zealand.
]]>Also, if you have not done it already, you will need to make sure the opening days for your library are set up correctly as you want them to appear on the reservation calendar.
Admin Website
For the admin website, go to Setup -> Administration

In the Name search box type in ‘reserve’ and change the settings in the image below by clicking the Edit button.
Once the settings are changed you must log out and then log back in again for the settings to take effect.

- #13: this refers to the Reservations for Today heading on the admin home page. Selecting Yes will show this heading and a list of toy reservations for that day if any
- #63: decide if you want to charge for reservation, yes add the amount, no leave it as 0
Member Website
If you are using the member website, go to Setup -> Members
In the Description search box type in ‘reservation’ and change the setting in the image below by clicking the Edit button.
Once the settings are changed you must log out and then log back in again for the settings to take effect.

- #208: if you would like your members to be able to make their own reservations on the member website then select Yes.
- #221: this setting prevents members from making back-to-back reservations, particularly for popular toys allowing other members the opportunity to reserve them. Type in the number of days after a reservation a member can make another one for the same toy
- #222: this setting prevents members from making a reservation on the day the library is opened or as many days prior to the session of your choosing
- #223: this setting prevents members from booking toys too far into the future. You can set the limit
Opening Days
As mentioned above, what you set up as your opening days as well as holiday closures, will appear in the reservation calendar.
Follow this link How to setup Days and Times of your Library to see how.
Once all these settings have been changed to your liking then your Reservation System is ready to go.
Other Info
Follow this link to find out how to make a reservation in the admin website
Follow this link to find out how members can make a reservation in the member website
Follow this link to find out how to access your list of reservations
Follow this link to view historical reservations
The post Setting up the Reservation System appeared first on MiBase New Zealand.
]]>The post Reserving a toy in the Admin Website appeared first on MiBase New Zealand.
]]>Go to Reserve -> NEW Reservation 
Toy List for Reservations
You will see the full list of your library’s toys that can be reserved.
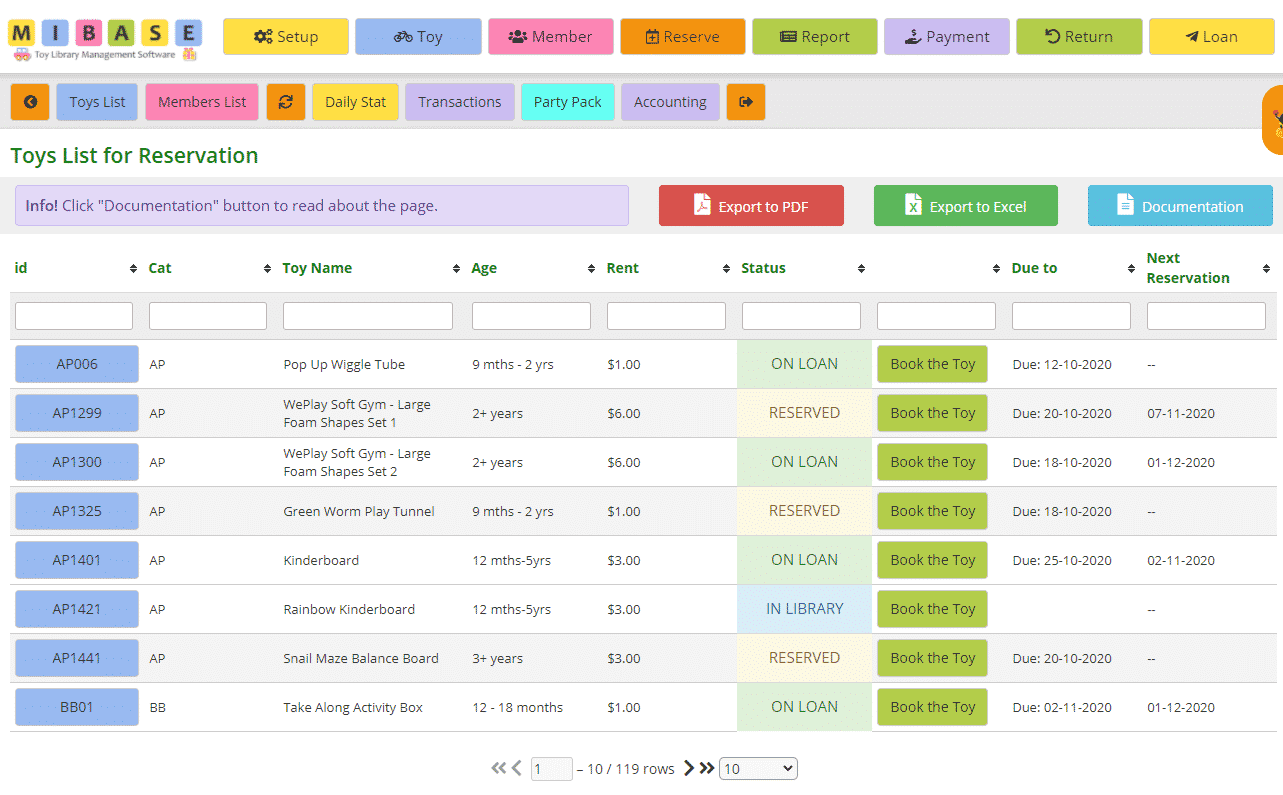 The last 4 columns are the most important when reserving toys:
- Status: will tell you if the toy is currently on loan, has a reservation already or is in the library
- Book the Toy: clicking this button will take you to the toy’s reservation page
- Due to: if the toy is currently on loan, this is its due date
- Next Reservation: when the toy has been reserved next. If the toy has multiple reservations, you will need to go to its Reservation page to see them all and the date in this table will show only the next one.
The remaining columns are self-explanatory.
Reserving a toy
Step 1
Locate the toy you would like to reserve by typing in the appropriate search boxes at the top of the table.
Step 2
Click the green Book the Toy button. You will be taken to the reservation page for that specific toy. If any reservations have already been made for the toy they will be listed here under the Active Reservations List as you can see in the example below.
Step 3
Find the member for whom the reservation is to be made to by typing in the Member id or Search Member boxes. Once you have selected your member, the page will update with the member’s details, the toy’s details and the reservation calendar. The list of reservations will move to the bottom of the page. To the right of the page, you will see a Legend, a coloured guide to show the toy’s availability in the calendar.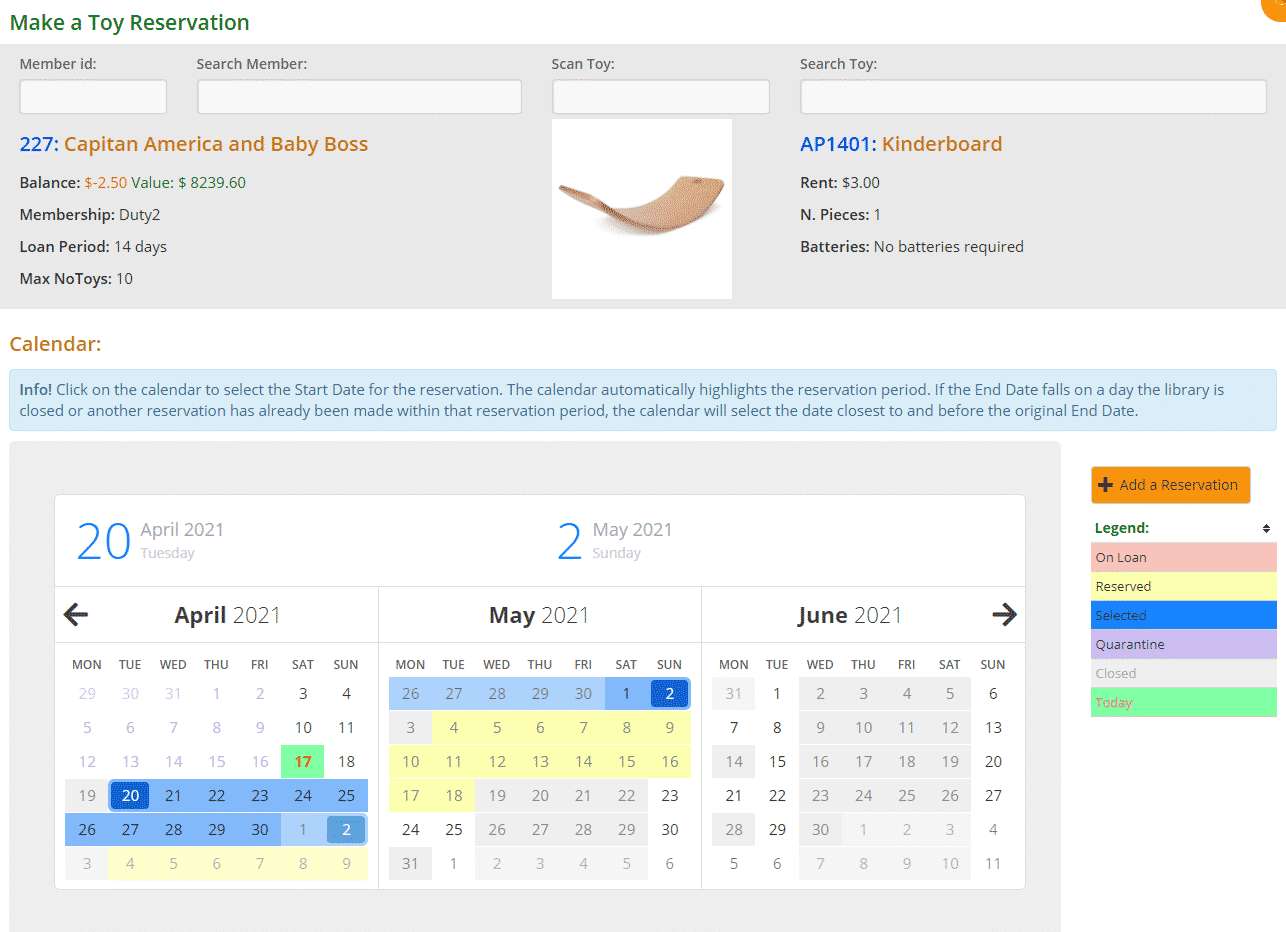
Step 4
Click on the calendar to select the Start Date for the reservation. The calendar will then automatically highlight in blue the reservation period according to the number of days you have set up in the settings (see above calendar).
Note: if there is a period between reservations or toys being on loan that is less than your library’s loan/reservation period, ie. a few days or a week, admin and members can still reserve toys in that time. If this happens, the calendar automatically selects the next appropriate End Date making sure there is no overlap and the toy can be returned in time for the next reservation.
Step 5
Click the orange Add a Reservation button above the Legend. A green Success message will appear under the blue box The reservation will appear in the reservation list at the bottom of the page.
If you have made a mistake or the member no longer wants to reserve that particular toy, simply click the orange Delete button and start again.
Or, if you have selected the wrong dates, simply click the green Edit button make the changes, and click Save.
Read the article Editing a Reservation for further explanation.

Maximum loans for same day/date
If a member has reached their quota of toys they can reserve/loan according to their membership, MiBaseNZ will prevent you from reserving any more toys. A red Error message will appear under the blue box stating the maximum number of toys this member can reserve. 
Multiple toy reservations for a member
If a member has more than one toy they would like to reserve, simply search for the toy by typing in the Scan Toy search box and clicking Enter on the keyboard or Search Toy box and selecting from the dropdown menu. Go through Steps 4 and 5.
Where to view toy reservations in MiBaseNZ
There are several places to view members’ toy reservations besides on the reservation page.
- the Reservations List page where you can view all toy reservations for your library. Follow this link to see where you can view your list of reservations
- the Member Detail page where you can view toy reservations for a specific member
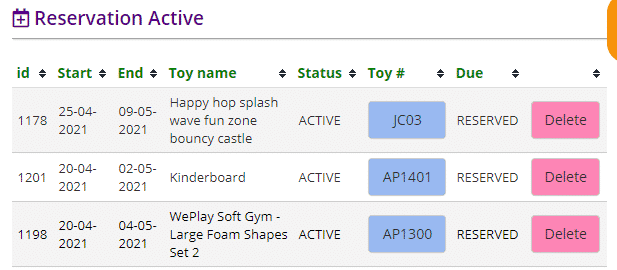
- a member’s Loan page. Scroll down and you will see a list of their reservations if any

To view a list of historical reservations to see whether they had been loaned or deleted you can go to the Reservation History page. Follow this link to see where you can view your list of historical reservations.
The post Reserving a toy in the Admin Website appeared first on MiBase New Zealand.
]]>The post Stocktake page appeared first on MiBase New Zealand.
]]>The Stocktake page is also a great way to see an overview of the key details of each toy and in some cases see where gaps are missing.
To access this page go to Toy -> Stocktake
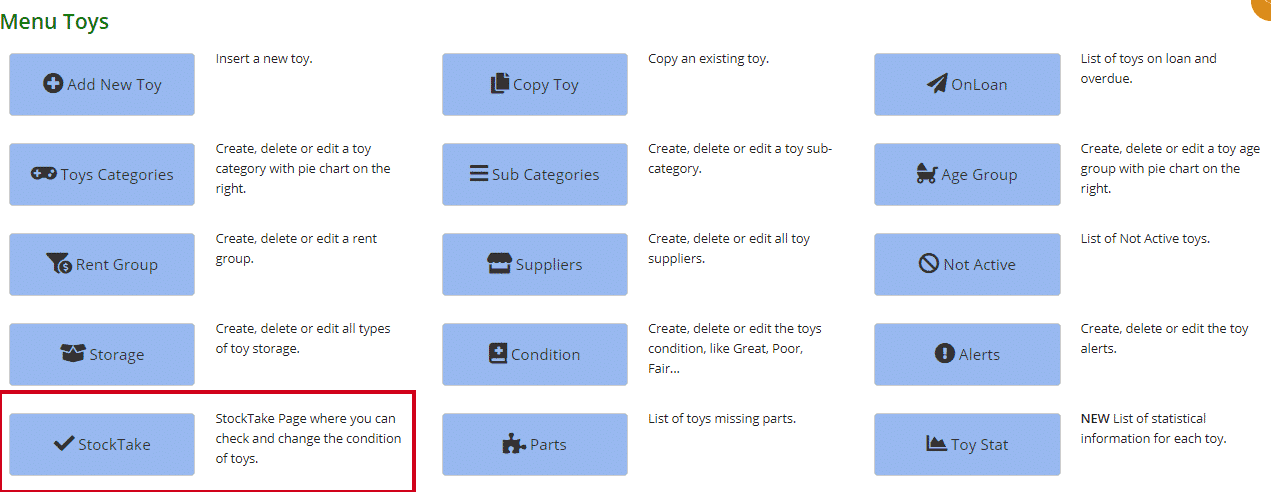
Then check, add or change any information on the list.
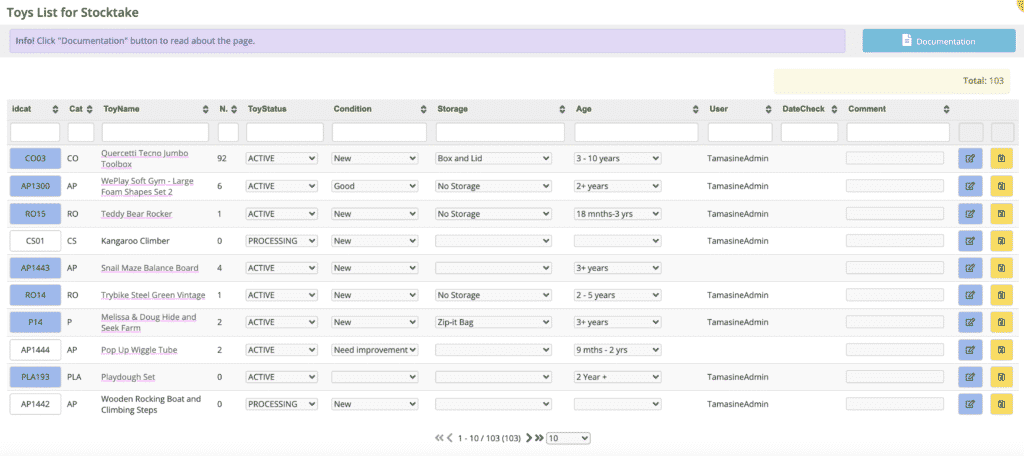
Column Description
- id: the toy’s individual id. If the box is blue, an image has been added for the toy. A white box means no image. If you hover your mouse over the box the image will appear.
If you would like to add an image for that toy, click on the image box and it will take you to the toy’s detail page where you can Upload toy image
Alternatively, if you would like to update the image you can also follow the same steps and select Change toy image. For further information on changing or uploading images, follow this link. - Cat: the toy category the toy has been saved under. If you would like to Add a new toy category, follow this link
- ToyName: name of the toy. If a dotted line is under the title it means the toy has a description, no dotted line no description. If you hover your mouse over the title the tooltip with the description will appear
- No: number of pieces the toy has
- ToyStatus: will only list Active or Processing. To change the status to something different other than these two options, select from the dropdown menu and click the yellow Save button
- Condition: this is great for when toys are no longer new and the condition needs to be amended. Select an option from the dropdown menu and click the yellow Save button. If you would like to Add a new toy condition, follow this link
- Storage: what the toy is stored in. If you need to add or amend, select from the dropdown menu and click the yellow Save button. If you would like to Add a new type of storage, follow this link
- Age: the age group for which this toy is suitable for. If you need to add or amend, select from the dropdown menu and click the yellow Save button. If you would like to Add a new age group, follow this link
- User: the admin who made the most recent changes. Whoever makes any further changes, MiBaseNZ will automatically update the user name when they click Save
- DateCheck: the last date a change had been made to the toy. This will also automatically update whenever another change is made and the Save button has been clicked
- Comment: when a comment has been added to the box Stocktake notes in the Edit a toy page, it will appear in this section and vice versa, any comment added here will automatically be saved in the Stocktake notes box. These comments or notes can only be seen by admin
If you need to change more information about a toy, click the blue Edit button and it will take you to the toy’s Edit a toy page. Remember to click Save once done.
More info
To sort or filter the list, click the arrows next to the heading you want to sort or filter the list by or type in the search boxes underneath the headings.
The post Stocktake page appeared first on MiBase New Zealand.
]]>The post Toy Details page appeared first on MiBase New Zealand.
]]>The Toy Details page can be accessed from a number of pages within MiBaseNZ. These include the Stocktake page, Toy Alerts list, and the Toys List page.
For this article, we will be accessing it through the Toys List in the second menu. From there click on the yellow View button alongside the toy you would like to see.
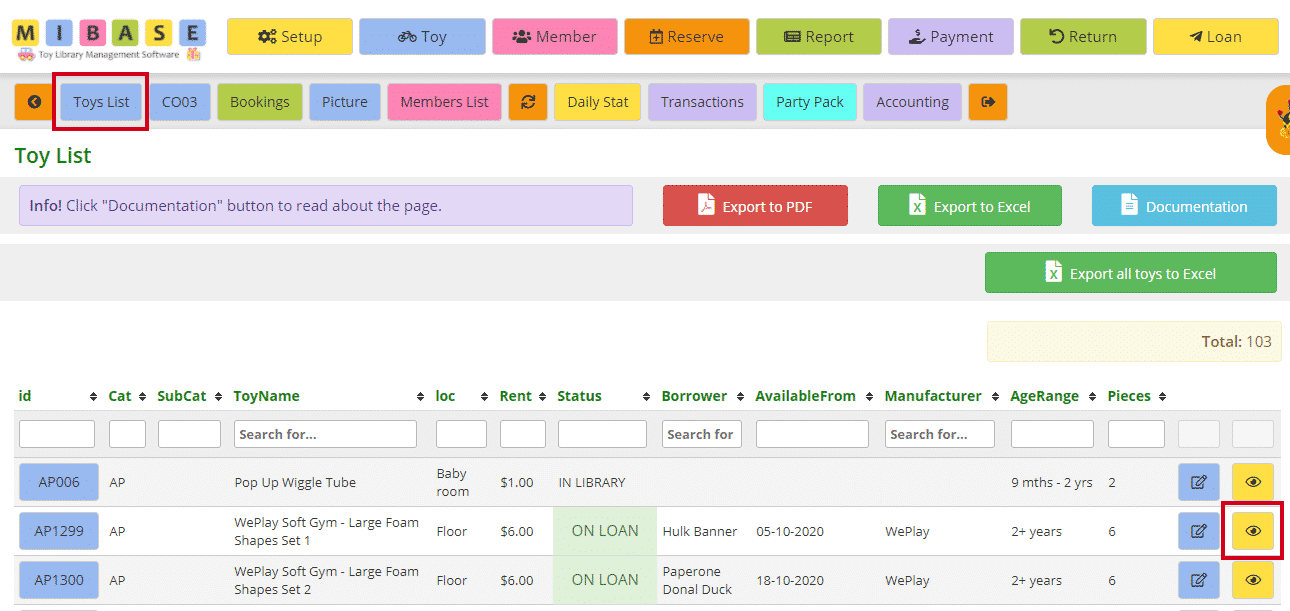
There is a lot of information on this page. We will break it down in sections and explain it in more detail below.
Toy Name

At the top of the page, the toy id and toy name will appear.
If this isn’t the toy you were wanting to view, you can type in the name of the toy you were after in the Search Toy field and select from the dropdown menu.
If this is the toy and you would like to edit any details, click the blue Edit Toy button to the right.
Underneath the toy name, there are three columns of information.
Toy Information
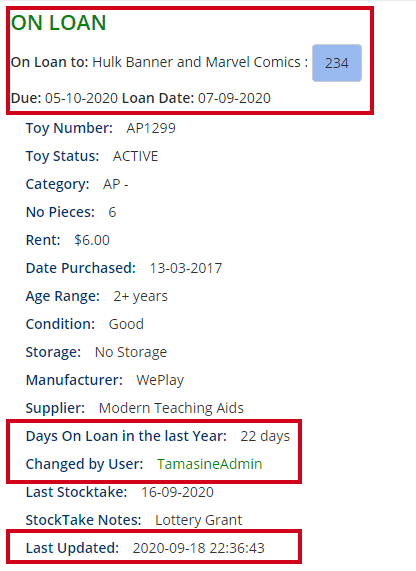
The first column on the left lists all the information that has been saved in the Edit a toy page.
Note: some headings will only appear if information has been added.
The three sections outlined in red you will not see in the Edit a toy page.
- On Loan to: this toy is currently out on loan. You can also see the Due Date and Loan Date which is the start date of the loan. Clicking the blue member id number will take you to the Member’s Detail page.
If the toy was in the library, this information would not appear - Days on Loan in the last year: this is the total days the toy was out on loan
- Changed by User: this automatically updates listing the username of the last admin who made changes to this toy
- Last Updated: this also automatically updates with the date and time of the last change made to this toy
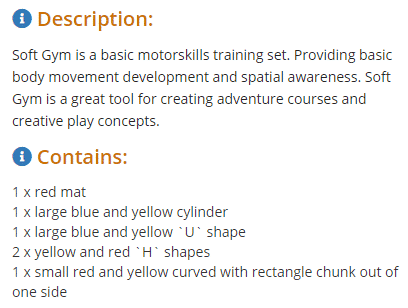
Description & Contents List
The second column shows the description of the toy and list of pieces for that toy. This information is added in the Edit a Toy page. Follow this link for further information regarding this.
Bag Label & More Info
The third column is where you can select a bag label to print for this toy.
Click on the dropdown menu and choose from the large selection of bag labels. Once you have selected click the green Open BagLabel on pdf.
If there is a bag label you would like to create or amend one in the list for your library, you can Open a Ticket and we will add it for you. For further information on this read this article, Customised Bag Labels.
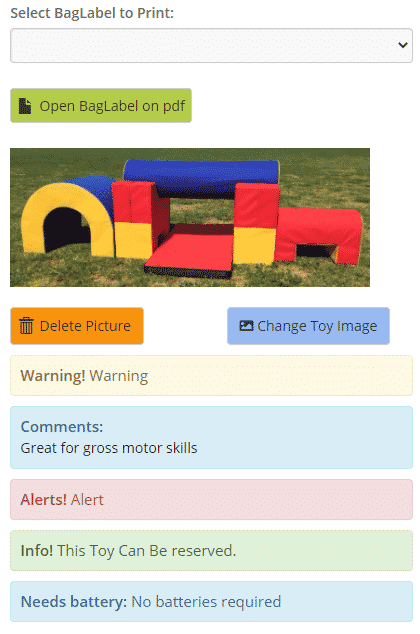
Underneath the bag label is the toy image. You can either delete the image or change it. Follow this link on Uploading Images for further information.
Underneath this, you can see a number of comment or alert boxes. These will only appear if the information has been added in the Edit a toy page.
Missing Parts
Continuing down the page underneath all the information is the Missing Parts section. This is where you can add pieces of the toy that are missing, broken, replaced etc. Follow this link on Missing parts for further information on how to do this.
If no parts are missing you will see this:

If there are missing parts, a list will appear like this:

Toy History
Every time the toy is loaned out, it will be recorded in this table. It will list up to 10 toy loans.

To view any more than that you will need to click the blue All History button. This will take you to the toy’s history page where you can see the full list of previous loans.
To the top right of the page, you will see
- Total: the number of loans for this toy
- Total Days out: total number of days the toy was out on loan
Although it doesn’t quite look like it, both tables contain the same information. The second table just shows the toy’s name which is not necessary for the first table.

You can also export this information to PDF or Excel by clicking the relevant buttons.
The post Toy Details page appeared first on MiBase New Zealand.
]]>The post Editing a Toy page appeared first on MiBase New Zealand.
]]>The Edit a toy page can be accessed from a number of pages within MiBaseNZ. These include the Stocktake page, Toy Alerts list, Toy Detail page and the Toys List page.
For this article, we will be accessing it through the Toys List in the second menu. From there, click on the blue Edit button alongside the toy you would like to edit. 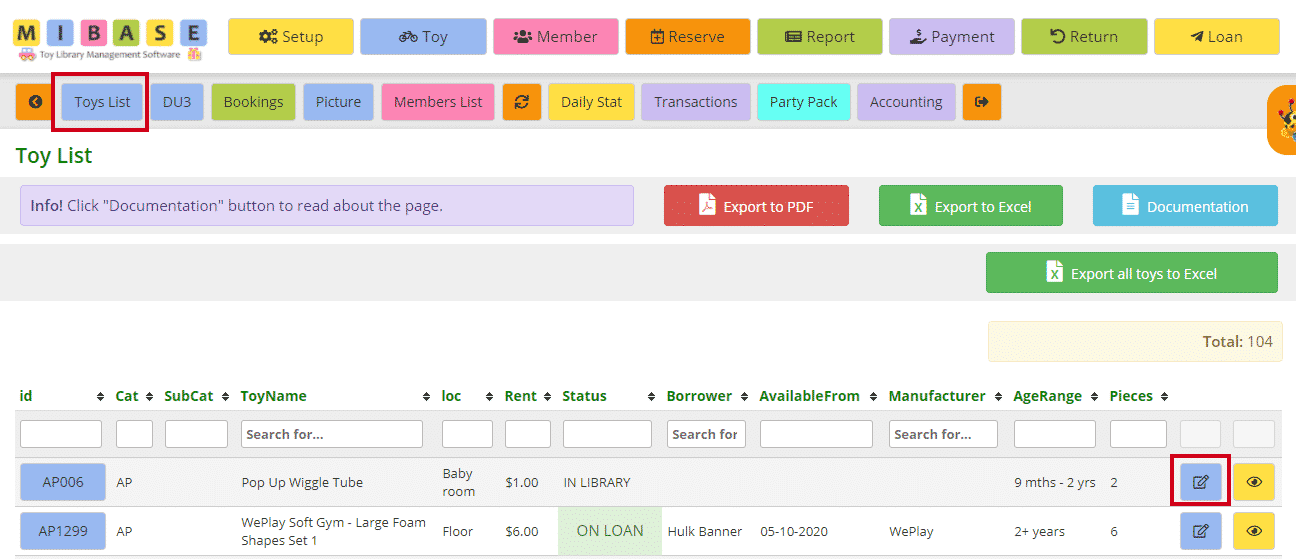
There is a lot of information on this page. We will break it down in sections and explain it in more detail below.
Toy details
- Name of Toy: be as descriptive as possible. It will be helpful for everyone; members and admin
- Category: select from the dropdown menu what category best suits the toy. If you need to Add a new category, follow this link
- Sub-Category: select from the dropdown menu what sub-category best suits the toy if you are using this function. If your category list is rather long then you should use sub-categories as it helps members to search for more specific toys. To Add new sub-categories, follow this link
- Toy Status: select from the dropdown menu. Most toys will be Active meaning it can be loaned and seen on all websites unless there is a reason for it not to be, for example, it is damaged, has been sold or it’s being repaired in which case it cannot be loaned Processing means the toy is active in the admin website but not the member or public. This status is used when a new toy has been added to the system and the information and image have still to be completed. It also means this toy cannot be loaned
Toy info

- Age: select from the dropdown menu the appropriate age for the toy. To Add another age group, follow this link
- Condition: the condition/quality/state of the toy. Select from the dropdown menu. To Add a new condition follow this link
- Date of Purchase: the date the toy was purchased. It will always have the current day’s date however you can backdate using the calendar when you click on the box
- N. Pieces: number of pieces – this does not have to be just toy pieces. It can include for example storage bag or box or instruction manuals. The total number of pieces must match with what is in the Contains list outlined below
- Storage: how the toy is stored. Select from the dropdown menu. To Add a new storage type, follow this link
- Renewable: would you like this toy to be renewed by members in the Member Website?
It auto-fills as Yes so to change to No, select from the dropdown menu - Supplier: where the toy was purchased from. Type in the name or website
- Manufacturer: who made the toy, type in the name
- Donated by: only use if the toy was donated. Type in the name of the person or company
- Needs battery: if the toy needs batteries type in how many and the type
- Party Pack: would you like to include this toy in the Party Pack if your library has the module, yes or no?
- Location: where the toy can be found within the toy library, for example, shelf or room. This is very handy if your toy library is large or has various locations/shelves. It is also great for volunteers or helpers to know where to return a toy. To Add a new location, follow this link
- Accessories Location: some libraries like to keep a toy’s accessories in another location for example behind the counter. Type in a location if it applies to the toy
- This toy can be reserved: select this box if you would like to make this toy available for members to reserve
Toy cost

- Rent: the cost to hire the toy. To Add a rent group, follow this link
- Cost: the cost of the toy when purchased
- Replacement cost: if the cost was discounted you can add the full price here
- Packaging cost: depending on how precise your toy library wants to be you could add the cost for the storage/packaging or printing of the label
- Freight: or delivery cost. If you have bought in bulk, you can divide the cost of delivery for each toy
Descriptions
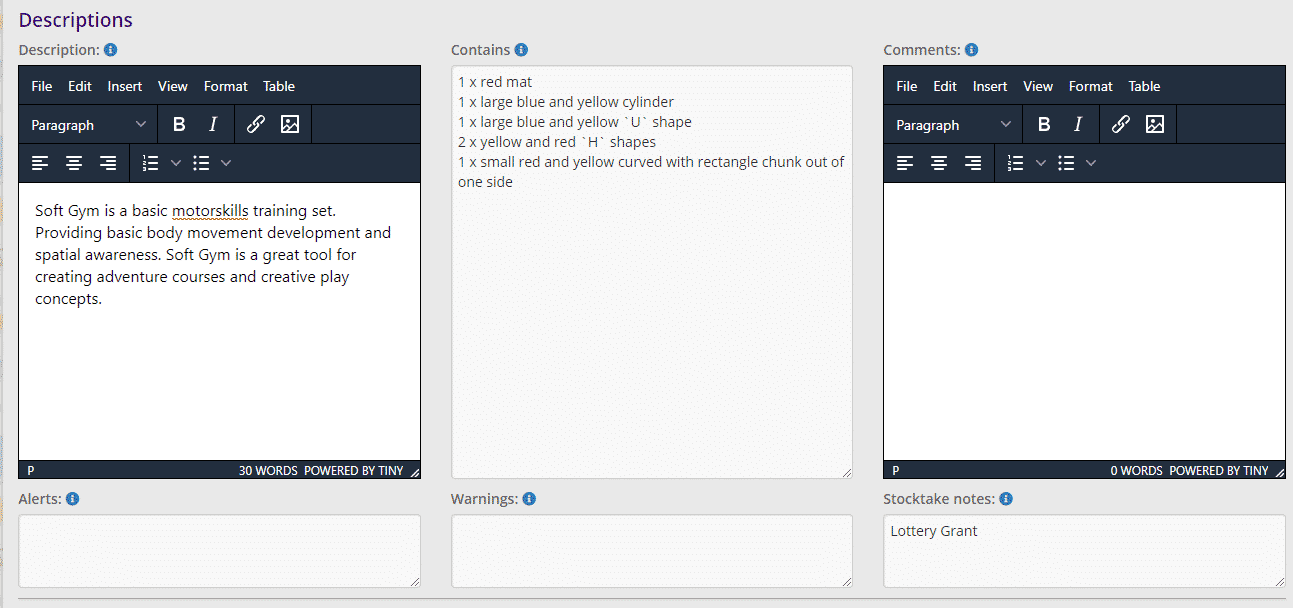
- Description: be as descriptive as possible as it will be seen in the Public and Member Website and can also be used on the bag label. It is great for google searches as well. There is no need to create your own description for the toy, you can just copy and paste it from the website it was purchased from. If there is no description, google search the toy in another website. Adding dimensions is also great if toys are rather large.
Follow this link for further information on Adding a great description - Contains: be as thorough and precise as possible as this list will be used when checking returned toys. It will be seen in the Public and Member Website and can be used on the bag label which is great for members to see what pieces are in the toy and if any are missing
- Comments: appears in a blue box in the Public and Member Website. This section is great for adding things like purpose of toy or how playing with this toy promotes certain skills or learning
- Alerts: appears in a red box in the Public and Member Website, for example, children will need to be supervised with this toy. It can also be used on the bag label. Follow this link for more information on Toy alerts
- Warnings: appears in an orange box in the Public and Member Website, for example, not suitable for under 3 year olds. It can also be used on the bag label
- Stocktake notes: this is where you can add notes after completing a stocktake. Only admin can see this
Extra info

- Processing time: where you can record how long it takes to add a new toy into the system
- Block image: selecting Yes will stop this toy image from being seen on the Public Website
- Link: can add a website link but it will be seen on the Public Website or you can add a link to assembly instructions. Follow this link to see how to Upload toy instructions
- Stockdate date: add the date of when this toy had last been checked
- Withdrawn date: if you have decided to withdraw this toy from the system, the date you do this will automatically be added in this section
- Withdrawn Reason: type in a reason for withdrawing the toy for future reference
- Keywords: adding keywords specific to the toy is great for members or the general public when searching on Google.
The type of keywords you can use is the category, what the toy promotes, manufacturer or key features of the toy.
It can be more than one word, separate the keywords by a comma, don’t use characters so, for example, Melissa & Doug – take out the ‘&’, use singular words not plural
Save toy
Once all information has been added or updated click Save at the top right of the page.
In the Second Menu, the Toy id button will appear as well as the Picture button.
A Success message will appear as well as buttons to the Stocktake List and Add New Toy page.

- Toy id: clicking this button will take you to the toy’s detail page where you can see all the information added
- Picture: clicking this button will take you to the page where the image can be uploaded. Follow this link for more information on Uploading Images
- Stocktake Page: follow this link for more information on the Stocktake page
- New Toy: follow this link for more information on Adding a new toy
On the Member and Public Websites, click the View Toy button to see all the information added as well as comments and warnings/alerts if applicable.
The post Editing a Toy page appeared first on MiBase New Zealand.
]]>The post Toy Alerts page appeared first on MiBase New Zealand.
]]>As it is an alert for a toy, it will be seen in both the Public and Member Websites in a red Alert box and it is also possible to use in the bag label so be careful what you write.
Admin can also see the alert in the Toy Detail page and the Loan page.
Toy alerts once added will also automatically be added to a list in MiBaseNZ’s Alerts page.
To access this list go to Toy -> Alerts.

Then check, edit or delete any information on the list.
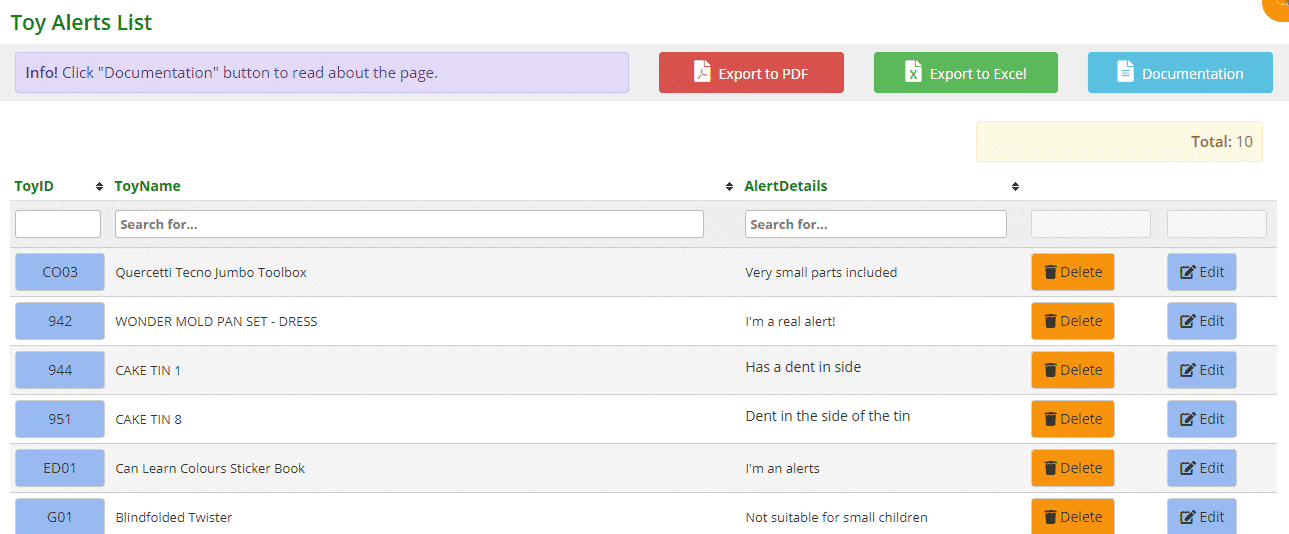
- ToyID: the toy’s individual id. If you hover your mouse over the blue box the image will appear. If you click the box you will be taken to the toy’s detail page
- ToyName: self-explanatory
- AlertDetails: the information that will appear in the red alert box on all three websites
- Delete: if this alert is no longer required you can just click the orange Delete button. The page will automatically update removing the alert. The alert will also be removed from the toy’s detail page in all three websites as well as on the Edit a Toy page
- Edit: if this alert needs to be edited in some way click the blue Edit button and you will be taken to the Edit a Toy page where you can make the changes. Remember to click Save
To sort or filter the list, click the arrows next to the heading you want to sort or filter the list by or type in the search boxes underneath the headings.
You can also download the list to PDF and/or Excel by clicking the Export to PDF or Export to Excel buttons. This will export the full list, not a filtered list. If you want to download a filtered list, export to excel and sort or filter through there.
The post Toy Alerts page appeared first on MiBase New Zealand.
]]>